Payments in Thinkwise
We have created a lunch app for our colleagues where they can register whether they used the company lunch. The cost for a single lunch is €2,50 and this must either be paid directly or from your wallet. Therefore, we had to integrate some sort of payment provider.
This article describes how we implemented this payment provider for a single payment. We used an ideal (Dutch payment method) provider. Please note we solemnly implemented this for the Universal GUI, therefore it might not work as smoothly in one of the other GUI’s.
Payment process
Before diving into the solution, it is important to have a little understanding on how payment providers work.
A payment provider must be connected in order to make any payments. Once there is a connection with a provider you will find out that it does not return any useful information by itself. For example, if you would like to know the status of a payment you will need to send a request for this status to the provider. The provider then tells you whether the payment was successful, still pending or canceled.
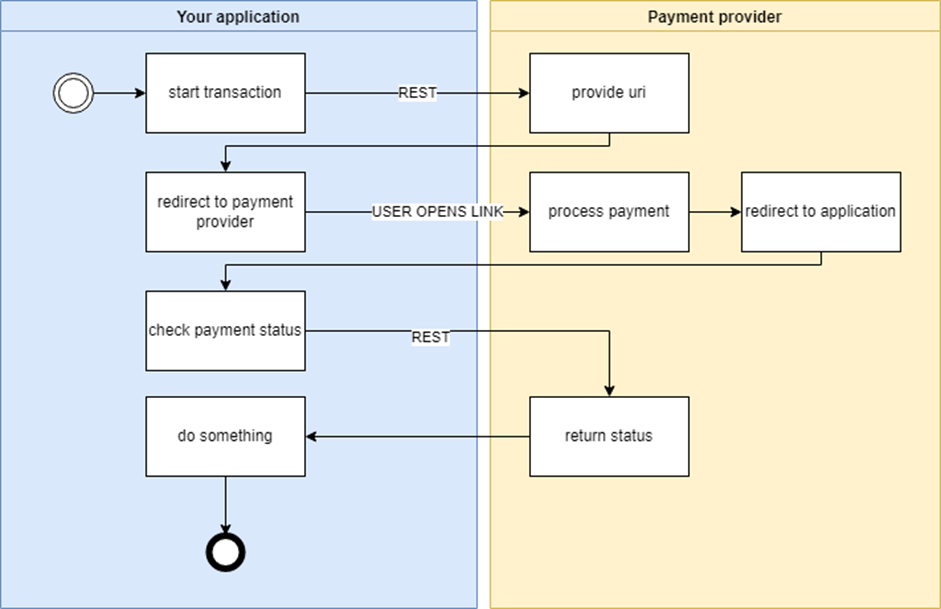
A basic payment flow, that was successful, looks like this:
- Start a transaction from your application, then request a payment URL from the provider
- Redirect the user to that URL
- Check from your application whether a payment was successful

Data model
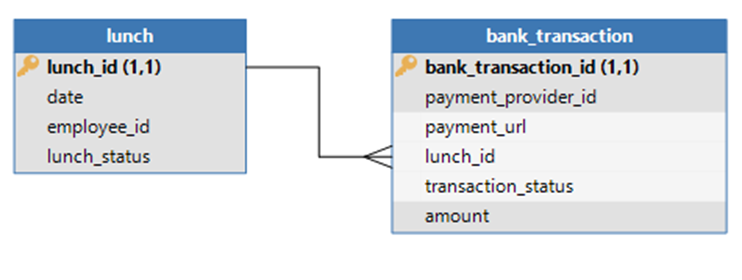
Let’s have a look at a simplified version of the data model we used. It consists of a few tables that are used for this payment. First, we have the lunch table in which lunches are registered. Each lunch contains a status which is either paid or unpaid. Second, we have a table that records bank transactions. Each transaction is linked to a specific lunch so that it can be tracked back, the bank transaction also contains columns for transaction status and transaction id that comes from the payment provider.

These two tables contain everything that is needed for making a bank transaction. Yes, you will need to store an API-key as well. In this scenario we assume a static key that does not change. If it does, or if you need multiple, like we needed, you can choose to store those in a configuration table.
Process flow
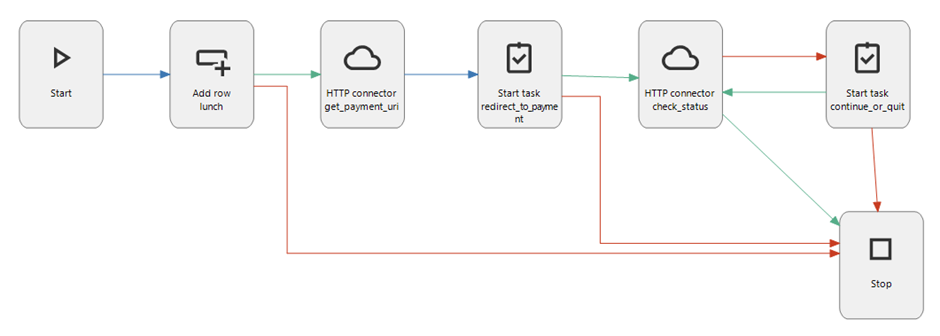
We want to trigger a payment once a record has been added to the lunch table. To achieve this, we implemented a process flow as follows. Once the user adds a lunch, it gets the payment link and can click this link to go to the payment provider. Once the user returns to the application, it continues the flow and the status will be checked. If successful, the process is completed and the status of the payment and lunch will be updated. If not successful, the user gets a question whether they want to retry the check or just stop.

Since it is not (yet) possible to redirect by pressing the execute button in a task we had to find a clever solution. To overcome this, we implemented a HTML field with a button in the task. The HTML field contains a basic template with a little styling to create a real payment button feeling. Once a user clicks the button a new screen will open the payment provider.
The continue or stop was introduced because there is no way of checking this in the background while the redirect task is open. We also found out that once users return to the application, the task sometimes magically disappears. Next section will cover this.
Securing the payment and status
When the application was tested, we found two main things going on:
- The user sometimes clicked the execute button instead of the payment button.
- Not everyone returned to the application or got to the correct screen, so the status was not updated.
The first was solved by adding a payment button to the lunch records that were not paid. This seems to work just fine for our colleagues.
The second was a bit trickier. In order to overcome the lunches from being paid more than once we introduced a second process. This time we used a system flow to check whether there were open payments. Next we requested the actual status of these. Once a payment turned out to be successful or canceled, the status was updated accordingly. This flow runs every x period. If there are no unpaid lunches, nothing more than one select-statement occurs.
By adding these two extra steps the application works as intended and our colleagues can join a nice lunch again.
End note
We also implemented other features of the API such as seeing your account balance, register new accounts and update the API-key. They have not been included in this blog to keep it readable.


