
Together with a fellow developer, I am looking for a way to connect to Indicium (Universal) as efficiently and securely as possible from an external application.
I couldn't find anything about this in the documentation and in the community.
From the data traffic I have been able to deduce that the Universal GUI uses Basic/Cookie Authentication. We could use this way, but probably there is a better way.
According to others, there are better alternatives such as JSON Web Tokens (JWT), instead of cookie authentication. I don't know what more the Indicium API offers in terms of authentication.
I'm looking for best practice examples.
Is there anyone who has already looked into this and can give advise?

Solved
Authentication method Indicium (Universal) for external applications
 +21
+21- Superhero
Best answer by Vincent Doppenberg
Hello Harm,
It’s difficult to give a step-by-step explanation on how to set up OAuth 2.0 authentication when most of this depends on the third party platform that you’re trying to connect to Indicium. I will explain how to configure an OpenID client in IAM and how the HTTP requests of the authentication flow work, but I don’t have enough information to give a more tailored explanation than that.
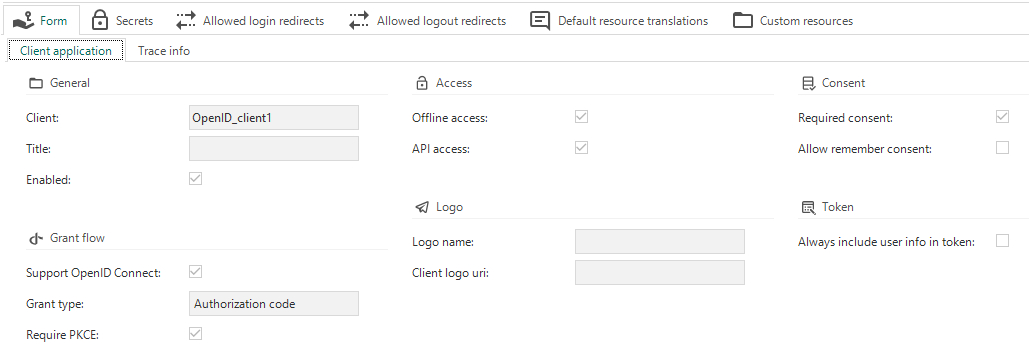
You start by creating an OpenID client in IAM with the Enabled checkbox checked. If you want access to Indicium’s API then the API checkbox must be checked. If you want to be able to refresh your access token without re-entering credentials, then the Offline checkbox must be checked. I don’t expect other checkboxes to be important in your case since you’re only looking to authenticate a third party to use Indicium’s API.
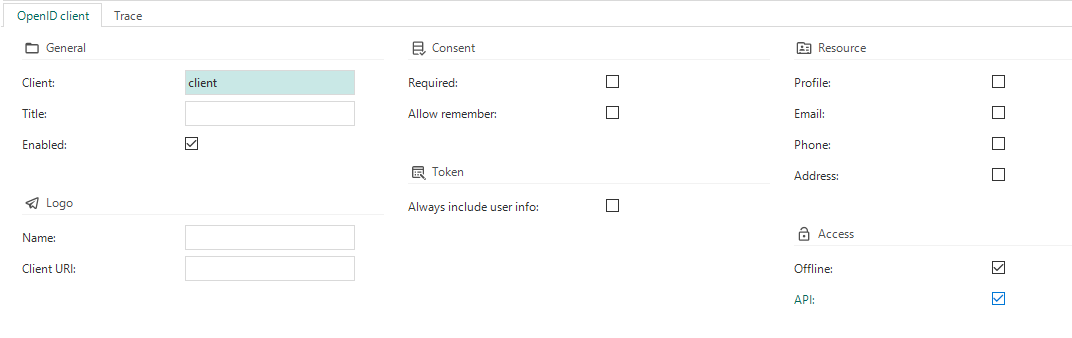
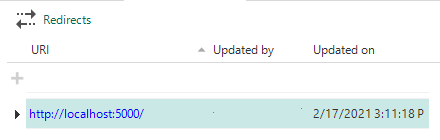
After creating the OpenID client in IAM, go to the Configuration detail and add a Redirect URI. The redirect URI is the URI you want to end up at after the authentication flow. Typically you’ll want to return to the client application that started the authentication flow.
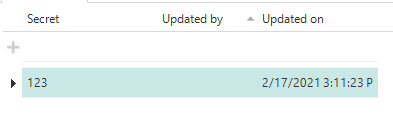
Also add a Client secret, one that is a bit more secure than the one in my screenshot. It can be a value of your choice, but treat it like a password.
This is the minimum configuration necessary in order to use OAuth 2.0 from a third party platform. Please note that every change to any of these OpenID settings in IAM will require Indicium to be restarted. From this point onwards Indicium will simply accept the standard OAuth 2.0 Authentication Code requests in order to obtain an access_token and a refresh_token.
The HTTP requests for the Authentication Code flow work as described below.
You start with the Authorization Code request. This request will give you a code for a specific OpenID client and a set of scopes. Which scopes can be requested depends on the checkboxes that are checked in the OpenID client configuration in IAM. In your case you’ll want the scopes openid and offline_access. The values for the client_id and redirect_uri parameters also depend on the values you’ve entered into IAM in the steps above.
GET
<indicium_base_uri>/connect/authorize?response_type=code&client_id=client&redirect_uri=http://localhost:5000/&scope=openid offline_access
This request will lead to Indicium’s login page where a user needs to log in and, if necessary, give consent for their user information being accessed by a third party. This only needs to be done once. After doing this, you will be redirected to the provided redirect_uri and Indicium will add a code parameter to the query string of the redirect URI. With my settings in this example, Indicium would redirect to the following URI:
http://localhost:5000/?code=XXX&scope=openid offline_access&session_state=YYYThe XXX value is important for the following request.
Next is the Token request. Here you’ll exchange the receibved authorization code and the client secret for an access_token and a refresh_token. For my example, the request will look like this:
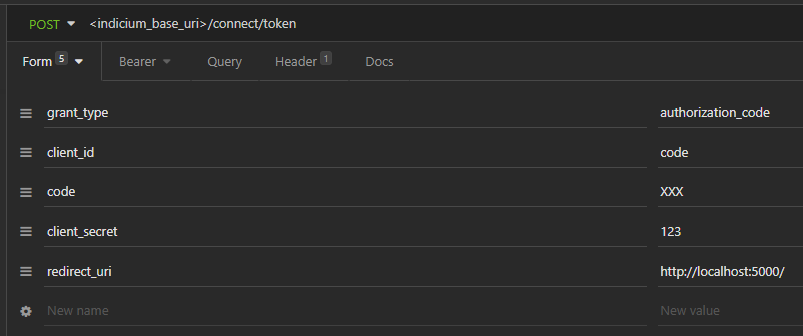
The response will be a JSON object containing an access_token property and a refresh_token property. The access token is a JWT token that can be used to authenticate a user with, using the Bearer authentication scheme.
In a client like Insomnia that would simply look like this:
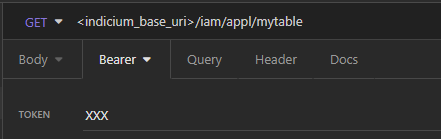
But it translates to the following HTTP request header:
Authorization: Bearer XXXVery similar to how Basic authentication works.
The access token is only valid for one hour, but this is where the refresh token comes in. Once a expired, a new access token can be obtained by exchanging the refresh token. Note that the refresh token can only be used once, but during the exchange you will also obtain a new refresh token.
So finally we have the Refresh Token request. This request is very similar to the previous token request, but the grant_type parameter must have the value refresh_token and instead of the code parameter, you’ll need to provide a refresh_token parameter.
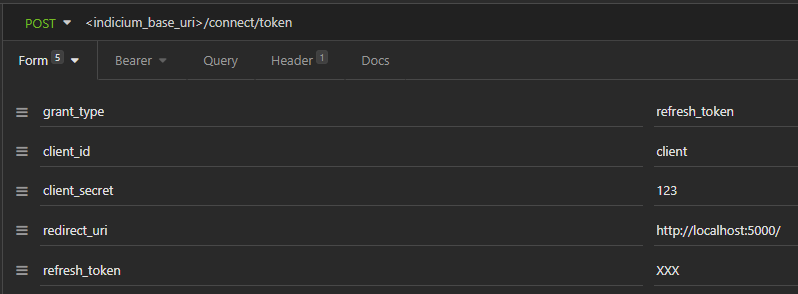
The response of this request is the same as the previous token request.
I hope this helps with understanding how to set up OAuth 2.0 authentication with Indicium.
This topic has been closed for replies.


Enter your E-mail address. We'll send you an e-mail with instructions to reset your password.