
This is the second installment in our blog series on the Scheduler.
In Part 1, we walked through the initial setup of the Scheduler. Now, in Part 2, we’ll explore how to effectively interact with the Scheduler to enhance usability and user experience.
The Thinkwise Scheduler supports a variety of interaction methods, such as creating activities by clicking on empty time slots, editing them through double-click actions, and assigning external resources via drag-and-drop. In this blog, we’ll demonstrate each interaction technique and show you how to integrate them into the Scheduler we configured in the previous part.
Interaction Methods
Click to create a new Activity
This feature allows users to click a time cell to initiate a task for quick data entry directly in the scheduler.
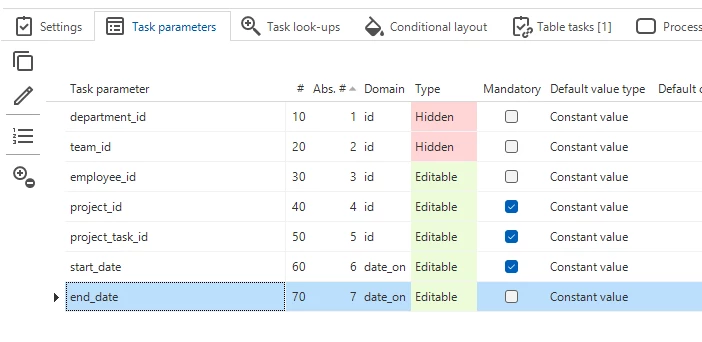
Start by creating a new task ‘project_planning_scheduler_add_activity’. Add task parameters for all fields that are needed to create a new activity:
Assign this task as a table task to the scheduler view. To make this tasks actually add a new task to the ‘project_task’ I have written a control procedure that will insert the data into this table.
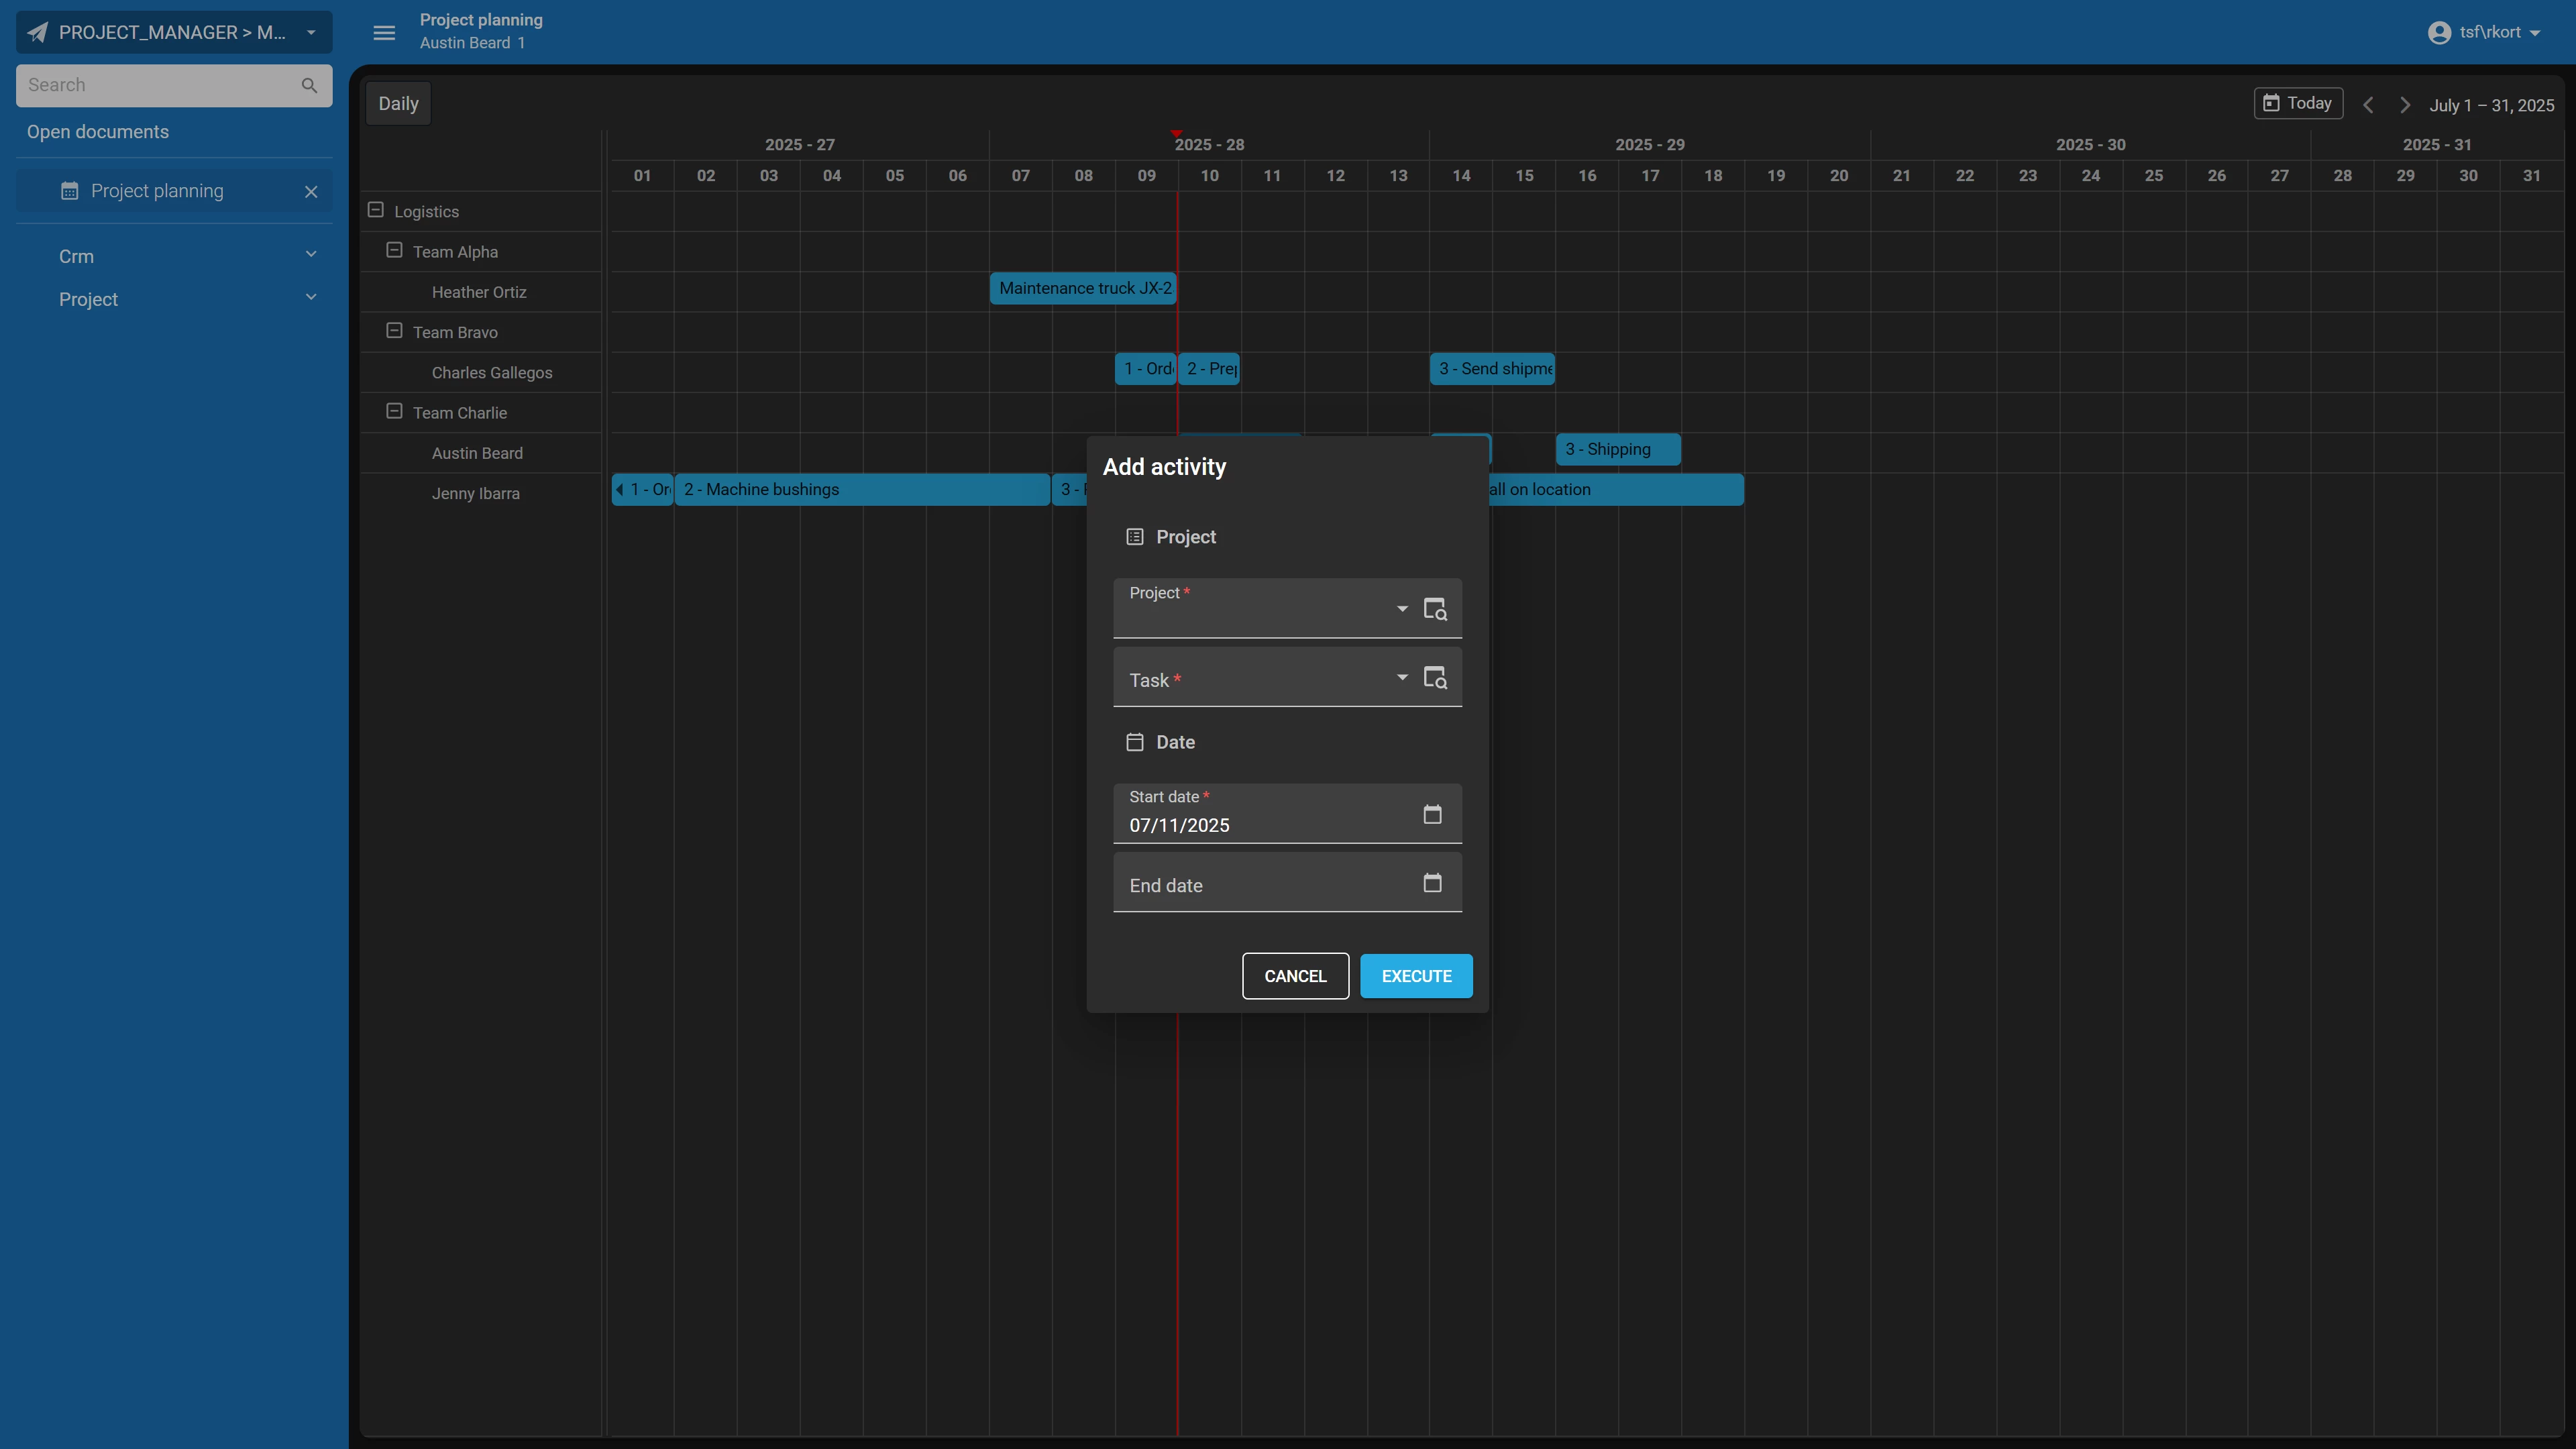
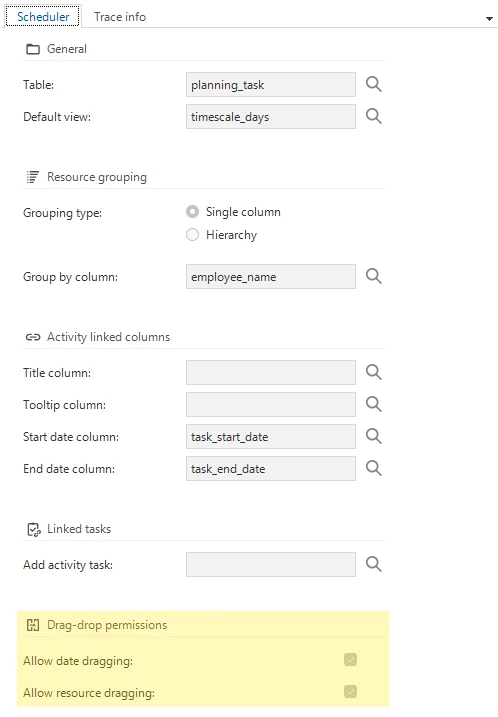
Go back to the scheduler screen. In the form, go to the field ‘Add activity task’ and select the task we just created. Note that only table tasks assigned to our scheduler view will appear in this list. Set the ‘Start date time parameter’ field to ‘start_date’. This will automatically fill the start date task parameter with the date of the timecell the user selected. The ‘resource_id’ will automatically be filled as well.
Now, clicking an empty time cell will trigger the add activity task:
Drag, Drop or Resize an Activity
To drag, drop or resize an activity the schedulers will use the subject’s update handler. Because schedulers are based on views the update handler needs to update the underlying tables.
For our example I have written a handler that will update the ‘project_task’ table with the new ‘start_date’, ‘end_date’ and ‘assigned_to_employee_id’ values.
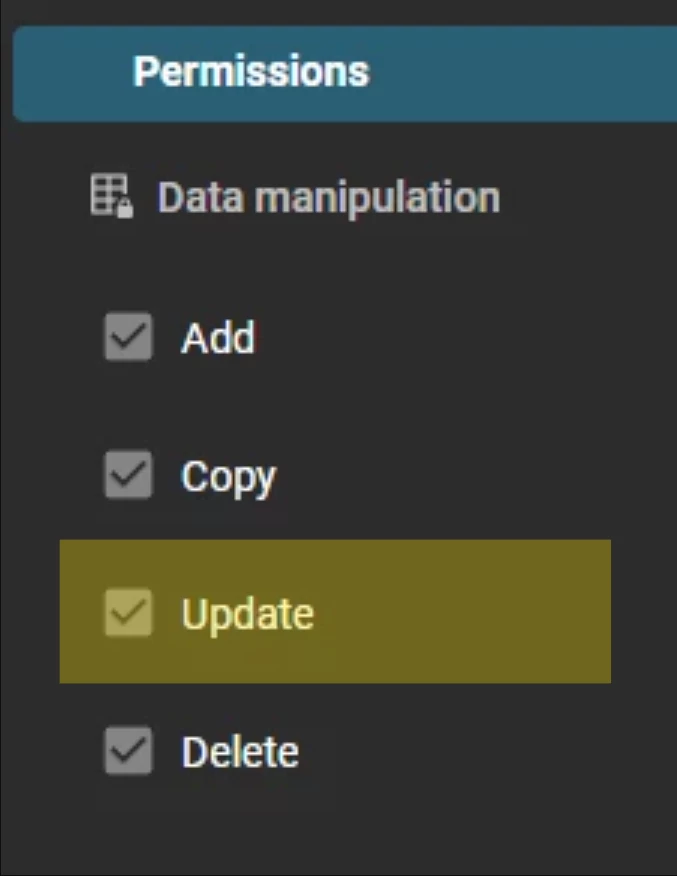
When setting up an update handler, make sure that the subject has permission to update data. You can check this by opening the subject screen, select the Scheduler view, and then under permissions, make sure update is checked.
Once the update handler is set up, check the ‘Drag-drop permissions’ form group of your scheduler. ‘Allow date dragging’ will allow the user to change the start and end time of an activity. ‘Allow resource dragging’ will allow the user to change the resource to which the activity is assigned. By default both options will be active.
For example: if a user is only allowed to change the start and end time of an activity but not to which resource it is assigned, set ‘allow date dragging’ to 1, and set ‘allow resource dragging’ to 0.
After refreshing the model we are able to drag-drop and resize activities.
Double Click on an Activity
Double-clicking an activity can trigger tasks to show more info or edit an activity.
To enable double click on an activity you need to set up a double click task on the scheduler’s subject.
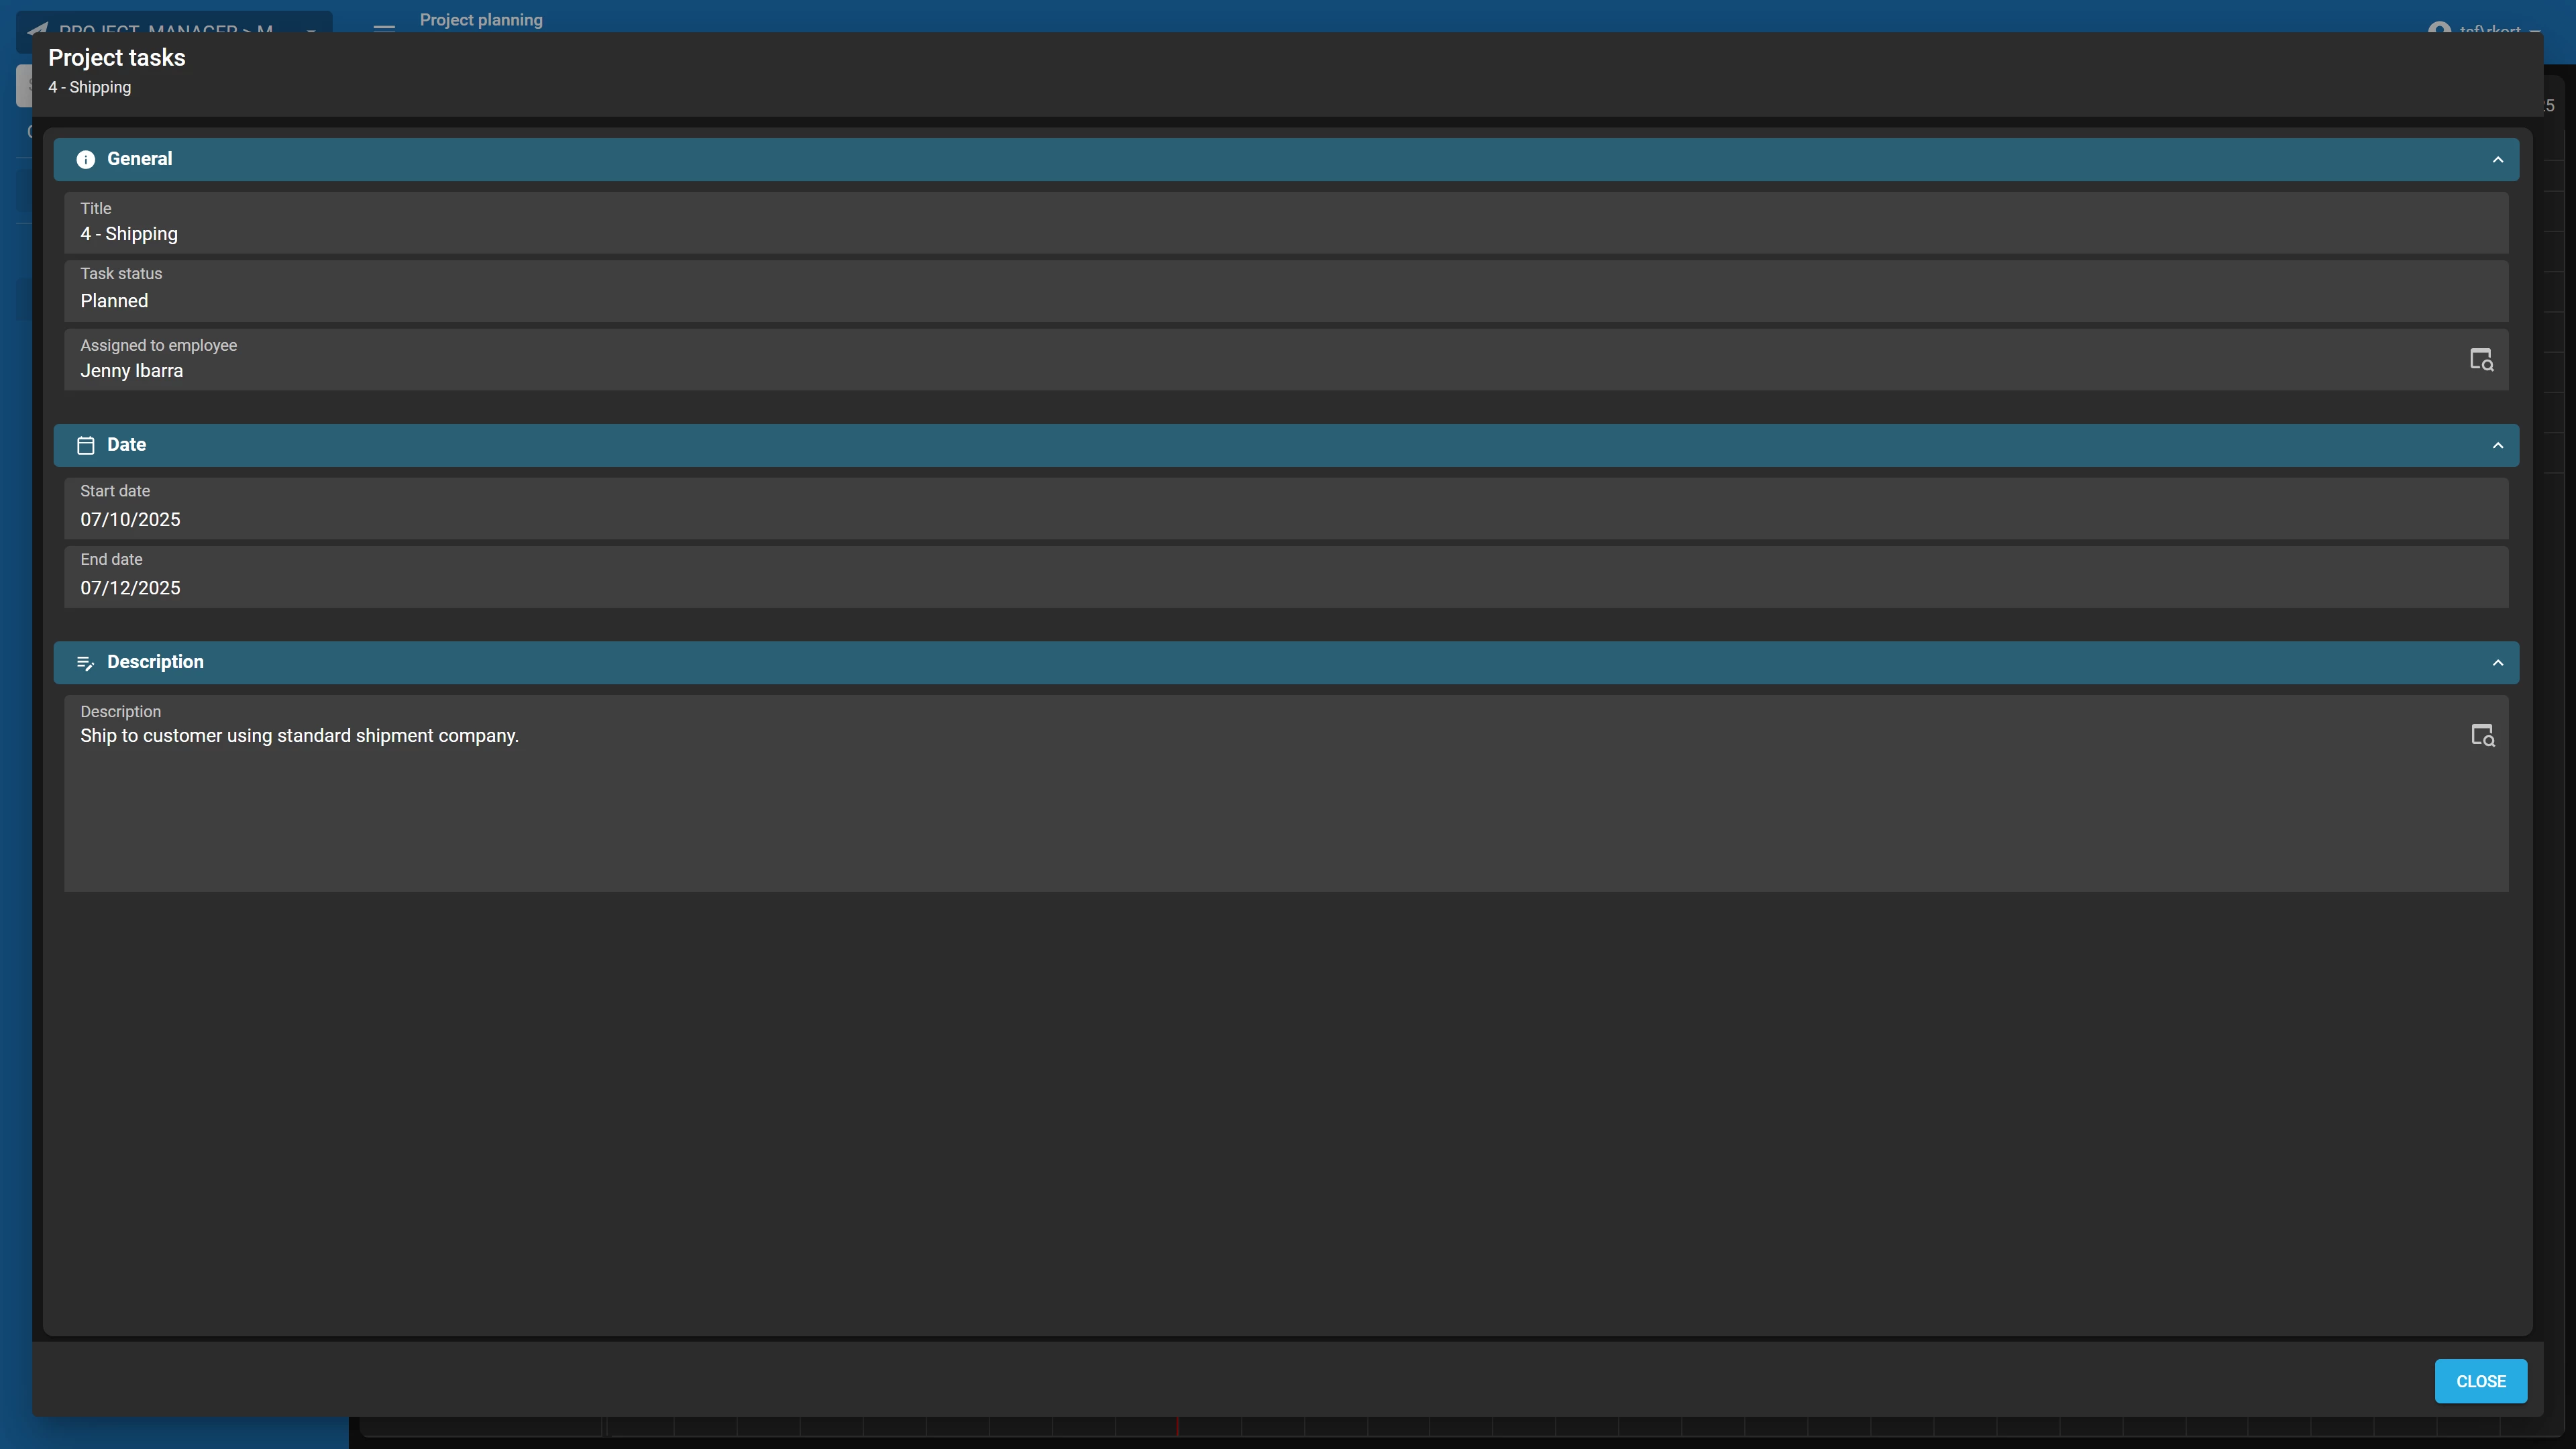
For our example we will add a double click that opens detail information about the activity.
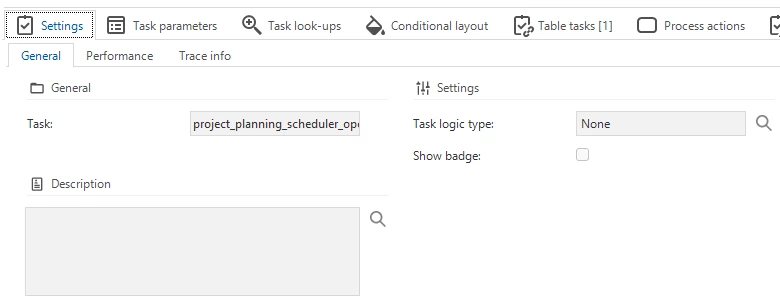
Create a new task: ‘project_planning_open_activity_details’. This is the task that will be started when we double click on an activity. Add ‘project_id’ and ‘project_task_id’ as task parameters. These will allow us the open the correct task detail screen using a process flow.
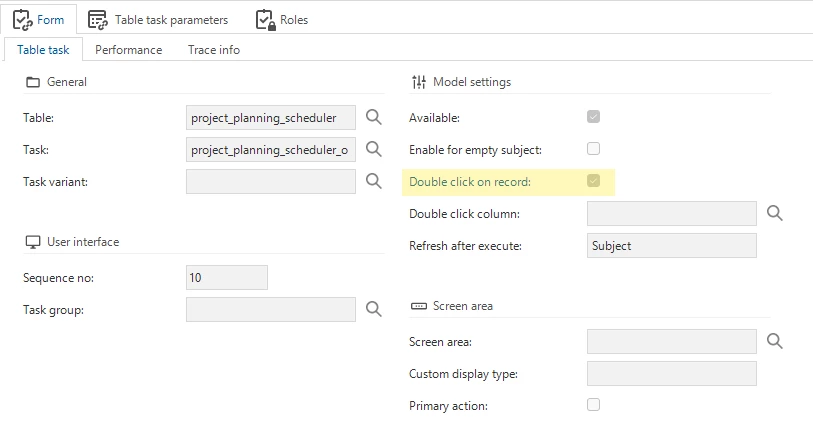
Assign the task as a table task to our scheduler view. In the table task form check ‘Double click on record’.
This is enough to start a task when a user double clicks an activity. To open a detailed view of the activity, we also need the following process flow:
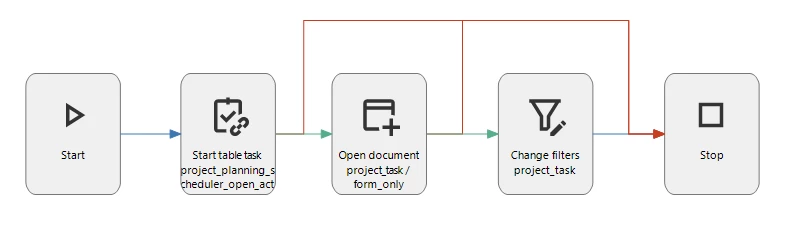
After refreshing the model, we can double click any activity and its details will now be opened in a modal popup:
Drag & Drop External Item as new Activities on a Scheduler
External Drag & drop allows you to drag an item from a separate list onto a scheduler to add it as an activity.
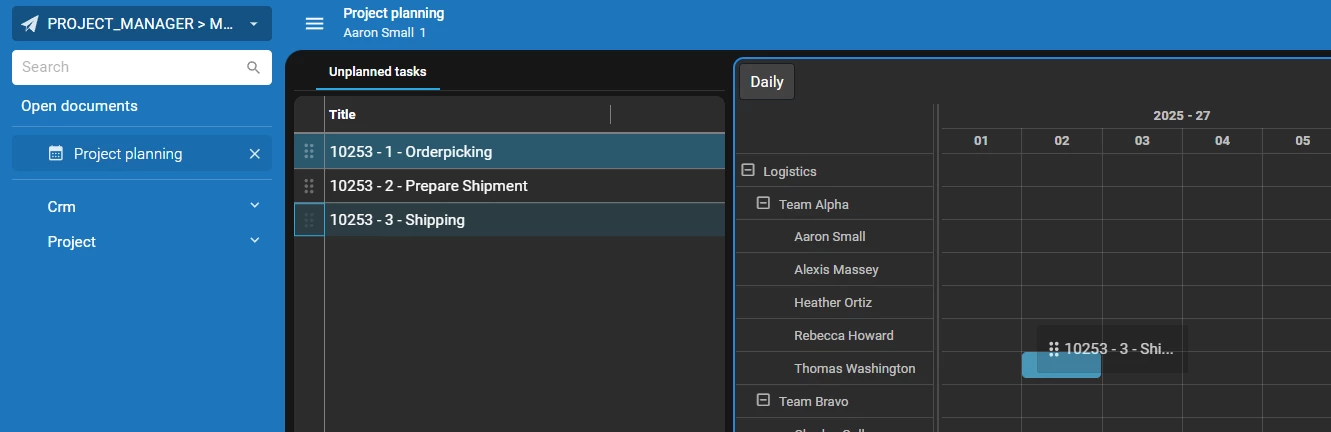
For our example we have a scheduler that shows all tasks that have been assigned to an employee. But to make it easy to assign new tasks to an employee we want to have a list of unassigned tasks on our screen, that we can drag and drop onto an employee and date.
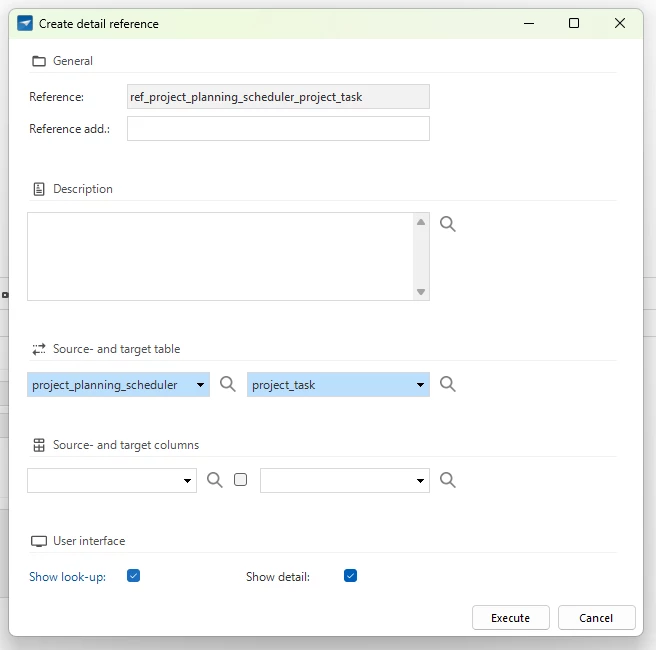
Let’s start by displaying the ‘project_task’ on our scheduler screen. To do this we create an empty reference between our scheduler view and the ‘project_task’ table:
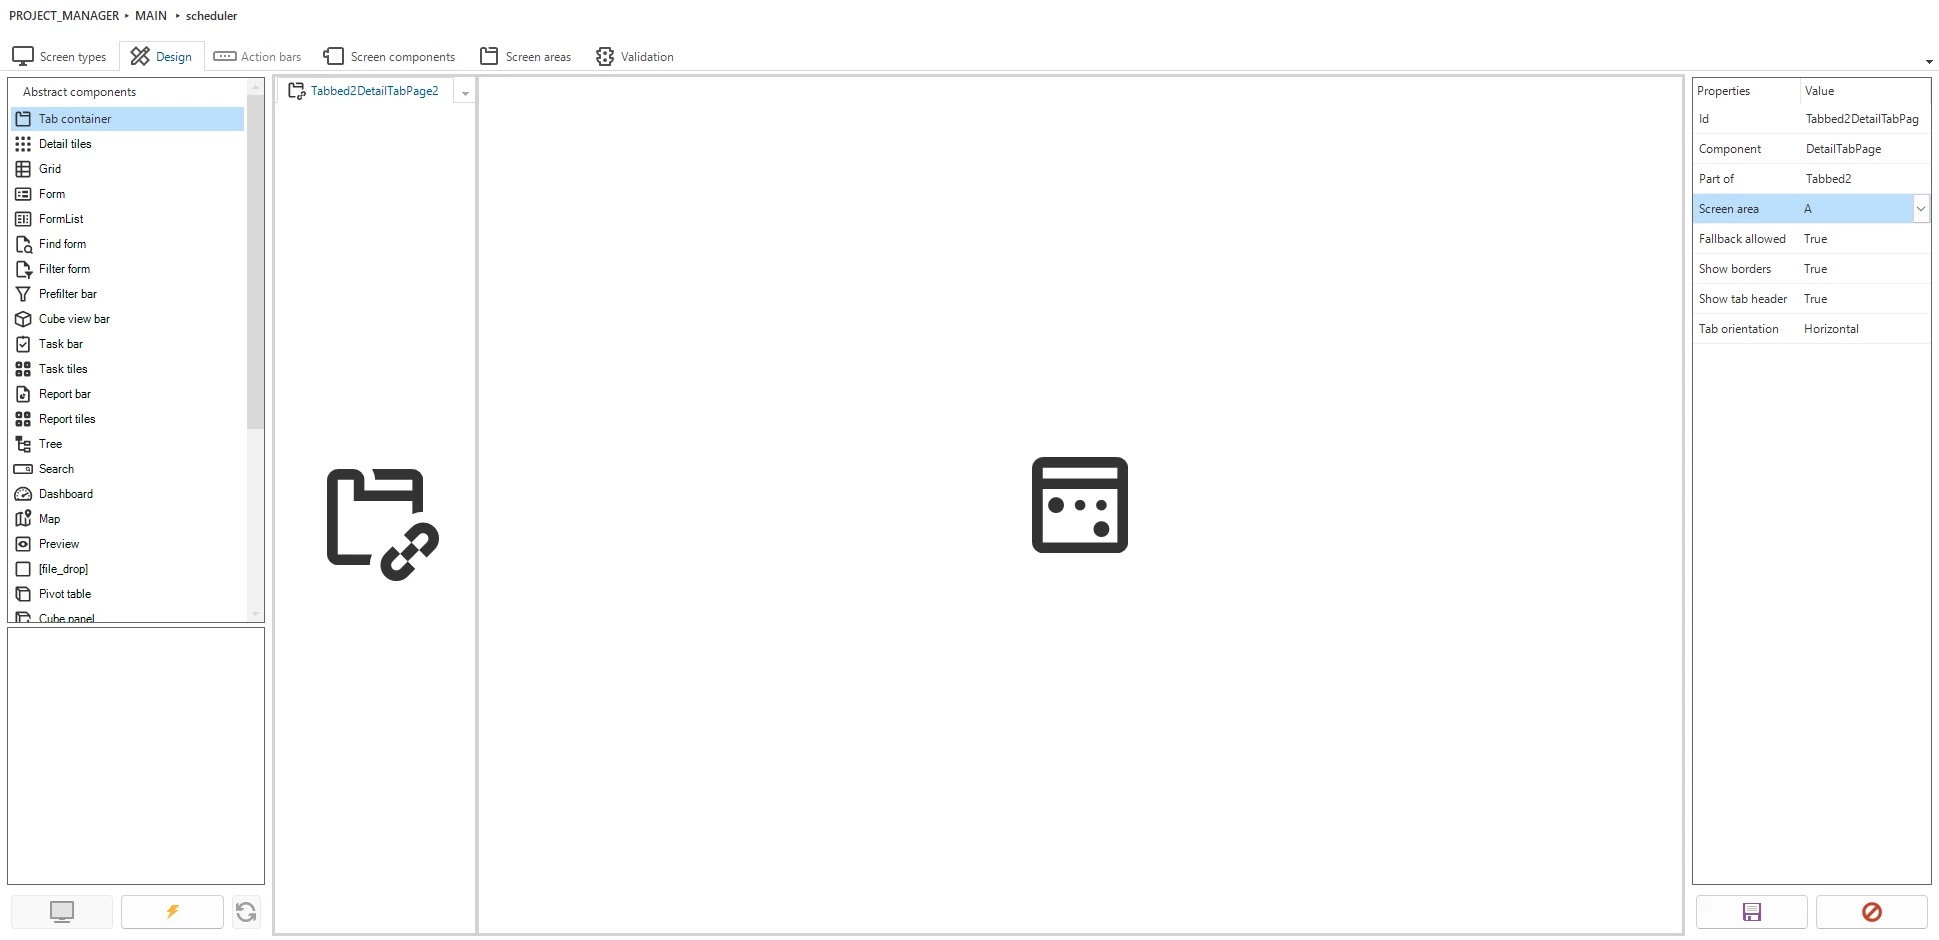
We need to change the screen type we created earlier to also display a detail tab. Our screen type now looks like this:
To make the ‘project_task’ detail look clear, I have made a variant of it that uses a screen type with only a grid. In the variant’s grid I have set all columns on hidden, except for the project task title column. I also applied a prefilter to this variant to only show tasks that have not yet been assigned to an employee.
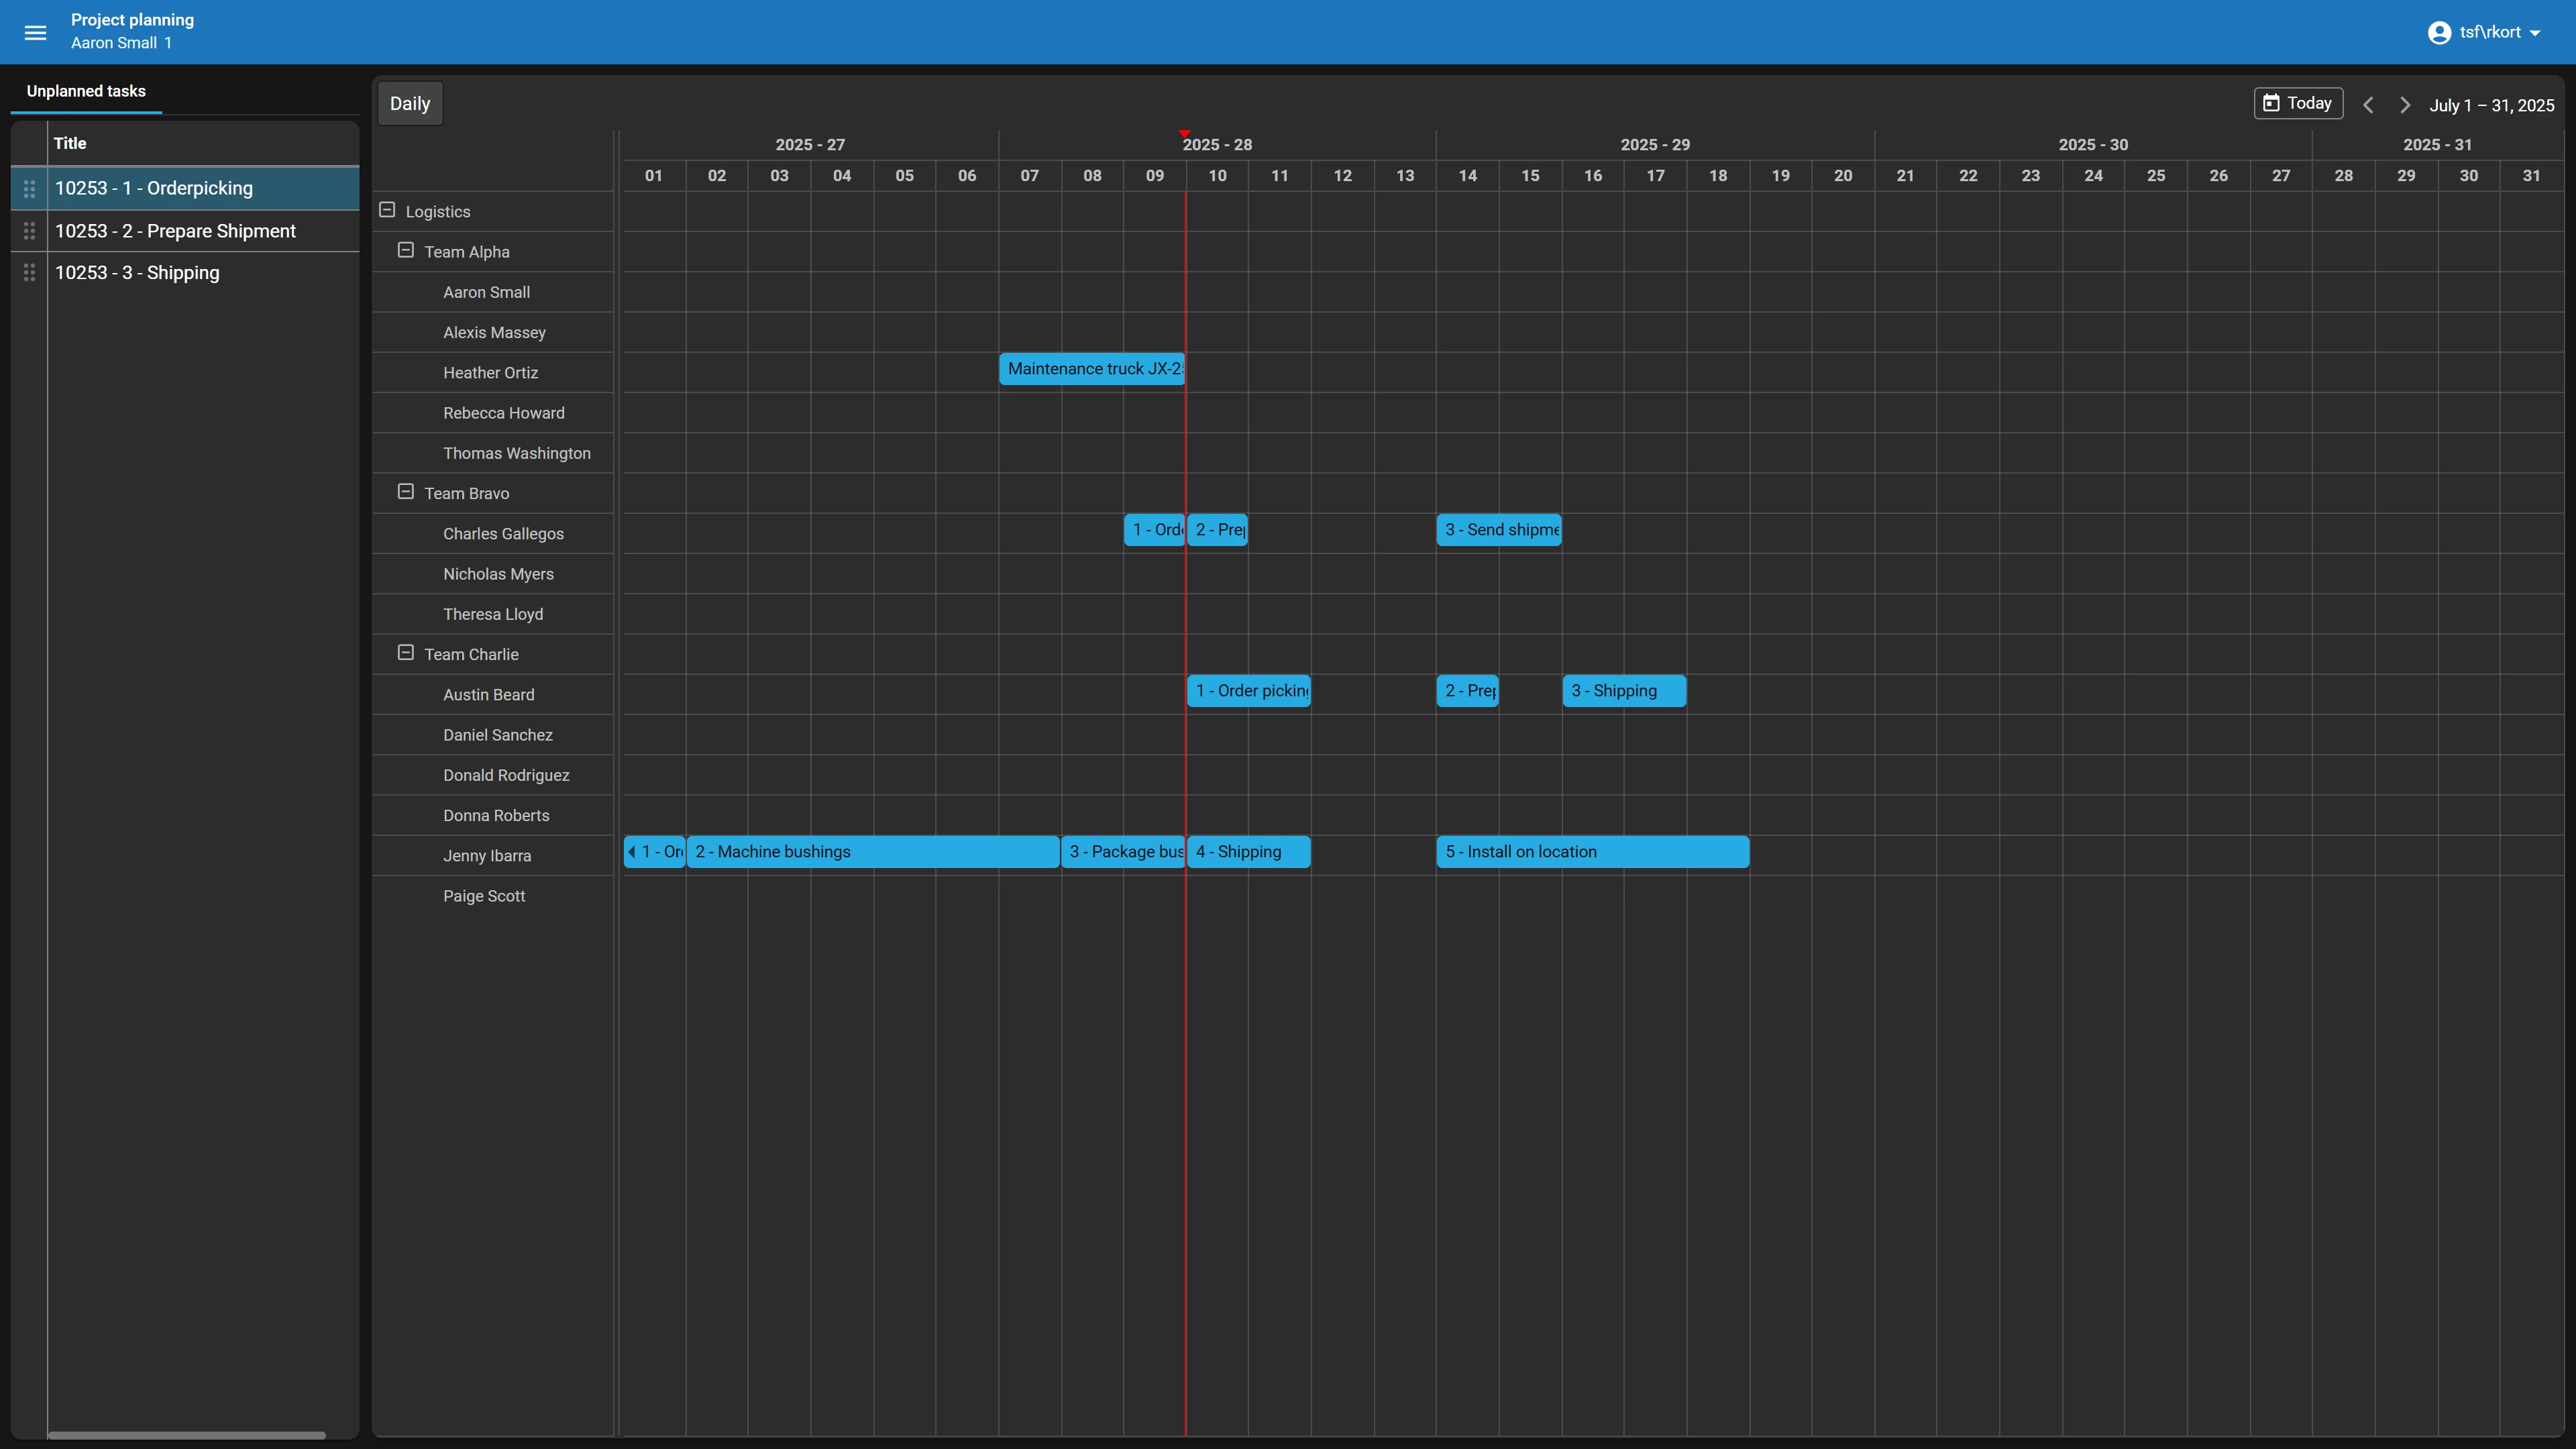
After refreshing our scheduler screen, we will have a detail grid on the left, and our scheduler on the right:
Enabling Drag-drop
Open the subject screen, select the ‘project_task’ table, and navigate to links -> Drag-drop. Click on add in the form to create a new drag-drop link. The source will automatically be filled, select ‘project_planning_scheduler’ as the target. For the drag-drop task we reuse the add activity task we created earlier.
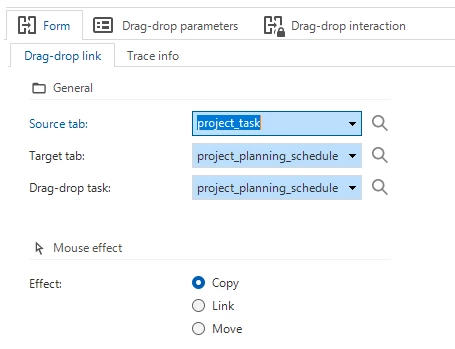
Then assign the ‘project_id’ and ‘project_task_id’ as Drop-drop parameters. Make sure that the drag-drop interaction is activated on both the source and the target subject.
Because we already setup the add activity task earlier, we are be able to drag and drop tasks from the list onto our scheduler:
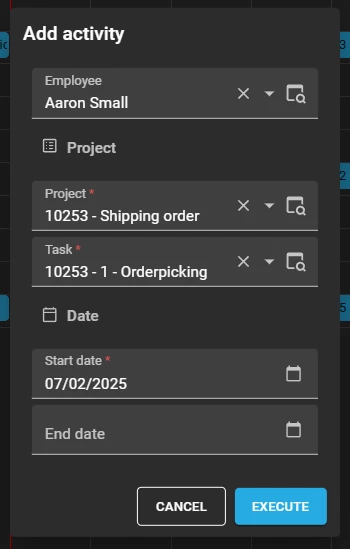
In the task popup, the parameters have been automatically filled:
Start a process flow after dragging & dropping an activity
In version 2026.1 it is now possible to start a process flow after dragging and dropping an activity. This allows you to create Process Flows that for example give you the ability to open a task to provide more information after dragging / dropping an activity. To implement this, use an ‘Edit row’ task as the starting point of your Process Flow.
Conditional Formatting
The scheduler allows you to style activities, resources and time cells. This can be useful when you want to highlight activities or resources that might need the users attention.
Activities
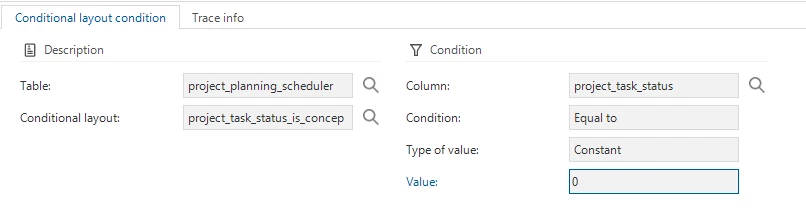
To control the color of an activity I have added the column ‘project_task_status’ to the scheduler view. After setting up this column we add a conditional layout for every possible status of the project task. To apply a conditional layout to an activity make sure that the applied to column in the form is set to the activity title of your scheduler.
For our scheduler we want to filter on the different statuses of the task, to do this i am using the ‘project_task_status ’ column as the filter condition.
In the 2025.2 release we have introduced new styling options. You now have the ability to control the font size and can add an underline or a strikethrough to text.
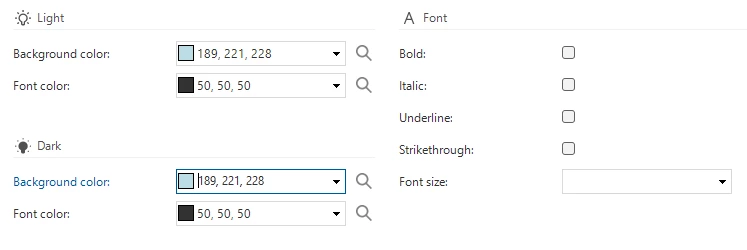
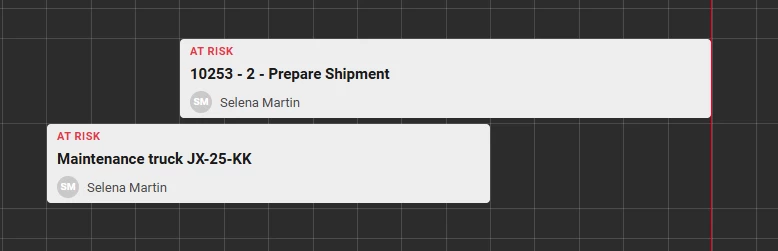
In this example I have the given the various status options a different background color. This should result in the task activities having a background color based on their task status.

After refreshing the model, we get the following result:

Resources
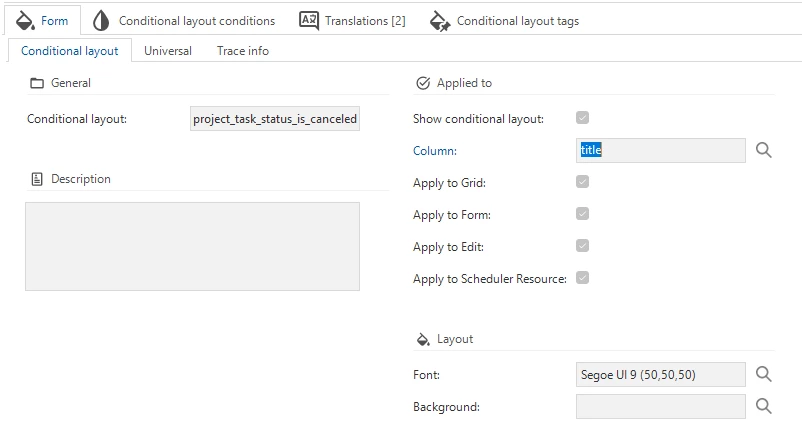
Sometimes it can be powerful to color a resource. For example when there is something wrong and you want to immediately draw attention, you can color the background of the resource to be red. Resources are also styled using conditional layouts.
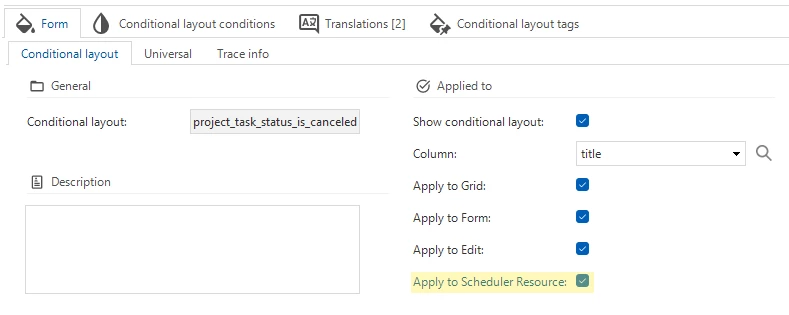
In the form of a conditional layout we have the option to also apply the conditional layout to the resource. In this example we set this to yes for the status canceled, so we will color the background of the resource red if there is any activity with the status canceled for this resource.
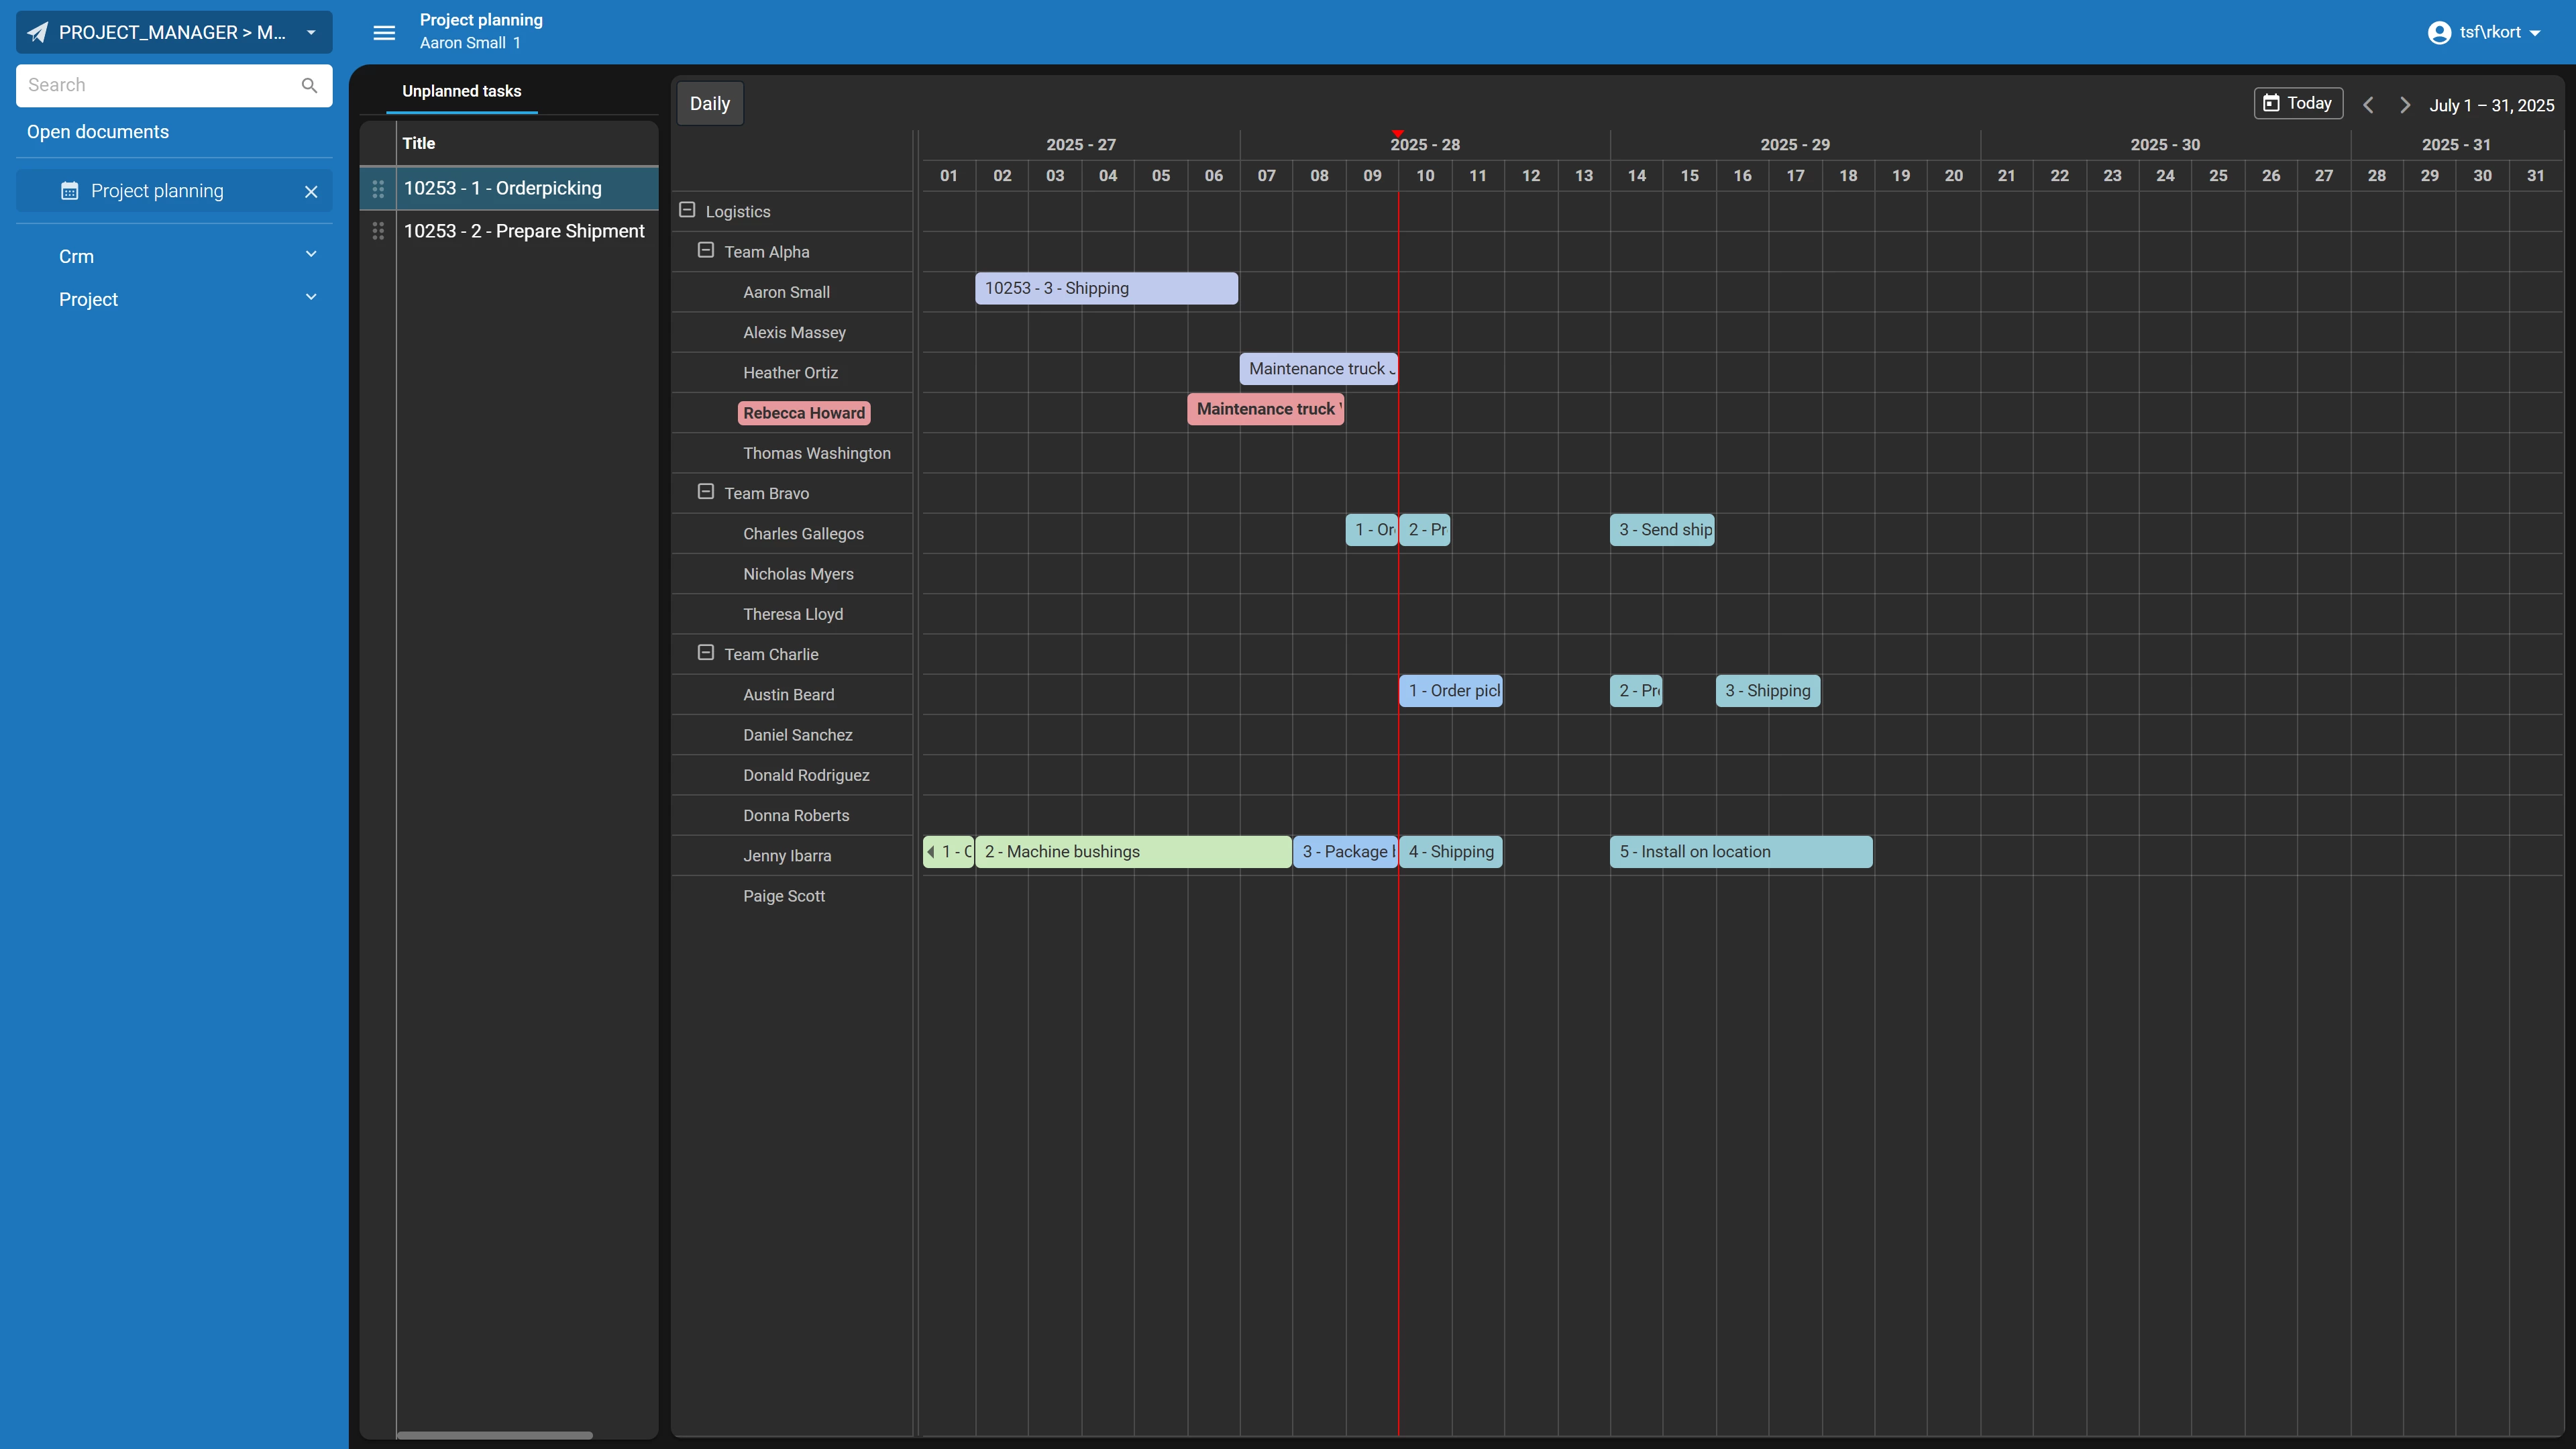
After refreshing the model, the resource now has a red background:
With the introduction of Resource Columns in release 2025.3 of the Thinkwise Platform you can now specify which Resource Columns you want to apply Conditional Formatting to. This allows you to highlight important data to the user without having to color all Resource Columns simultaneously.
Time cells
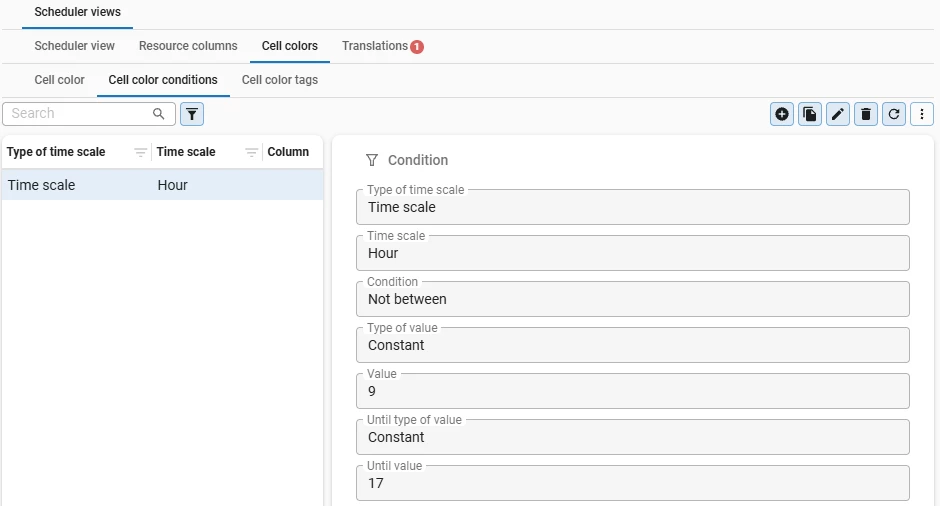
Since platform version 2025.2, you can apply conditional formatting to time cells in the Scheduler. Two types of conditions are available. A Time scale condition evaluates against the time itself, and a Column condition evaluates against the database values.
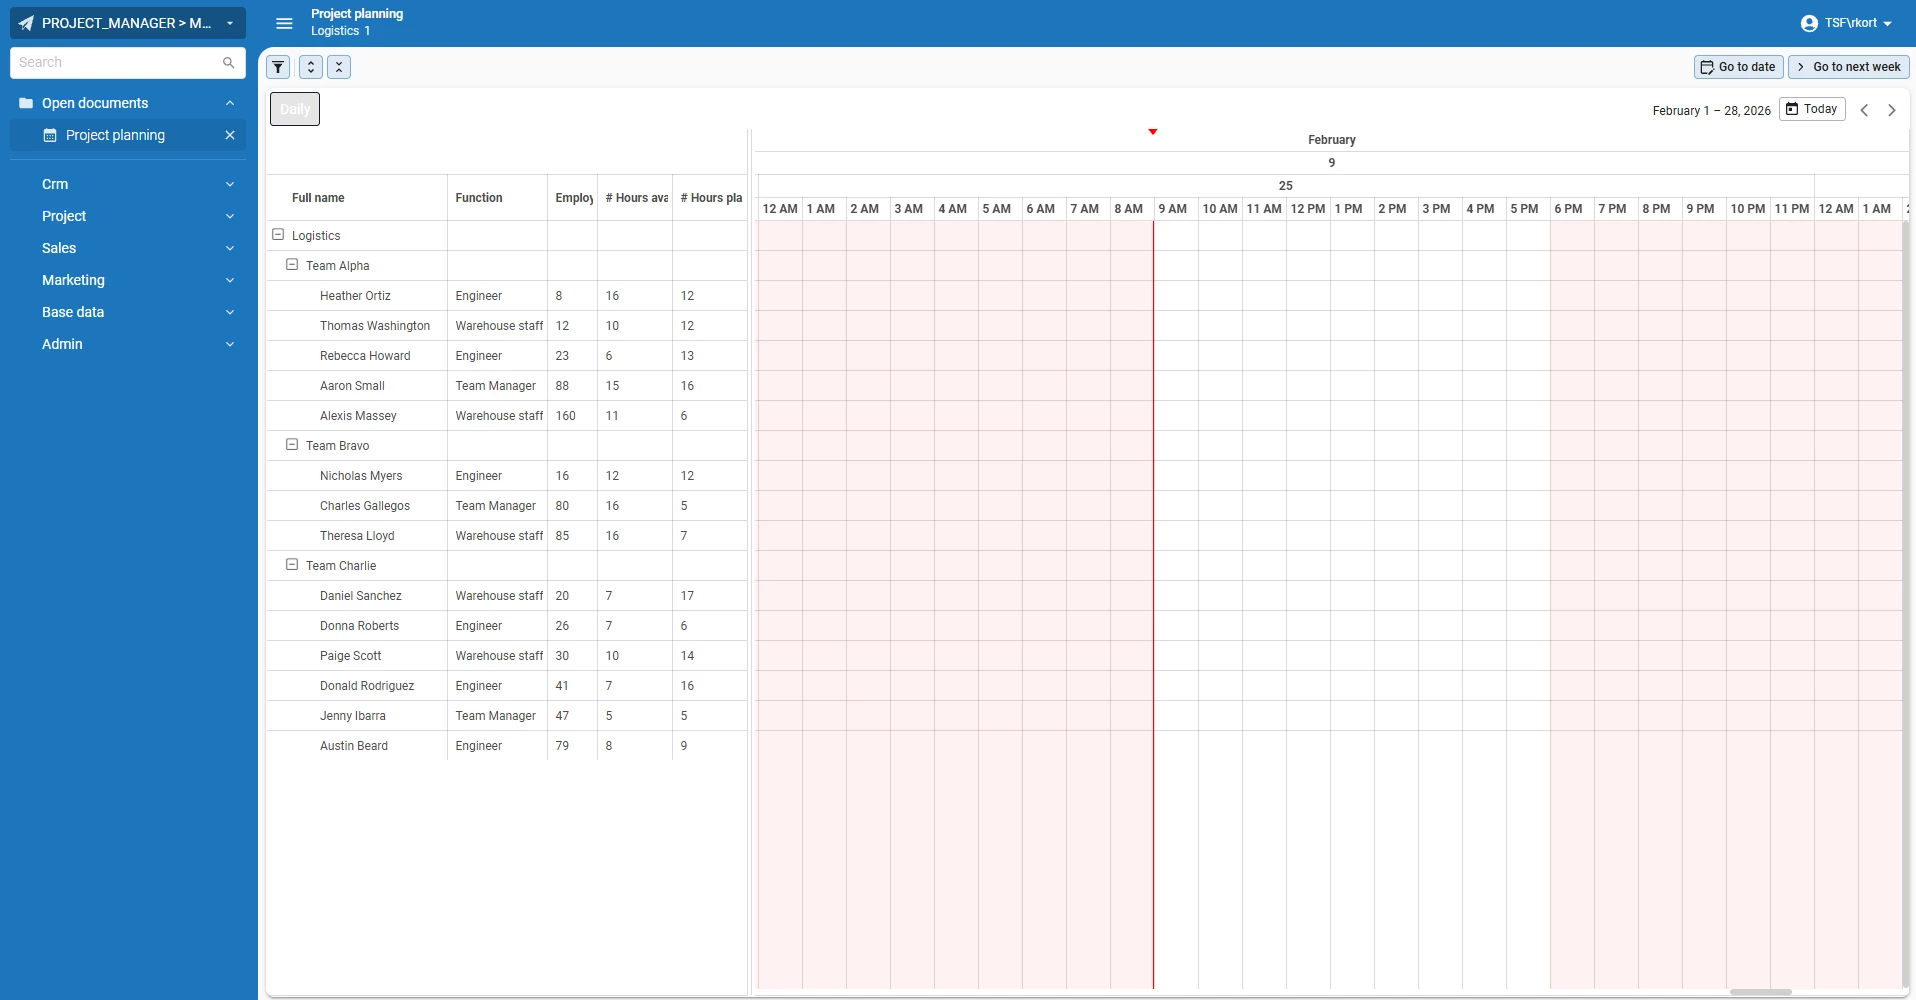
For example: if all your resources share the same working hours, a single time scale condition on Hour is enough. Set the cell color and add the condition not between 9 and 17. Every cell outside that window turns red, without any further configuration.
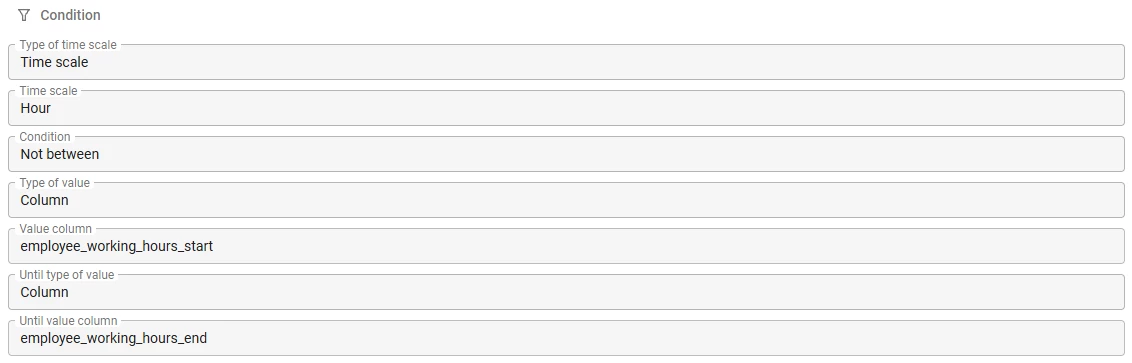
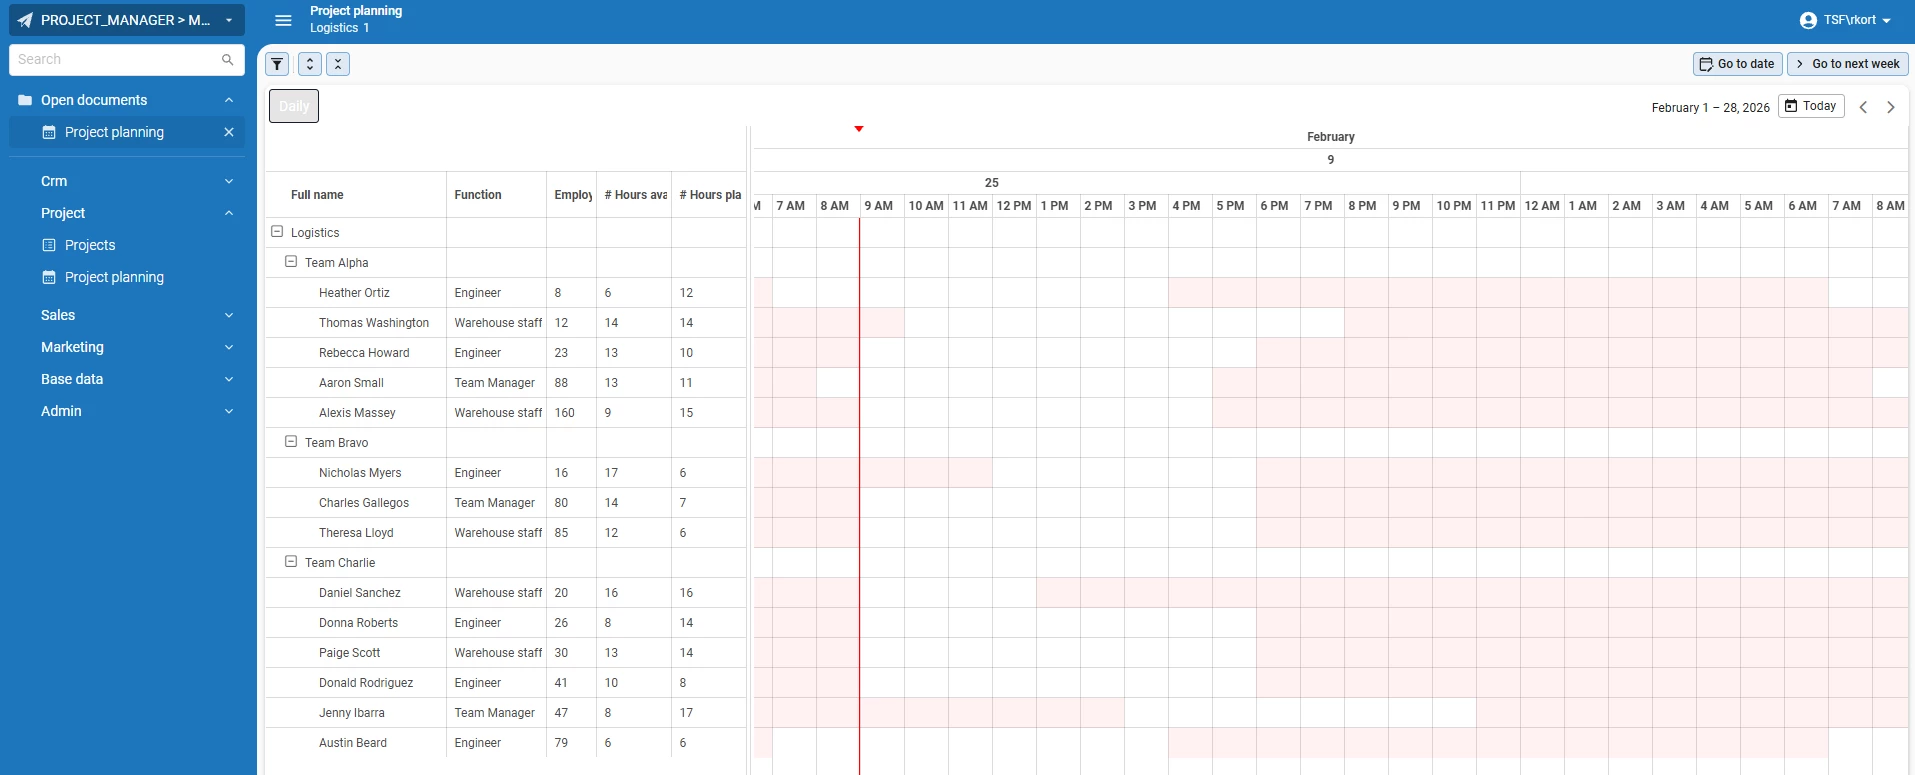
If working hours vary per employee, change the condition type of value to column to use the working hours of each individual employee. The Scheduler then colors each employees non-working hours individually, based on its own data.
HTML styling of activities and tooltips
Activities & tooltips can now display HTML and multiline text when the domain control type of the activitiy title / tooltip column is set to ‘HTML’ or ‘Multiline’.
For practical examples see: