

Hi everyone!
This is my first blog, where I’ll explain some aspects of Form configuration in the Universal GUI. Let me introduce myself: I’m Mustafa Kazanc, new UX/UI Designer at Thinkwise and colleague of Bart Metselaar.
In recent versions a couple of changes have been made to the behavior of the Form in the Universal GUI. This blog is meant to clarify the expected behavior and ways to override that behavior (based on Platform version 2024.3).
1. Default GUI behavior
Three key principles are applied to optimize the layout of Forms in the GUI, making it easier for users to navigate and input data efficiently.
-
Principle 1 - Fields are stretched to cover the entire width of the Form
-
Principle 2 - Fields are distributed following an N-pattern
-
Principle 3 - Fields are dynamically positioned to minimize whitespace
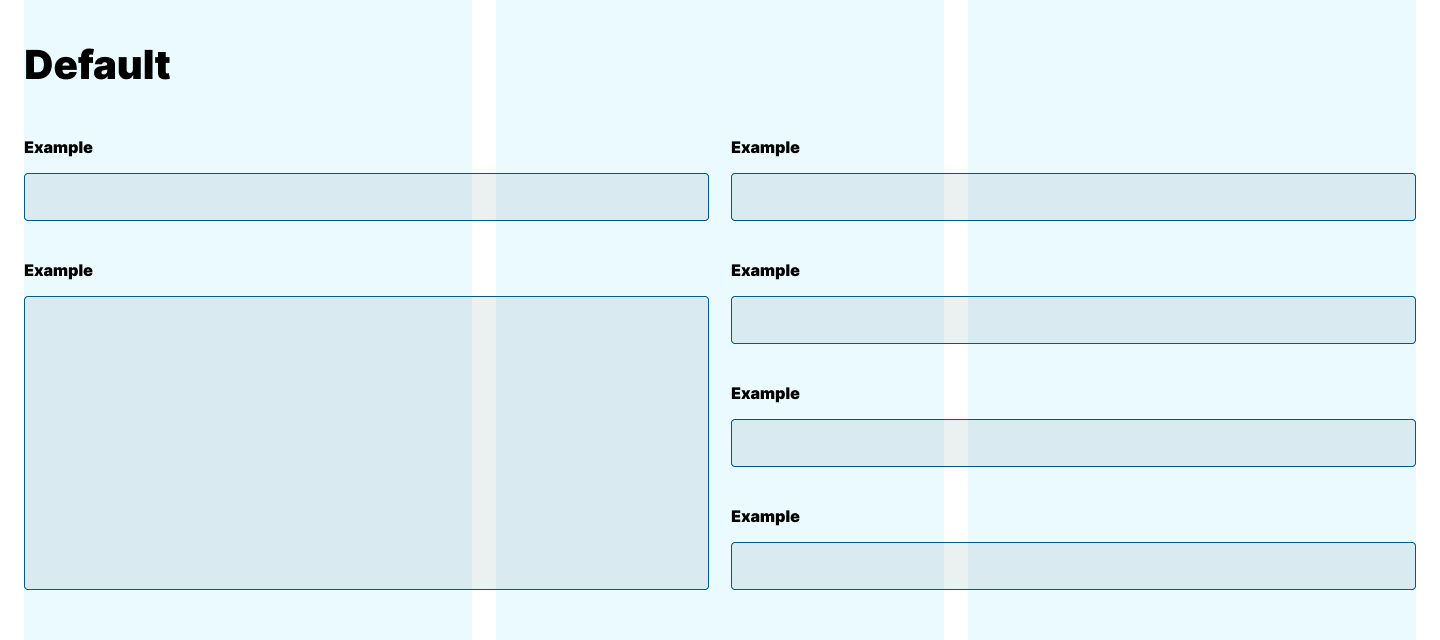
Principle 1: Fields are stretched to cover the entire width of the Form
The Universal GUI divides the available width on the screen by the (minimum) Field width (px) to determine the number of Columns and evenly distributes the Fields over the available width.
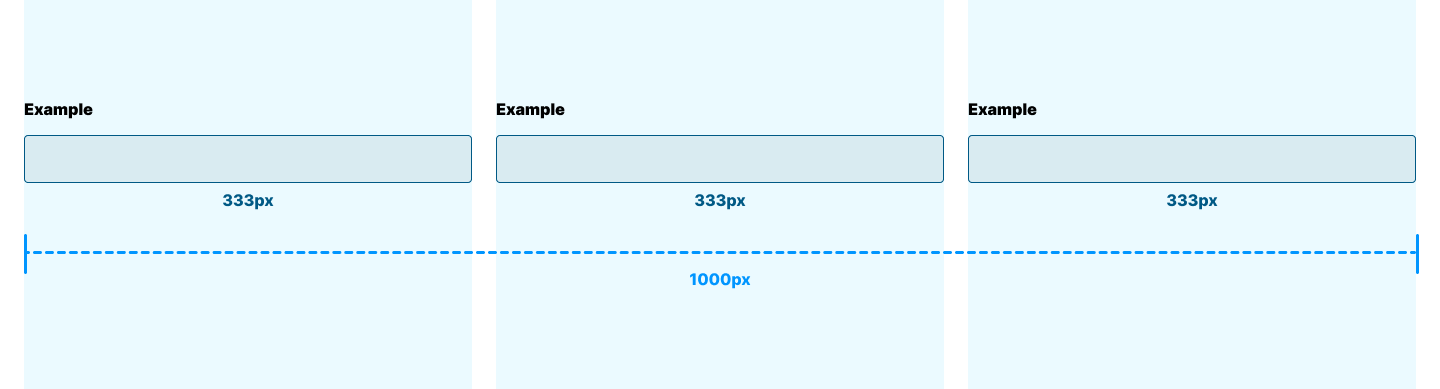
Example: Available width of 1000px divided by Field width (px) of 300px will result in 3 Columns of 333px.
Principle 2: Fields are distributed following an N-pattern
Fields are distributed according to an N-pattern, ensuring that they are presented in a logical order from top to bottom and left to right. This approach helps keep the content organized, even when the Form includes multiple Columns or changes in screen size, preventing confusion for the user.
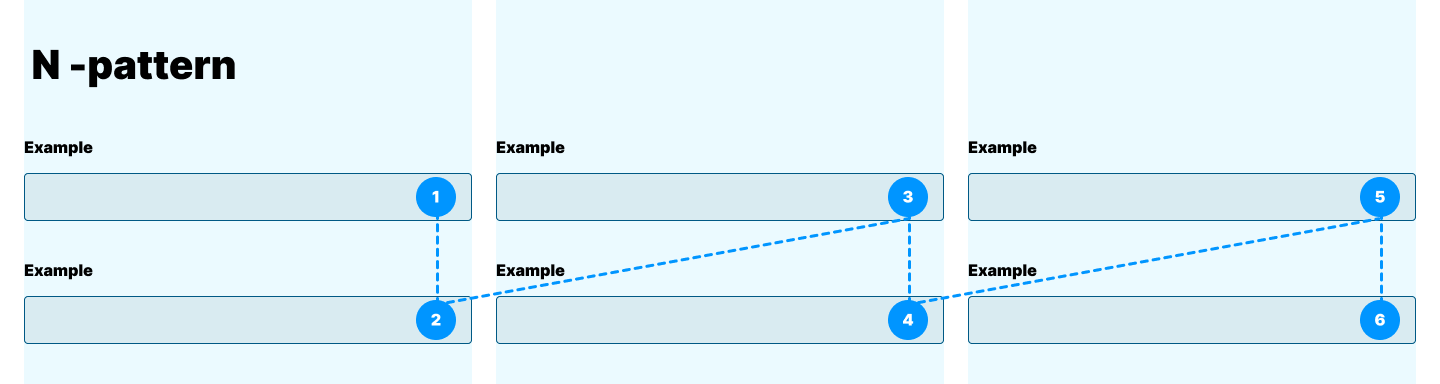

The N-pattern is more effective than the Z-pattern, which tends to cause readability issues, especially when combined with Form Groups. The structure of the Z-pattern leads to a fragmented flow of content, making it difficult for users to follow the Form's logical progression.
Principle 3: Fields are dynamically positioned to minimize whitespace
Effective use of whitespace makes a Form more visually calm and easier to read. A structured layout prevents a cluttered appearance and enhances the user experience.
For example, a total of 8 fields needs to be distributed across the same 1000px Form. The Universal GUI can handle this in two ways:
-
2 Columns each containing 4 Fields. Everything fits perfectly, leaving no extra space. However, the Fields are stretched to 500px each.
-
3 Columns with 4, 2, and 2 Fields. This results in unused space, leaving 4 fields worth of whitespace.
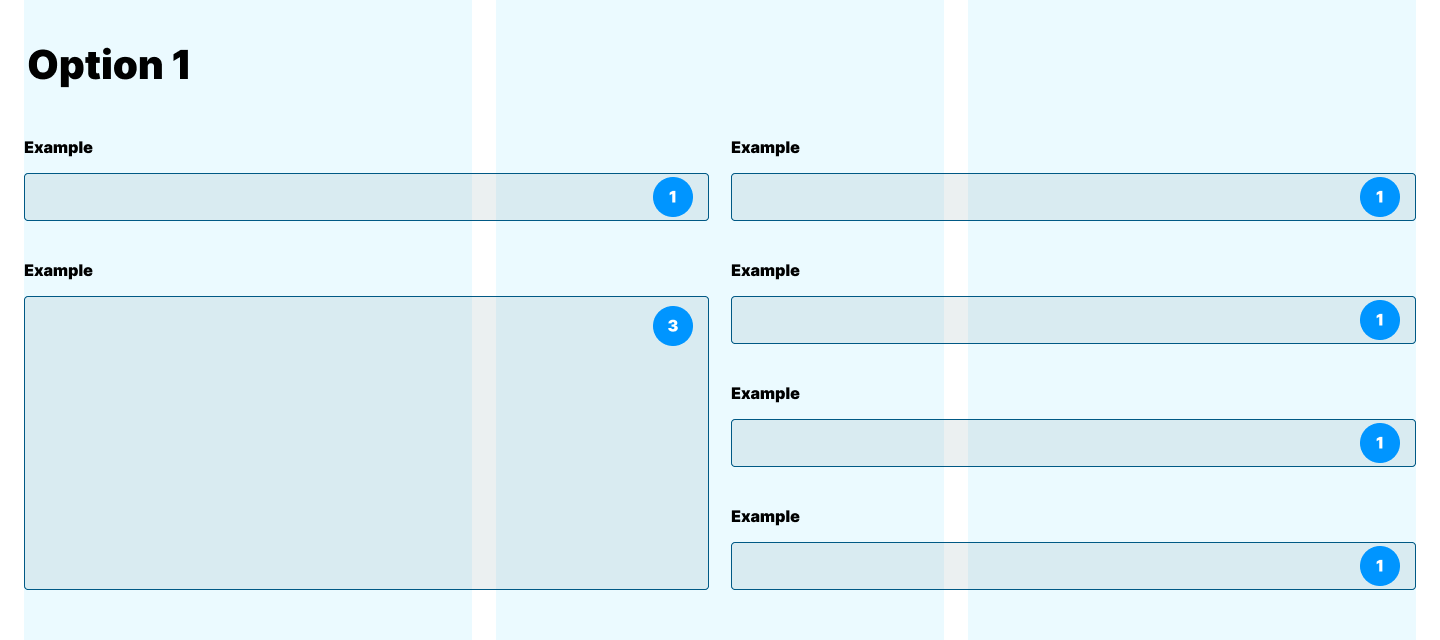
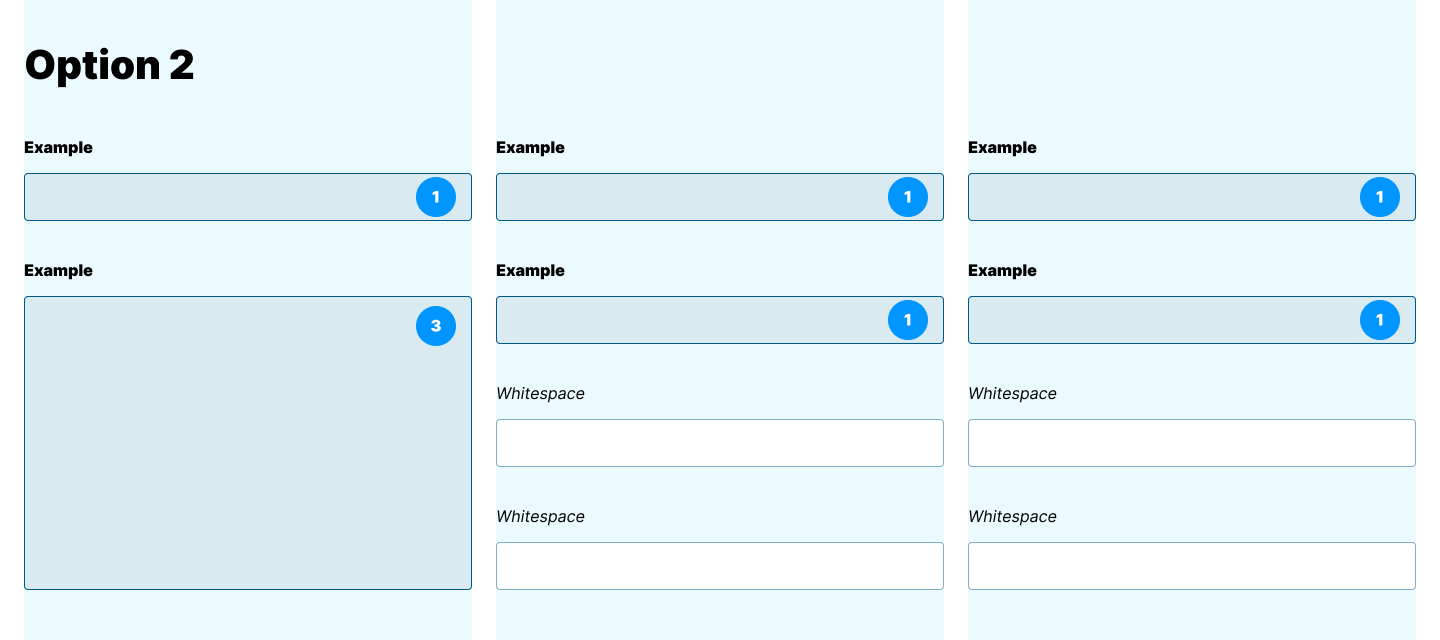
Currently, the GUI always chooses the option with the least empty space (option 1) to ensure the layout looks as filled as possible.
2. Default Settings
When you open a screen with a Form component, the Universal GUI retrieves Subject and Column data from the Model. Thinkwise modeling focuses on reuse and efficiency, enabling developers to work 10 times faster. Defaults serve as the baseline settings (User Interface → Subjects → Tab Default Settings), but lower-level settings can override them.
By default, the Universal GUI displays Forms according to the Default Settings in the Software Factory, but this can be adjusted in the Subject Settings. Here, you can configure the Screen Type, Form, and Grid settings.
A Form is set to display a maximum of 99 Columns by default, with a width of 241px and a height of 25px.
Note 1: The 99 columns represent the maximum, while the Field width (px) is a minimum. This means the width can be larger but never smaller than the defined value.
Note 2: The default width of 170px comes from the Software Factory, including 6px for padding or margins between fields, 25px for icons or validation indicators, and a 1.2 factor to account for font size differences and text clipping in the Universal GUI.
3. Subject Settings
In the Settings tab (User Interface → Subjects → Tab Subjects → Tab Default → Tab General), you can set Subject-specific settings for the Form. Note: The exact location of these settings (General 1, 2, or 3) depends on the screen size.
These settings function as an override to the Default Settings. This means that changes made here overwrite the default values, allowing you to make specific adjustments without completely altering the default configuration.
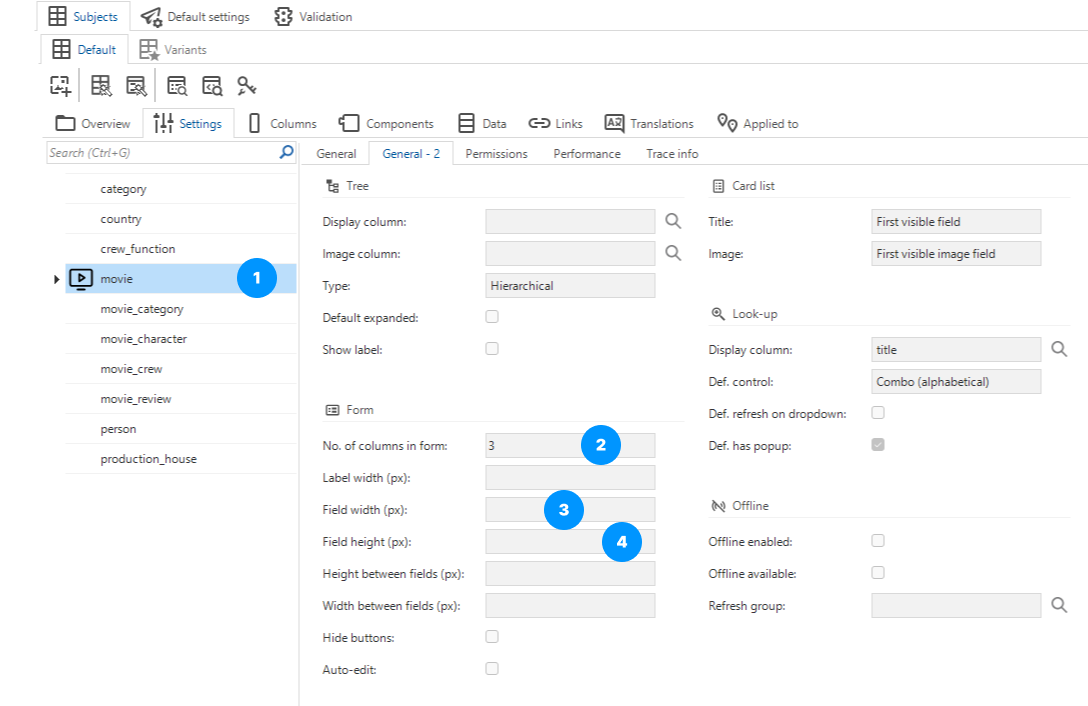
In the Subject Settings, you select the correct table to configure. Next, you define the maximum number of Columns displayed in a Form (No. of columns in form -see point 2). Additionally, you set the maximum height and width of Fields using Field width (px) and Field height (px) (see points 3 and 4).
By default, 99 Columns are allowed, but your Form is automatically distributed across the number of columns that fit within the available space. This ensures an optimal display without requiring manual adjustments.

4. Overriding the Default Behavior
In the previous three chapters, I explained how a Form works by default in the Universal GUI. In this chapter, I will go deeper into how you can override the default behavior of the Universal GUI in the Software Factory. We will look at how to Group fields, create Sections, and determine the position of Fields.
To override the default settings of the Universal GUI, it’s important to fully understand the functionality of the following settings in the Software Factory in User Interface → Subjects → Components → Form:
-
Next group
-
Field in next column
-
Field on next tabpage
-
Field number of positions further

As mentioned earlier, fields are automatically distributed across the available columns with the Default Settings
Next group
In the Software Factory, the Next Group option determines how fields are grouped within a Form.
In my example, I use a Table called movie. I want to group the Fields into Groups such as General information, Release, and Rating. I set this up using Next group (point 1), which neatly organizes the fields by category and keeps the Form well-structured.
I have a total of six fields and check the 1st, 3rd, and 5th ones. In the adjacent field, I use the Group label to assign a name to each Group. The Group label always counts as 1 Field, even if the translation is left empty. If that is not desired, use the Field in next column setting as explained in the next paragraph.

Next Group helps logically group fields and improve the readability of the Form.
Field in next column
Field in next column refers to forcing a Field to the next Column in a Form. This setting can help break a lengthy group in multiple Columns, if the Form width allows for that. The subsequent Fields remains within the same Group but are visually allowed spread evenly over next Columns to optimize space and keep the Form organized. Unlike a Next group, no new label is added. It can also be used to group Columns without using group labels.
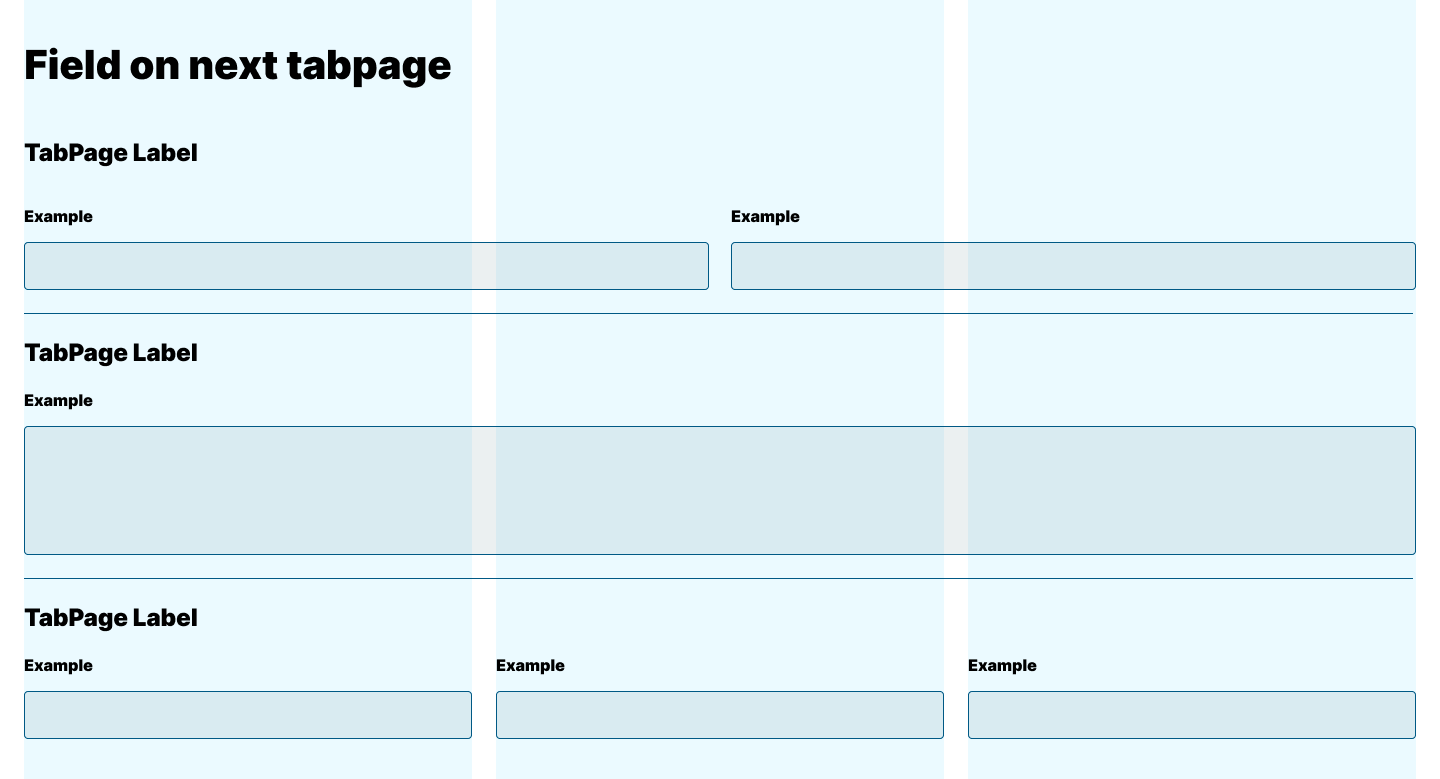
Field on next tabpage
When you check the Field on next tabpage option in the Software Factory (see point 3), the Universal GUI ensures that all subsequent Columns are placed in a new Section. This creates a visual separation, making long or complex Forms more organized and easier to navigate. Effectively, the GUI applies the 3 principles within each Section.
If you want to display Fields in different Sections, you use the Field on next tabpage. The process works the same: check the Fields that should start a new Section, and give the Sections a name via the Tabpage label.
A nice application of Sections is the display of a Multi-line Field across the entire width of a Form, as displayed in below image.
Note: If you want the sections to be evenly distributed across the Columns, make sure Next group or Field in next column is not checked. If this option is enabled, the Fields will automatically be placed one below the other, spanning the full width.
By the way, with Release 2025.1 we’ll introduce collapsible Sections with an additional setting to determine whether a Section should open collapsed or expanded by default. This allows to show the Trace fields Section collapsed for example.
Field number of positions further
The setting Field no. of positions further determines how far another Field moves downward within a Form. Think of it like a small jump down: with a value of 0, the Field is combined with the previous Field, appearing next to it. If you enter a 1, the Field moves directly beneath the previous Field, with no extra space in between. With a value of 2 or higher, you create space between this Field and the one above, pushing them further apart. And so on.
This setting is especially valuable for 2 purposes:
-
Use 0 to place two or three smaller and related Fields next to each other (for example Street and Number).
-
Use 2 (or more) to override principle 3 (Fields are dynamically positioned to minimize whitespace). The original example of 8 Fields, which are divided into 2 Columns of 4 Fields, can be adjusted to show 3 Columns instead.
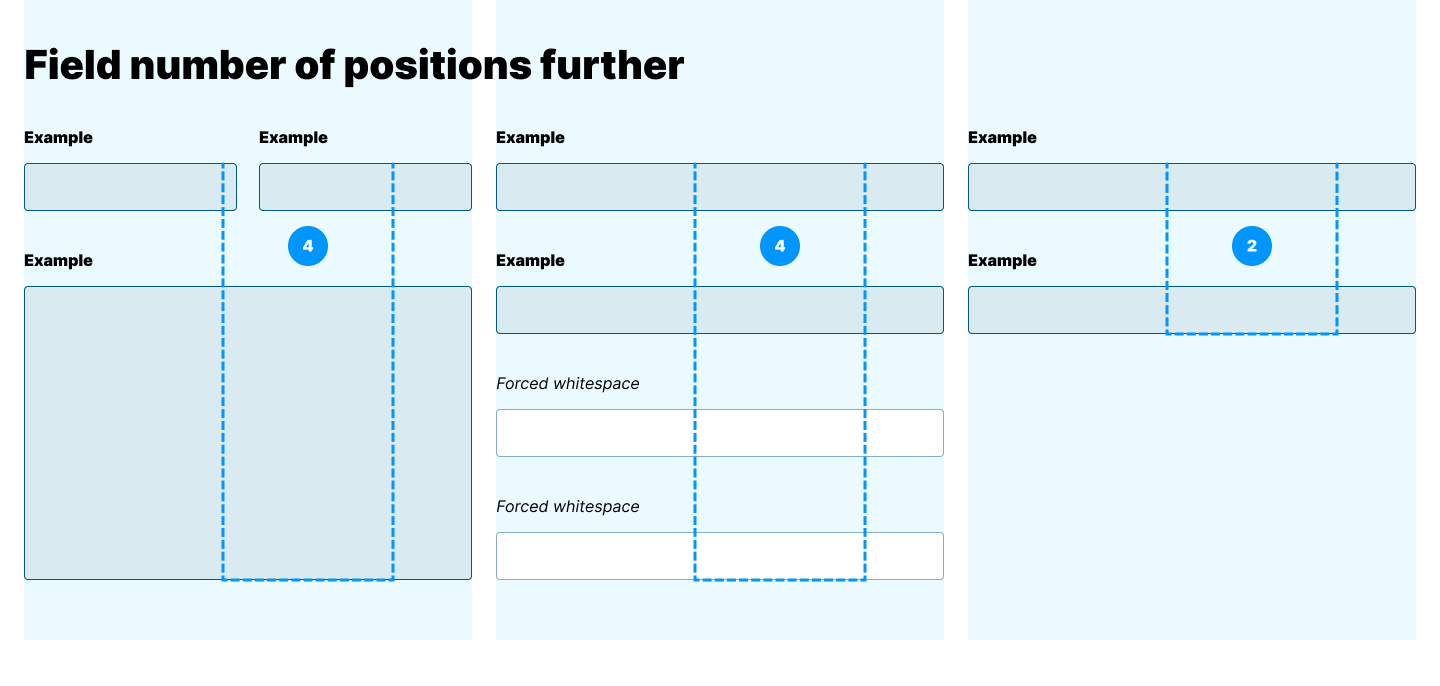
If you want to override the default 4-4 layout and create a 4-2-2 setup, you need to give the GUI a total of Fields that can best be distributed over 3 Columns. We can mimic this by setting the Field no. of positions further of the fifth field to 3. This forces the last two fields to move to the third column, resulting in a 4-2-2 structure.
I hope this blog gives you a good idea of how to configure a Form to your liking in the Universal GUI. Of course, we’re curious to hear your thoughts and questions!
P.s. This Idea is noteworthy in case you wish to continue the discussion about changes to expected behavior: