




With Thinkwise Platform STS 2026.2.12, MCP support lands as a beta feature. Connect Claude, or any other MCP-compatible AI tool straight to the applications you build on the Thinkwise Platform: your data, your logic, your rules, with your application roles and IAM doing the security work.
If you have never touched MCP before, you are in good company, and you will not be figuring it out on your own. This guide assumes zero prior knowledge and walks you, step by step, from what MCP is through your first authorized chat with your own application's data.
Grab a coffee. In about twenty minutes your AI assistant will be able to query live data straight from your own application, and only the data your IAM roles allow. Once you get there, tell us what you built. We are learning what works best from the same use cases you are.
What is MCP
MCP stands for Model Context Protocol: an open standard that lets an AI assistant call out to external tools and data sources in a structured, predictable way. Instead of copying data into a chat window, the assistant asks your application directly, through a defined set of actions you control.
MCP is not an AI or a language model on its own. Think of it as a connector standard: it defines how a chatbot or agent talks to a server, not how that chatbot thinks. Indicium can now act as that server, exposing your application's data and logic as MCP tools that Claude, or any other MCP-compatible client, can call.
Every call still runs through your platform's IAM roles and access delegation. The AI never sees more than the connecting user is authorized to see.
Under the hood, this is simpler than it sounds. Indicium exposes a single MCP endpoint, typically something like https://your-indicium-host/mcp, and that is the one address your AI tool connects to. On first connection, Indicium walks the AI through an OAuth flow using the client application you registered in IAM: the AI presents the client ID and secret, your user signs in and grants consent, and Indicium returns a token scoped to exactly the roles you authorized. Every request after that, whether the AI is reading data or running a task, goes through that same /mcp endpoint and is checked against your IAM roles before anything happens.
For more information, see:
Prerequisites
Before you start, make sure your environment is on these versions:
- Thinkwise Platform STS 2026.2.12 or later
- Indicium 2026.2.12 and Universal UI 2026.2.12
Indicium setup
The setup we recommend is simple: make Indicium reachable from the public internet. That might sound bold, but it is exactly how we run things ourselves. Every Thinklab and Thinkwise Cloud environment is already internet-facing, not tucked away on a local network, and it holds up fine.
That includes development environments. Indicium authenticates and authorizes every request before it touches your data, so opening up a dev environment carries the same protection as production, and it should not introduce meaningful security risk.
If Indicium runs on-premises, it's also worth confirming that the server can resolve its own external hostname over DNS. This is easy to miss, since it doesn't affect normal inbound traffic, but it can break outbound calls Indicium makes to itself.
On-premises DNS occasionally has no record for that external name, so the call fails even though the server is reachable fine from the outside. It's a rare issue, and it's usually a quick fix for your system administrator: add an internal DNS record, or a hosts file entry, that resolves the external hostname to the server itself.
Tip: Turn on single sign-on (SSO) wherever you can. It adds a layer of security and makes login painless for your users.
Local
Not every environment can be open to the internet, and that is fine. MCP also runs locally, against an Indicium instance on your own machine or network.
The trade-off is reach. Most browser-based AI tools cannot open a connection to something running locally, so your options narrow. Concretely, that rules out Claude's and ChatGPT's browser and mobile apps, and it rules out automation platforms like n8n too: none of them can reach a server sitting on your own machine. For this scenario, we recommend Claude Code with the Claude CLI, both of which run your local Indicium without issue.
IAM setup
MCP authorization runs entirely through IAM & Indicium. Three switches need to be set correctly before your first connection will work: user authorization, application authorization, and the client application itself.
User authorization
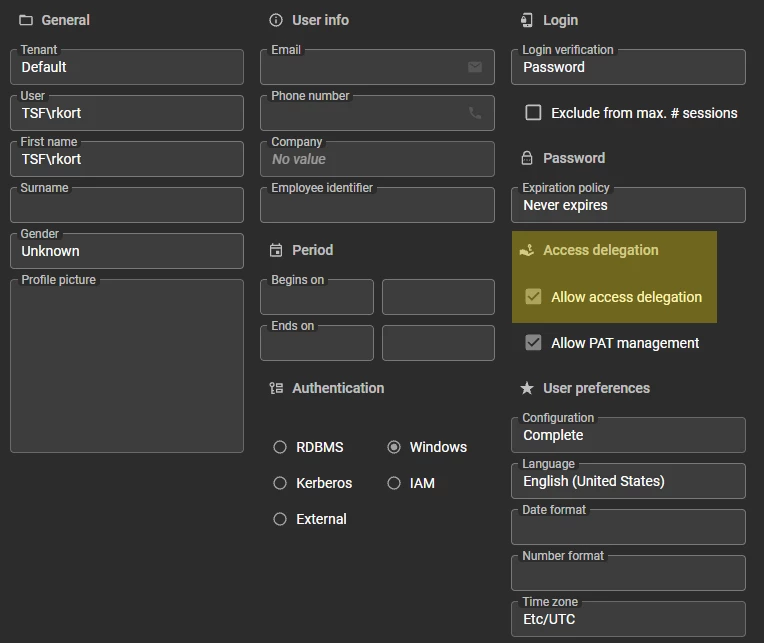
Every user who will connect an AI assistant needs delegation rights. Open the user record in IAM and enable Allow access delegation for each user you want to give MCP access.
Application authorization
The application needs the same switch. Open the application record and enable Allow access delegation there as well.
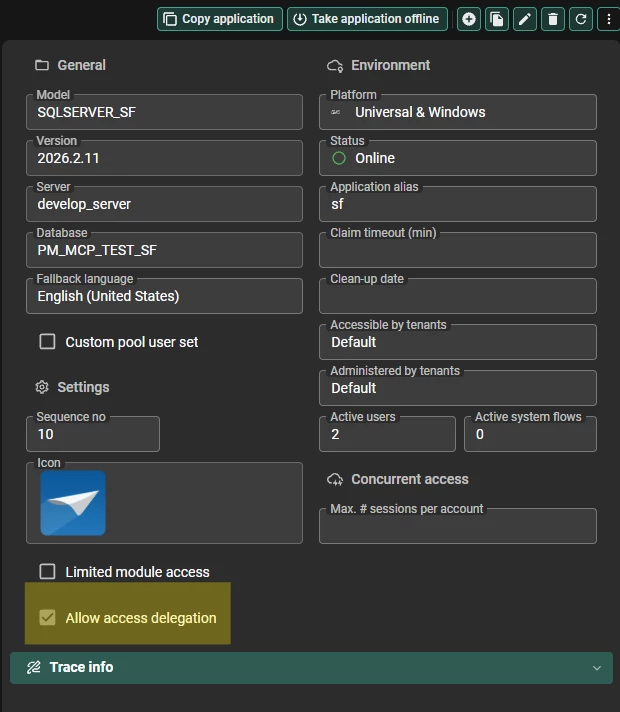
Then authorize each relevant role for both User groups and Access delegation. Skip one and you will not be able to authorize that role's scope for MCP later, so it is worth double-checking both boxes now.
Client application setup
IAM treats every external system that authenticates against your platform as a client application: a registered identity with its own name, secret, and permissions, separate from any individual user. Your MCP connector is just one more client application, so it gets set up the same way any other integration would.
In IIS, the setting Load User Profile settings needs to be set to True for the Indicium Application Pool. For more information, see the Client applications documentation.
Open the client application screen and create a new client application with the following settings:
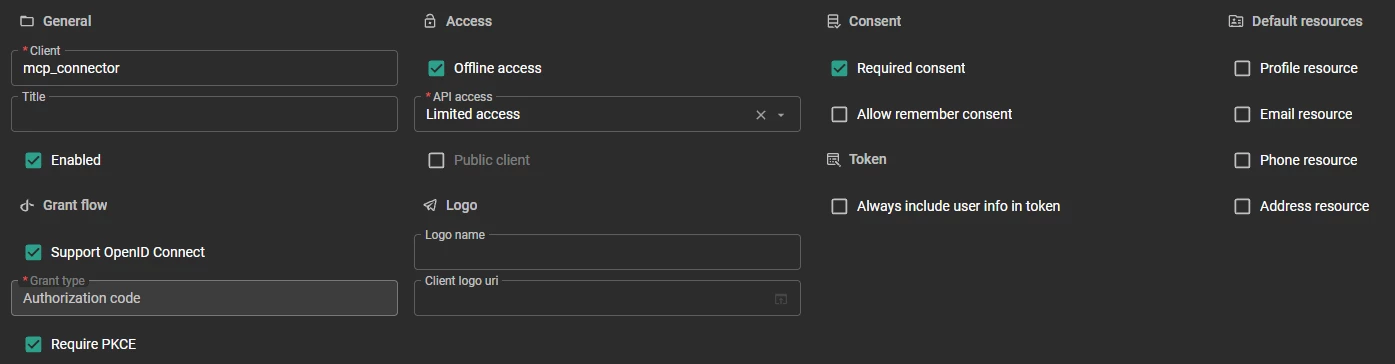
Give it a clear name. You will reuse this name as the client ID when you connect the MCP connector to your AI tool later. This name should not include any spaces or special characters. Enable the client, set API access to “Limited access”, turn consent on, and switch offline access on.
Using a client secret is optional for most AI clients. If you set the client application to be a public client anyone with the correct URL and client application ID can connect to the /mcp endpoint. IAM authorization is still respected and people will only be able to actually use MCP if they have the proper authorization set in IAM.
We recommend using a client secret when you configure an MCP connector for your entire organization and make it available to internal employees only. In all other cases - especially when users need to configure the MCP connection themselves - we recommend using a public client application.
To set a client secret, open the Secrets tab and create a new client secret. The MCP connector uses this secret to authorize itself when it connects.
Treat this secret exactly like a production credential. Store it in a password manager or secrets vault, never in a chat log, command history, or shared file.
Allowed login redirects
In the Allowed redirects tab, I add the following record: http://localhost:8080/callback
This field is essentially a guest list: once your user logs in, IAM only hands the result back to a web address on this list and rejects anything else. That is what stops a login response from ending up somewhere it should not.
Which address belongs here depends on how you are connecting. Running Claude Code locally on your own machine, as in this guide, means the login result comes back to that same machine, typically an address like http://localhost:8080/callback (the port can vary depending on how the tool is set up), but this can be different for your environment.
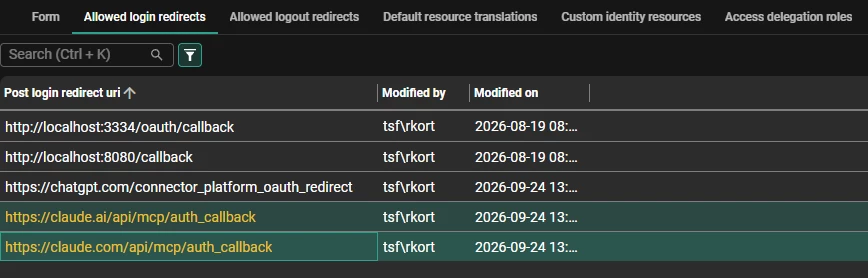
Connecting through a cloud-hosted AI tool instead, such as Claude.ai in the browser or the Claude desktop app, means the result goes to a fixed address the vendor publishes, for example https://claude.ai/api/mcp/auth_callback, rather than to your machine.
If you are not sure which one applies, start with checking the AI chatbot / tool’s own setup screen: it will often show you the exact address to add at the point where it asks for your client ID and secret. You can add more than one record in this tab, so feel free to list one for every tool or environment you plan to connect with.
Access delegation roles
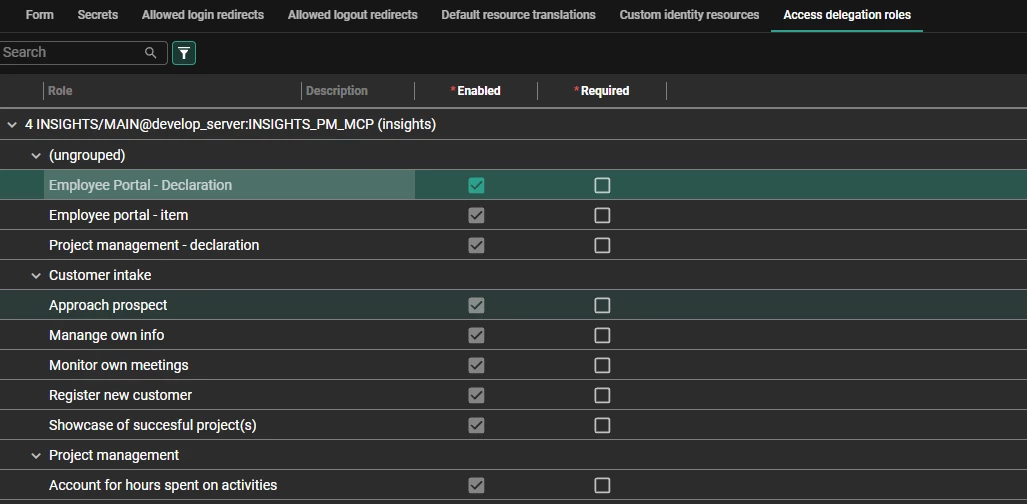
Finally, open the Access delegation roles tab and enable every role you want available through MCP.
Adding a custom MCP connector to your AI of choice
With IAM configured, you are ready to point an AI tool at your new MCP connector. The options below all work the same way, but reachability decides which ones you can use. An internet-facing Indicium opens up the full list. An Indicium that only is accessible from inside your own network limits you to Claude Code based solutions for now.
Claude web and desktop app
To successfully configure a Thinkwise MCP connector in Claude web or desktop you need to be running at least Indicium version 2026.2.14, released on the 28th of September 2026.
Both clients run in Anthropic's cloud, so they can only reach an Indicium that is published to the public internet. An internal-only accessible Indicium will not work here.
Claude currently looks for the authentication endpoints at the root of your host. We recommend placing Indicium in a subfolder (such as /indicium). To make this work with Claude, add three redirects at server level:
/.well-known/... => /indicium/.well-known/...
/authorize => /indicium/connect/authorize
/token => /indicium/connect/token
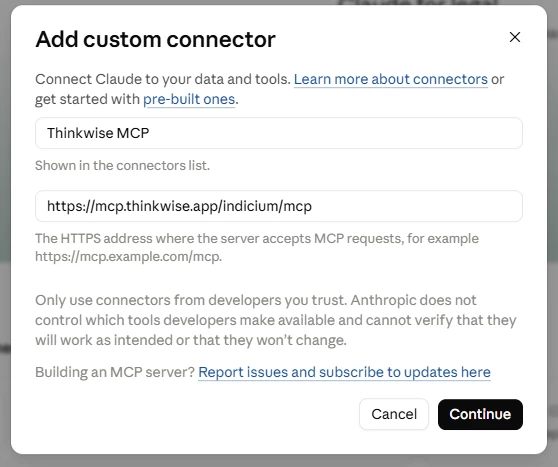
Now add the custom connector in Claude. Open the Customize screen from the menu, go to the Connectors tab, click Add, and select "Add custom connector".

Enter a name and the URL of the /mcp endpoint of your Indicium.
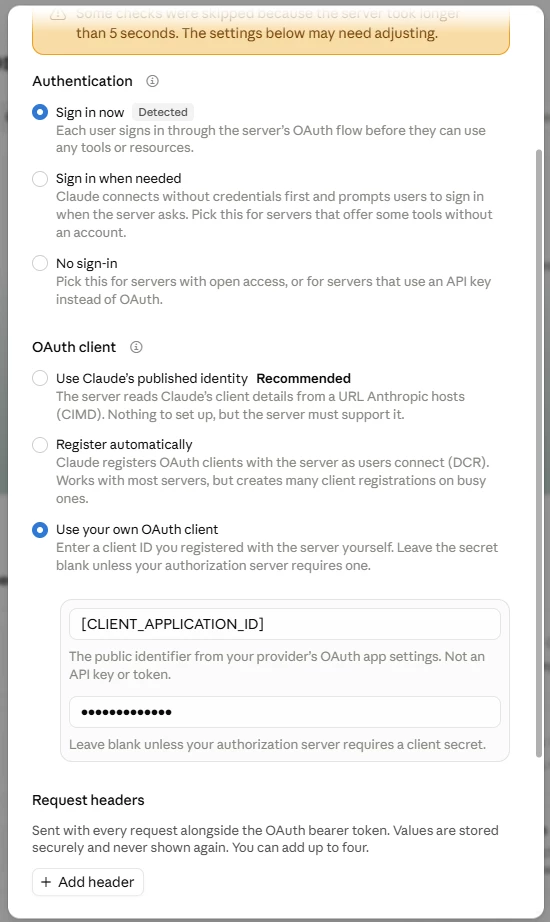
Click Continue to reach the authentication screen. "Sign in now" is selected by default. For the OAuth client, choose "Use your own OAuth client": two fields appear, where you enter the client application ID and the client secret you configured in IAM.
To make Claude connect properly also set up the redirect URL for Claude in your client application. At the time of writing these are: https://claude.ai/api/mcp/auth_callback and https://claude.com/api/mcp/auth_callback
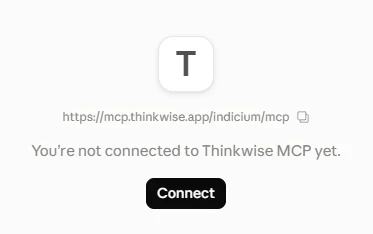
Claude then asks you to connect to your server. Press Connect. Indicium opens, where you authenticate and confirm the roles available to MCP.
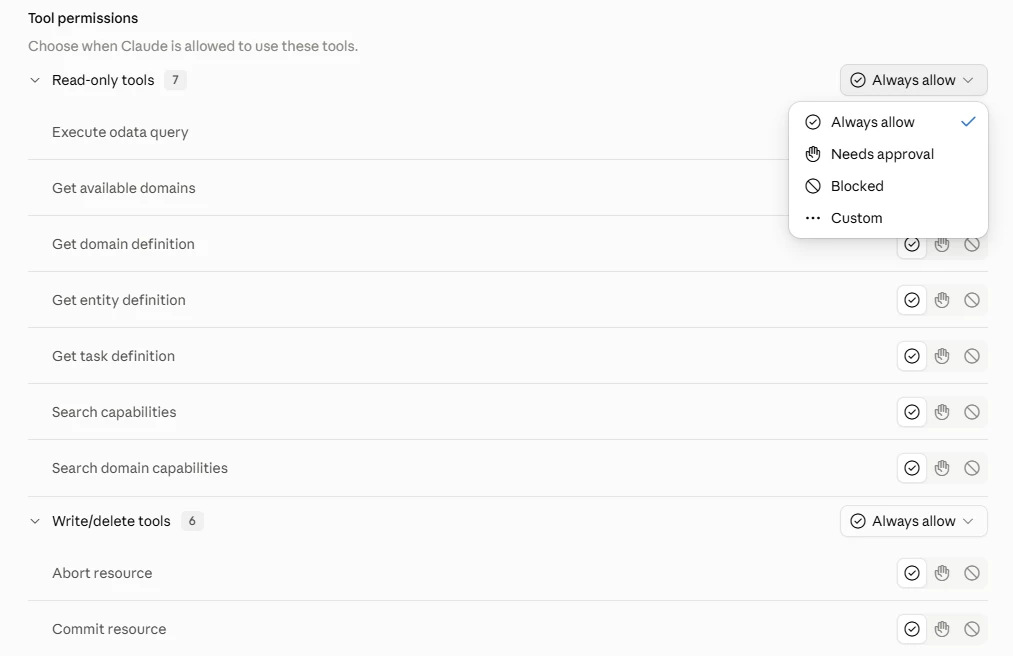
Indicium sends you back to Claude, where the connector now appears in the list. I recommend turning on the always allow option for every tool the connector exposes, so a chat never stops to ask for approval mid-answer. That is it, your connector is ready to use.
Claude Code
Three pieces of software need to be on your machine before you can add the connector:
- Visual Studio Code (only when using Claude Code in Visual Studio Code)
- The Claude Code extension for Visual Studio Code (only when using Claude Code in Visual Studio Code)
- The Claude Code CLI
Already have all three installed? Skip ahead to Install using chat below.
Choosing a Claude Code client
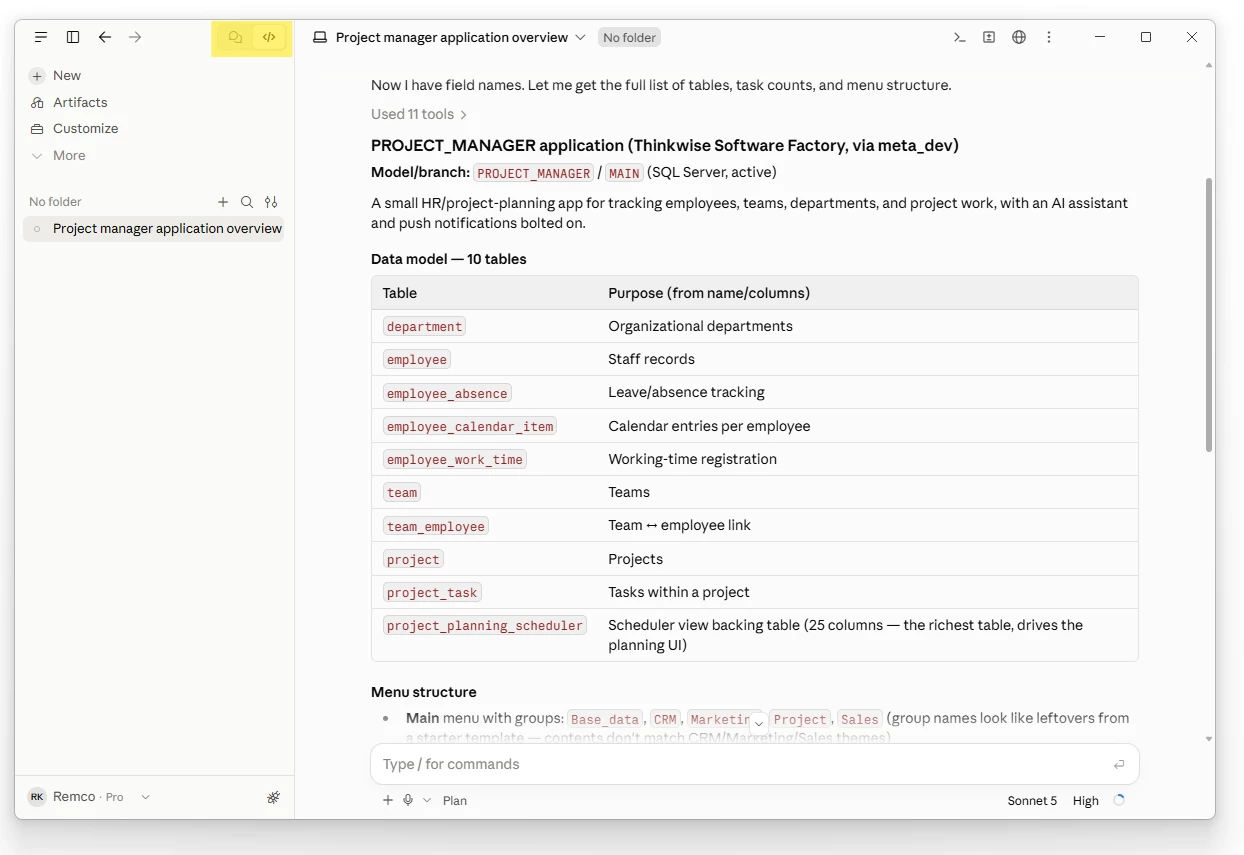
You can run Claude Code in multiples places, for example the Claude Code extension in Visual Studio Code, or the Code tab in the Claude desktop app. Both run on the same engine, so your MCP connector works identically in either one. The choice is personal. The Visual Studio Code extension suits developers, especially if you are also using RDBMS plugins in VS Code. While the Code tab in the desktop app is the easier starting point for everyone else and is presented in a more user friendly way.
Permissions in Claude Code
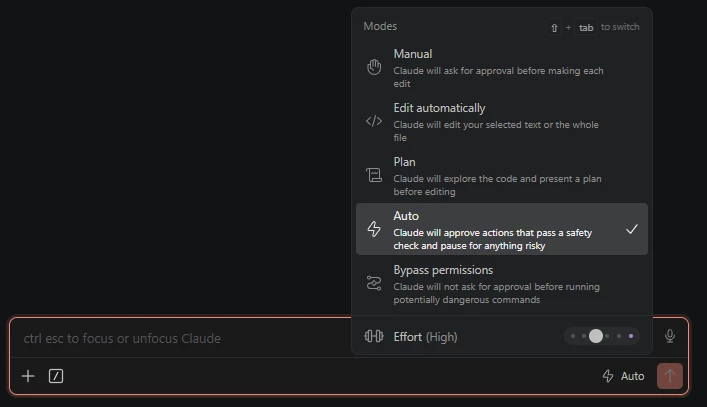
The first time an MCP tool runs, Claude asks your permission. That is expected: it is the same guardrail that protects any file Claude touches on your machine.
You might also be asked to save a file to disk now and then, if Claude decides that is more efficient than holding everything in memory, or if it needs to filter a dataset that is easier to work with as a file. Set your comfort level in the permission selector at the bottom right of the chat bar. The default mode asks before every tool call, Auto approves routine actions automatically, and Bypass permissions skips confirmation altogether, so pick the one that matches how much you want to supervise.
Install using chat
You can add a connector straight from chat. Open a new chat window and send the prompt below. I have also included this prompt as a skill in the attachments, this makes it more reusable if you have more than one MCP environment that needs setting up. Claude will ask, step by step, for the information it needs: your Indicium URL, the client ID (the client name you chose), and the client secret. It will then use that information to create the MCP connector in your Claude Code installation.
Only add MCP connectors through chat when the Indicium is not publicly available. Otherwise we recommend using the Claude web / desktop app to add it as described above.
Note that the below described MCP Manager tool provides a more user friendly way to configure local MCP servers.
install an mcp connector using the following instructions:

# Install an MCP connector in Claude Code

Set up and authenticate a custom MCP connector in Claude Code. Ask the
questions in Step 0 one at a time before doing anything — do not assume
defaults for values the user hasn't given you, except where marked "default."

## Step 0 — Gather configuration

Ask, in order, waiting for each answer before asking the next:

1. **Server name** — the alias to register this connector under in Claude
   Code (e.g. `sf_mcp`). This name must be used consistently in every step
   below (add, get, config lookup, `/mcp` selection) — do not let the add
   command use a different name than later steps reference.
2. **MCP endpoint URL** — the full transport URL (e.g.
   `https://<host>/<path>/mcp`).
3. **OAuth client ID.**
4. **OAuth client secret** — tell the user it will only be exported into the
   current shell session as an env var, never echoed, logged, or written to
   a file.
5. **Callback port** (default: `8080`) — only needs to change if the
   server's OAuth client has a different redirect URI pre-registered.
6. **OAuth discovery document URL** (default:
   `<mcp base URL without /mcp>/.well-known/openid-configuration`) — ask
   only if the user says the default path doesn't apply.
7. **Config scope** (default: `user`) — `user` registers the connector once
   for every project on this machine; `local` restricts it to the current
   project only. Ask only if the user wants something other than `user`.

Call the collected values `{{SERVER_NAME}}`, `{{MCP_URL}}`, `{{CLIENT_ID}}`,
`{{CLIENT_SECRET}}`, `{{CALLBACK_PORT}}`, `{{DISCOVERY_URL}}`, `{{SCOPE}}`
below. Derive `{{RESOURCE_BASE}}` by stripping the trailing `/mcp` path
segment from `{{MCP_URL}}`.

## Step 1 — Export the client secret for this shell session

The variable name is `MCP_CLIENT_SECRET` — fixed, not derived from the
server name. `claude mcp add --client-secret` reads only this name; anything
else fails with *"No TTY available to prompt for client secret. Set
MCP_CLIENT_SECRET env var instead."*

(bash)
```
export MCP_CLIENT_SECRET="{{CLIENT_SECRET}}"
```
(PowerShell)
```
$env:MCP_CLIENT_SECRET = "{{CLIENT_SECRET}}"
```

Agent shells generally do not persist environment variables between tool
calls. Run this export and the Step 2 `add` in a **single** invocation
(`;`-joined in PowerShell, `&&`-joined in bash) rather than as two steps.

## Step 2 — Add the MCP server

```
claude mcp add -s {{SCOPE}} --transport http {{SERVER_NAME}} {{MCP_URL}} \
  --client-id {{CLIENT_ID}} \
  --client-secret \
  --callback-port {{CALLBACK_PORT}}
```
`-s {{SCOPE}}` is not optional — with no `-s`, `claude mcp add` defaults to
`local`, which registers the server for the current project only.
`--client-secret` with no value reads from the env var set in Step 1.
`--callback-port` pins the OAuth redirect URI to
`http://localhost:{{CALLBACK_PORT}}/callback` — required whenever the
server's OAuth client has that exact redirect URI pre-registered.

## Step 3 — Add discovery metadata

The entry's location in `~/.claude.json` depends on the scope used in
Step 2:

| Scope | Path in `~/.claude.json` |
|---|---|
| `user`  | top-level `"mcpServers"` → `"{{SERVER_NAME}}"` → `"oauth"` |
| `local` | `"projects"` → `"<project path>"` → `"mcpServers"` → `"{{SERVER_NAME}}"` → `"oauth"` |

Locate the entry by searching the file for `"{{SERVER_NAME}}"` rather than
assuming either path. Under its `"oauth"` object, add:
```
"authServerMetadataUrl": "{{DISCOVERY_URL}}"
```

## Step 4 — Discover and pin scopes dynamically (do not hardcode)

Do not type out a fixed scope list. Query the server itself for what it
currently advertises, then write that into the config:

1. **Query the server for its current scopes.** GET the OAuth
   protected-resource metadata document (RFC 9728), which is unauthenticated:
   ```
   curl -sS "{{RESOURCE_BASE}}/.well-known/oauth-protected-resource"
   ```
   This returns JSON with a `scopes_supported` array. If it 404s, retry
   against the MCP path itself:
   ```
   curl -sS "{{RESOURCE_BASE}}/.well-known/oauth-protected-resource/mcp"
   ```
   If both fail, ask the user to paste the scope list manually and skip to
   step 5 below.

2. **Check for an existing scopes value.** Read `oauth.scopes` at the same
   scope-determined location as Step 3 — top-level
   `mcpServers.{{SERVER_NAME}}.oauth.scopes` for `user` scope,
   `projects["<project path>"].mcpServers.{{SERVER_NAME}}.oauth.scopes` for
   `local` — or a `.mcp.json` in the repo for project scope. It's likely
   empty/absent on a fresh add — that's expected, just treat the server's
   list as entirely new.

3. **Diff before writing.** Compare the server's `scopes_supported` array
   against any existing `oauth.scopes` string.
   - If they already match, say so and skip to Step 5 — nothing to change.
   - If this is a fresh add, or the server list only adds scopes, note what's
     being granted.
   - If scopes are being removed/narrowed from a prior value, note that too.

4. **Confirm before granting.** Since this is a first-time authorization
   (or a widening one), use AskUserQuestion to show the discovered scope
   list and confirm before writing it — especially anything that reads like
   a write/approve/send/manage/create/delete capability. Don't silently
   apply an OAuth grant the user hasn't seen.

5. **Write the config precisely.** Set `oauth.scopes` for
   `{{SERVER_NAME}}` to the confirmed list, joined with single spaces, in
   the server's own ordering:
   ```
   "scopes": "<scope1> <scope2> <scope3> ..."
   ```
   Do this with a targeted string replacement (Read the exact surrounding
   lines first, then Edit) — do not round-trip the whole `~/.claude.json`
   through a JSON parser/serializer, since it's a large shared file and
   reserializing risks reformatting unrelated content.

6. **Validate.** After editing, parse the file (e.g.
   `Get-Content -Raw ~/.claude.json | ConvertFrom-Json` or
   `python -c "import json; json.load(open(...))"`) to confirm it's still
   valid JSON and that `oauth.scopes` reads back as expected.

## Step 5 — Verify registration

```
claude mcp get {{SERVER_NAME}}
```
Expect `Status: Needs authentication`, the configured `client_id`,
`callback_port {{CALLBACK_PORT}}`, and a `Scope:` line matching
`{{SCOPE}}` (`User config (available in all your projects)` vs
`Local config (private to you in this project)`).

If `{{SERVER_NAME}}` is missing entirely, first confirm which scope it was
actually added under — re-run `claude mcp get {{SERVER_NAME}}` and read the
`Scope:` line, or `claude mcp list` from the directory in question. Do
**not** resolve a lookup miss by duplicating the entry under several
project-path key variants: `JSON.parse` keeps only the *last* duplicate
key, so the added entries are inert, and strict parsers (PowerShell's
`ConvertFrom-Json`) reject the file outright. If a project-scoped entry is
genuinely unreachable, re-add it with `-s user`.

## Step 6 — Authenticate

Claude Code enumerates MCP servers at session start, so a server added
mid-session will not appear in the current one regardless of what the config
says. Tell the user to **restart or reload the session first**, then run
`/mcp`, select `{{SERVER_NAME}}`, and complete the OAuth login in the
browser window that opens. Claude Code should then report the server as
connected.

Remind the user: this only registers the scopes in config — the actual
OAuth token is issued during this authentication step, so it must run
*after* Step 4's scopes are written, not before.

## Troubleshooting

If authentication fails with "Client secret validation failed", **remove
and re-add** rather than editing in place:
```
claude mcp remove {{SERVER_NAME}} -s {{SCOPE}}
```
then repeat Step 2. Claude Code links the stored client secret to a hash of
the server's config — editing the URL or secret directly in
`~/.claude.json` without going through `claude mcp` can silently orphan
that link.

**Changing scope after the fact** requires a remove and re-add:
`claude mcp remove {{SERVER_NAME}} -s <old-scope>`, then repeat Step 2 with
the new `-s`. Steps 3 and 4 must then be **redone**, because `claude mcp
add` writes only `type`, `url`, `clientId`, and `callbackPort` — the
`authServerMetadataUrl` and `scopes` added by hand do not migrate to the
new config location and are silently lost.

**If the MCP URL 404s**, check the transport scheme before anything else. A
correctly configured OAuth-protected MCP endpoint answers an unauthenticated
POST with `401` and a `WWW-Authenticate` header; a plain `404` (especially
an IIS error page) usually means the path is not served over that scheme at
all. Retry the same URL over `https://` before assuming the path is wrong.
Note: Claude installs the connector by running PowerShell scripts through the Claude CLI. It will ask, repeatedly, for permission to run each one. Allow them, or set your permission mode to Auto or Bypass permissions as described above.
Once the connector is added, open a new chat session, type /mcp, and select MCP servers. Your new connection appears with the label "Needs authorization." Click it, then click Authorize. This opens a browser window to Indicium, where you authorize your user with the rights they are allowed to use. Click Allow at the bottom of the screen.
That is it, your MCP connector is live and ready to use.
MCP manager
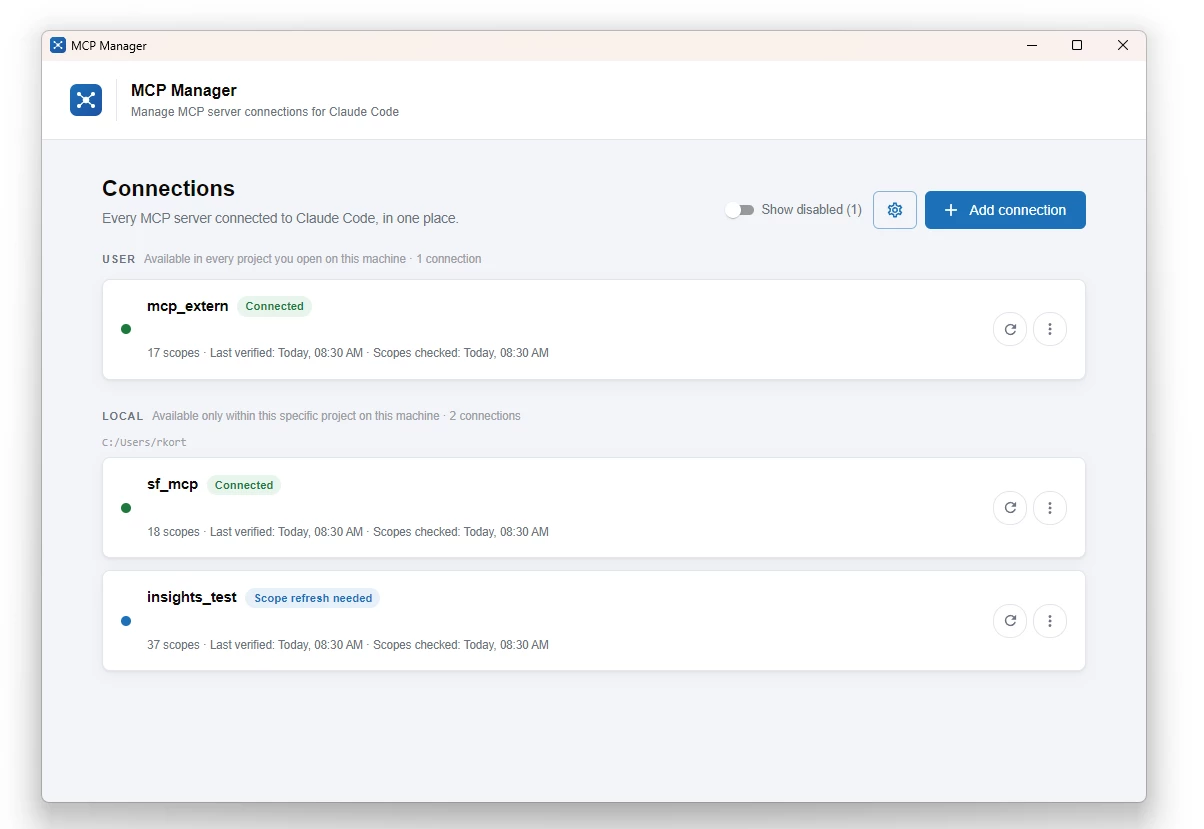
Managing which MCP connectors are installed, authorized, or need their scopes refreshed can get fiddly from the command line alone. I built a small companion app to make it visual, and I think it is useful enough that I want to share it.
The app lists every MCP connector installed in Claude on your computer, lets you add, remove, or refresh connections, and walks you through adding a new one with a short wizard.
One important caveat: this is not an official Thinkwise application. There is no support ticket system for it. It is a personal project I am sharing because it makes my own life easier, and it might make yours easier too.
You can find the companion app and setup instructions in this GitHub repository.
The first time you open this application Windows might not allow you to open the application because of SmartScreen. In the properties of the executable enable Unblock. Then you can open the application.
ChatGPT with OAuth
ChatGPT connects to your MCP connector through OAuth as well. Like Claude's web app, it runs in the cloud, so it needs an internet-facing Indicium. Set it up once in your workspace settings and the connector becomes available to every user in your organization.
In your workspace settings, open the Apps screen and click Create.

Now configure the app. Name and description are free text, so pick something your users will recognize. Point the connection URL at the /mcp endpoint of your Indicium, set authentication to OAuth, and check "I understand and want to continue".
Next, open "Advanced OAuth settings" and set the registration method to "User-defined OAuth Client". Enter the client ID (the client application name you chose in IAM) and the client secret you configured there.
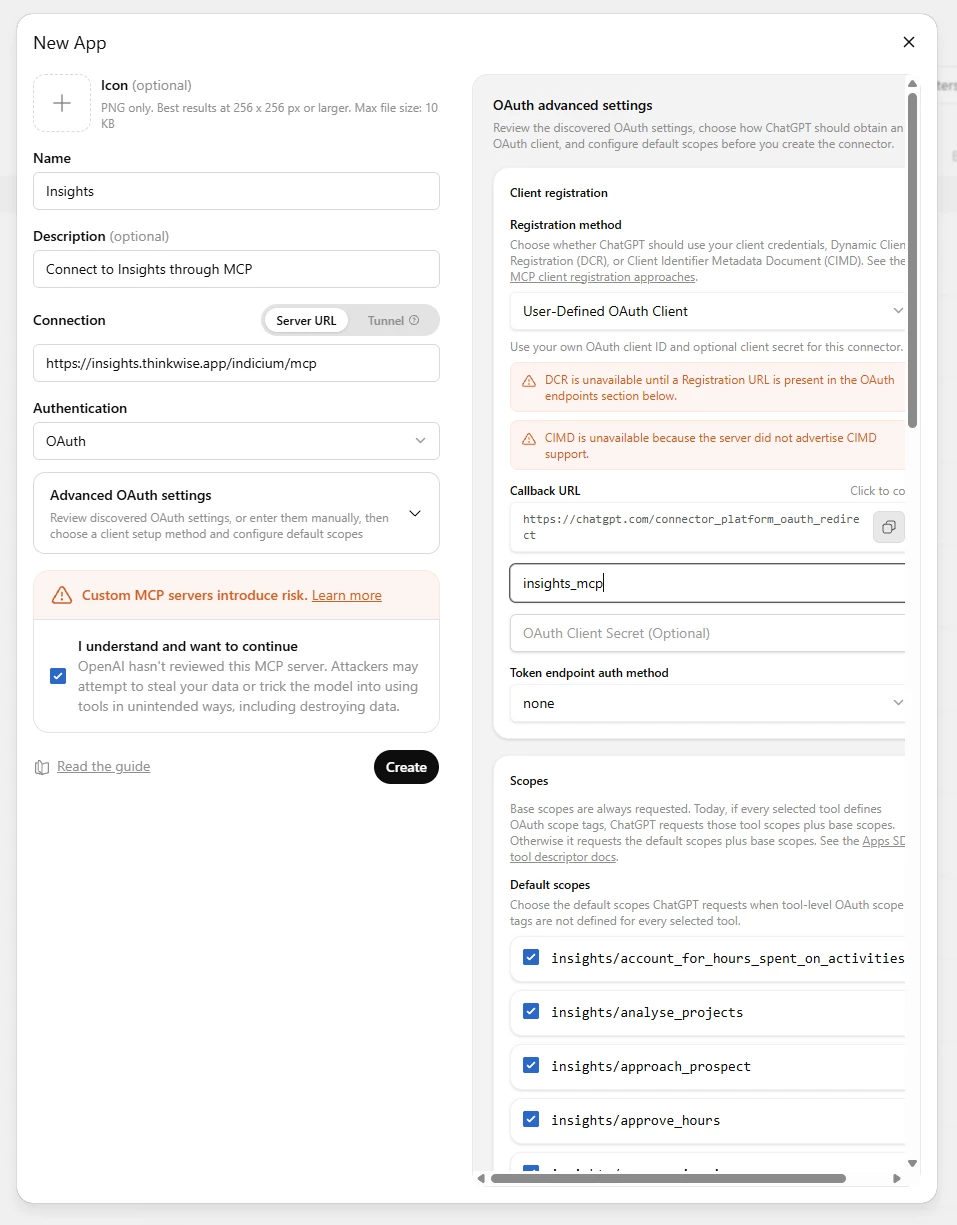
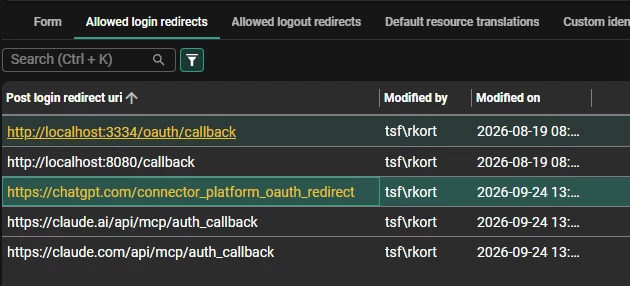
ChatGPT then shows a callback URL, at the time of writing https://chatgpt.com/connector_platform_oauth_redirect. Copy it and add it to the Allowed login redirects tab of your client application in IAM. Skip this and IAM rejects the login: the callback is not on its guest list.
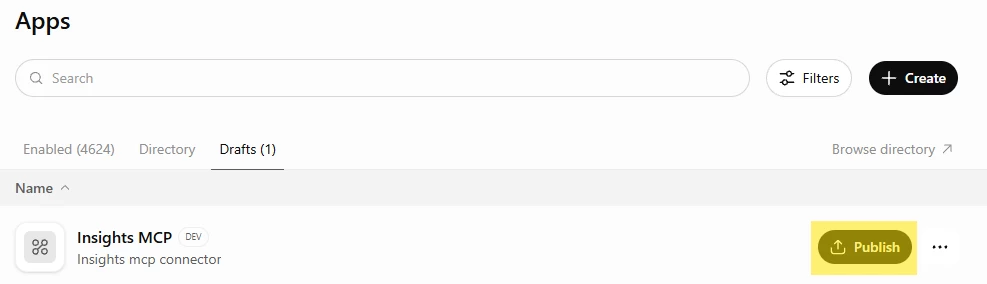
Click Create. The app lands on the Drafts tab of the Apps screen. Open it and click Publish to make it available to your users.
Each user need to connect once before the connector works in chat. Open the Plugins tab in ChatGPT, select your new plugin, and click Connect. ChatGPT sends you to Indicium, where you sign in to your application and authorize ChatGPT to use your roles. That is it, your connector is ready to use in any chat.
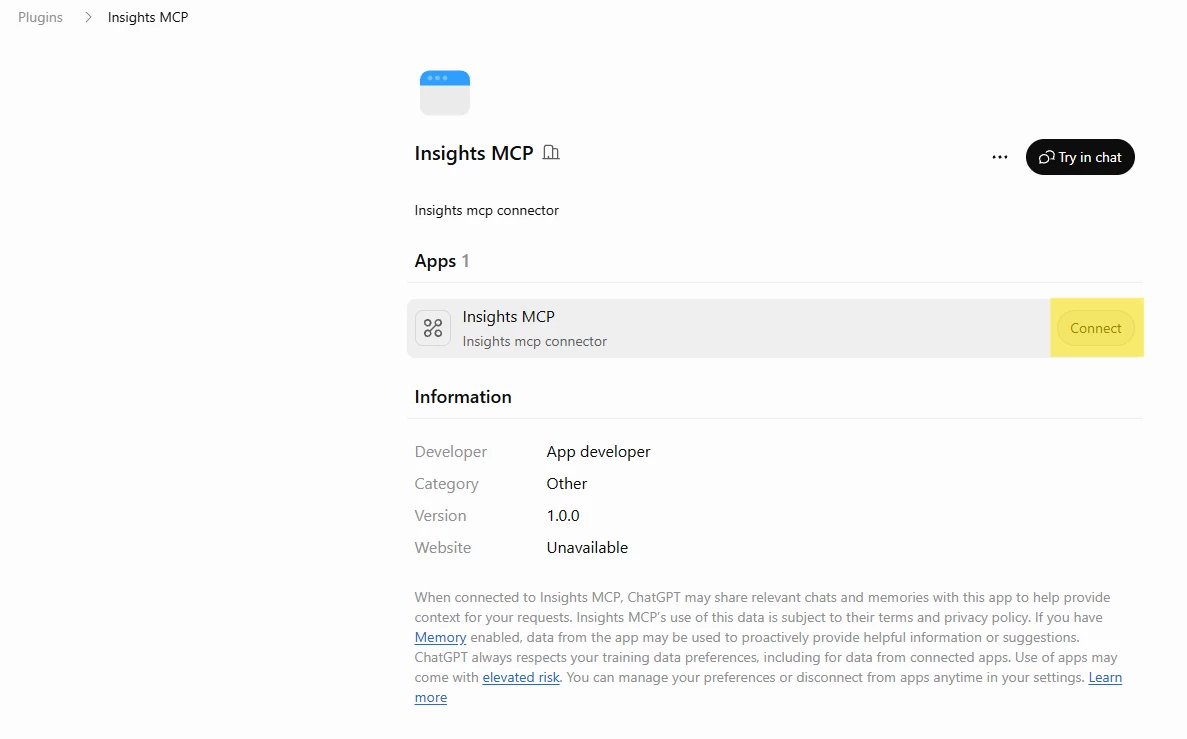
Each user connects once before the connector works in chat. Open the Plugins tab in ChatGPT, select your new plugin, and click Connect. ChatGPT sends you to Indicium, where you sign in to your application and authorize ChatGPT to use your roles. That is it, your connector is ready to use in any chat.
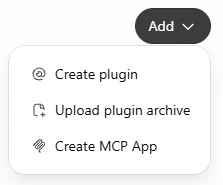
Authorization through Personal Access Tokens
Not every client speaks OAuth. Some skip it entirely, others support it only through Dynamic Client Registration (DCR), which the Thinkwise Platform does not support. When a client accepts a Personal Access Token (PAT) instead, that token can be your way in.
There is one major downside to using Personal Access Tokens: everyone using the connector in that client authenticates with the same token, so every action lands in your application and Software Factory logs under one single user.
This is why we recommend against Personal Access Tokens for production applications. You lose the ability to trace an action back to the person who triggered it. For AI agents running in the background the risk is smaller: those usually run under a service account anyway.
The rule of thumb: use OAuth wherever the client supports it, and fall back to a Personal Access Token only when you have no alternative, for example when your organization permits one specific tool and nothing else. Never for users on a production application.
ChatGPT Web & Desktop
Today, ChatGPT connects only with a Personal Access Token. OAuth support for ChatGPT and Codex is on the roadmap.
Adding an MCP connector to ChatGPT requires access to your organization's Workspace settings. Go to "Apps" and click Create. The first time, ChatGPT asks whether you want to enable ‘developer mode’, click yes.
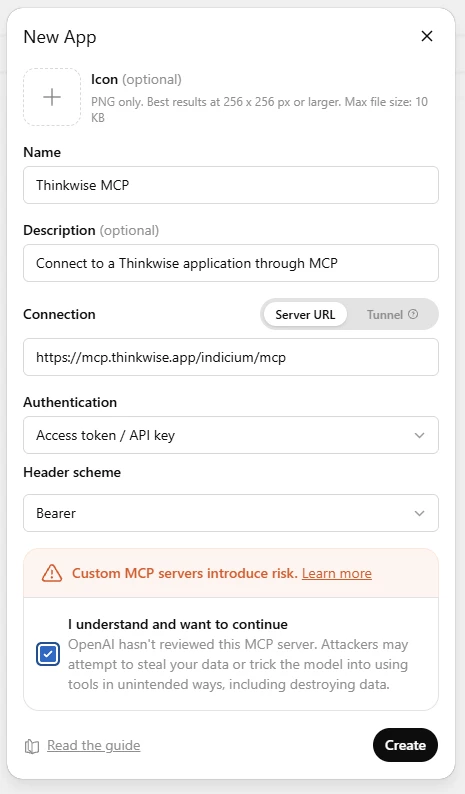
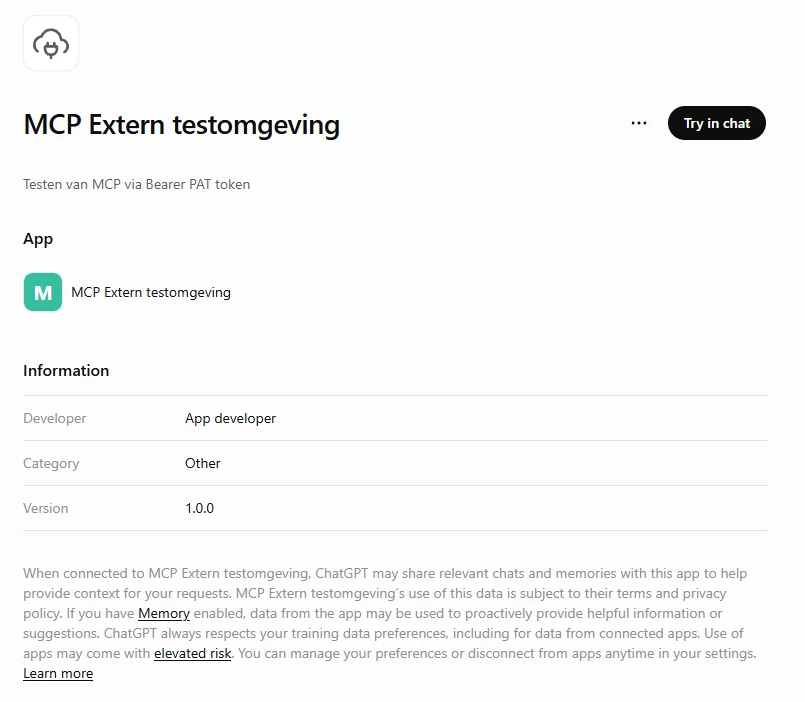
Once connected, the plugin appears in each user's plugin overview, ready to use in chats. The first time someone opens it, ChatGPT asks them for a Personal Access Token.
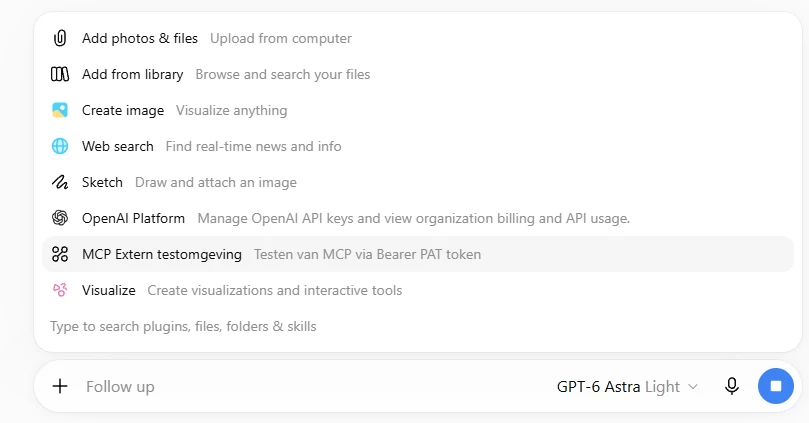
In a new chat, click the plus button in the chat box and select the MCP connector as a source.
Microsoft Copilot Studio
Copilot reaches the Thinkwise MCP server through an agent, and you build that agent in Microsoft Copilot Studio.
Start by creating a new agent.
In the create agent screen, click the Tools button in the top right corner to add a new tool to the agent.
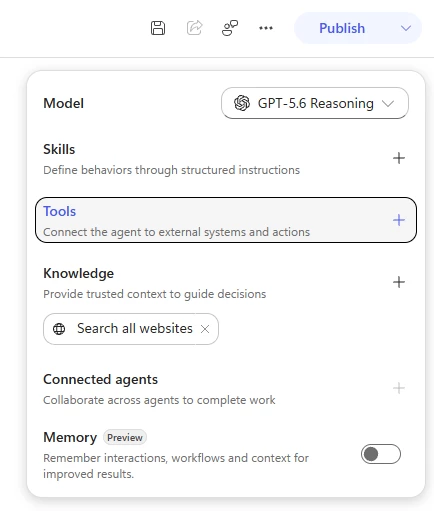
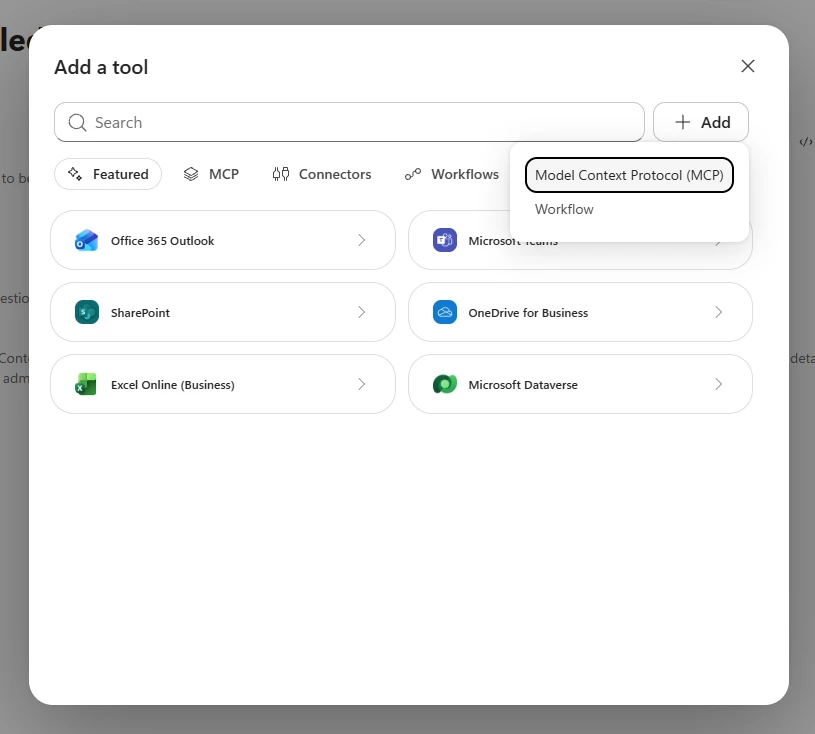
Click Add and select the Model Context Protocol (MCP) option.
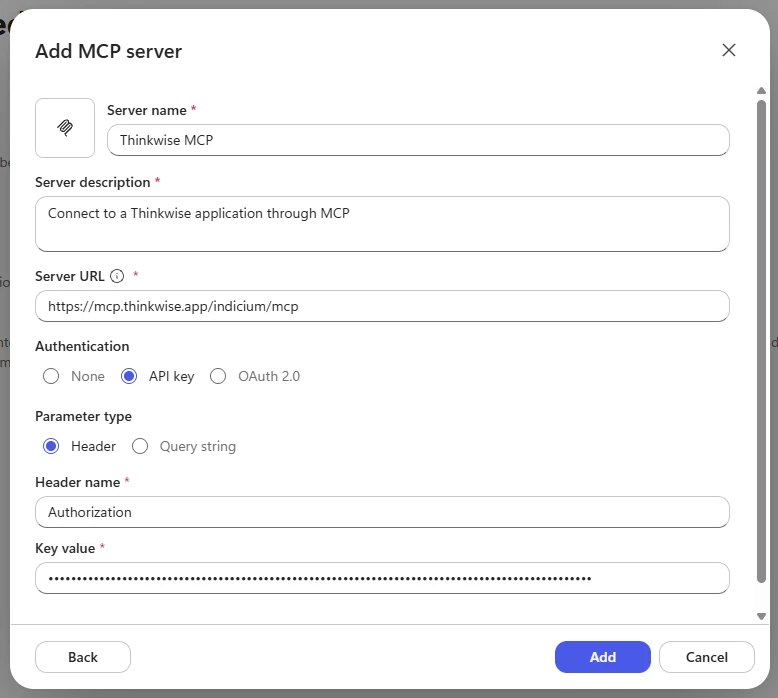
Now configure the MCP server. Server name and description are free text, used only for display. Point the server URL at the /mcp endpoint of your Indicium. Set authentication type to "API key", header name to "Authorization", and the key value to "Bearer [YOUR_PAT_TOKEN]". Click Add.
In the connection screen, click Create new connection.
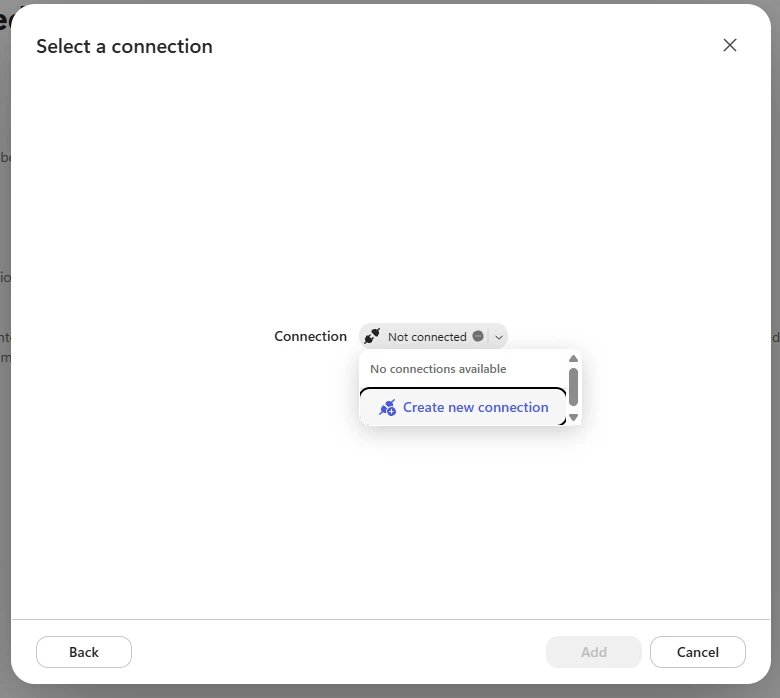
Add the authorization key again, with the value formatted as "Bearer [YOUR_PAT_TOKEN]".
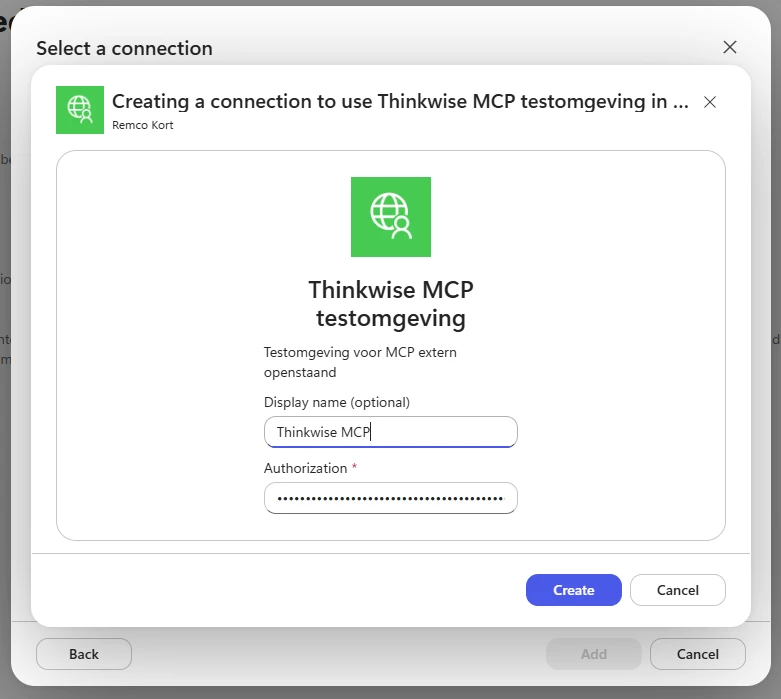
A successful connection appears. Click Add to create the MCP tool, and it shows up in the list of tools.
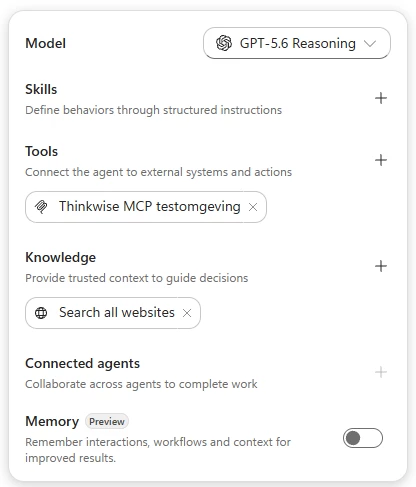
Finally, give your agent a name and a description. This screen also takes context and skills, which is where you steer how the agent behaves. Test it in the preview tab, and once it works as expected, publish it and use it in Copilot.
Mistral
Mistral can be an interesting option because it is one of the few options to run a European model. In our experience this model is however not up to the level of Claude and ChatGPT.
To configure a new MCP connection, in Mistral, select "Connectors" in the menu on the left.
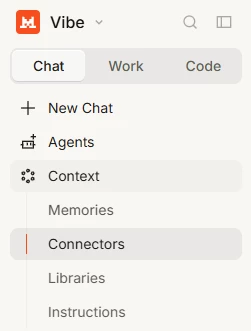
On the right, click "Add connector" to open the connector marketplace, then click "Add custom connector".

Set up the connector by entering the connector name and the server, pointing at the /mcp endpoint of your Indicium. Set Authentication type to "API Token Authentication" and paste your Personal Access Token into the "Authorization header value" field. The type is already set to Bearer by default.
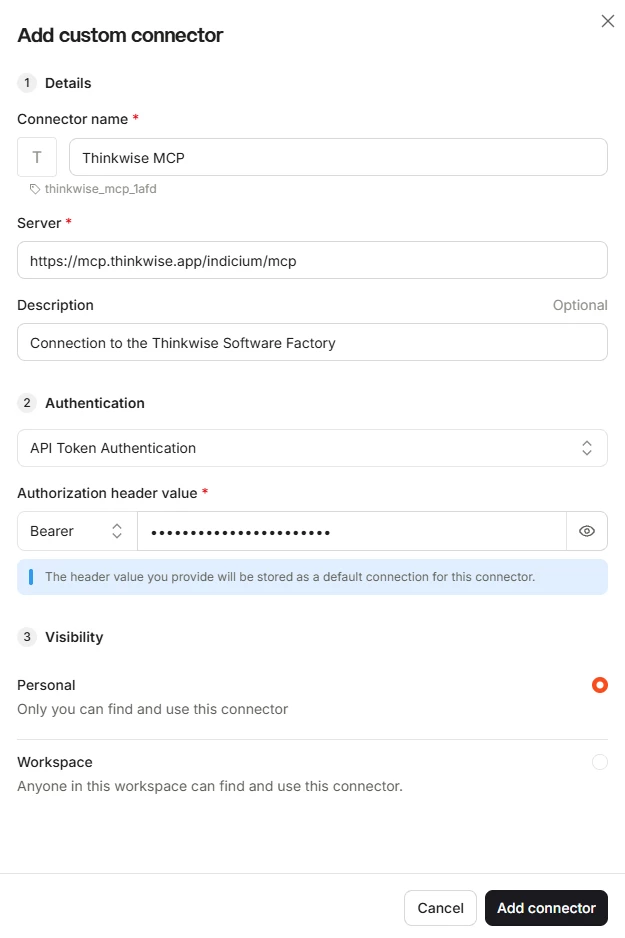
Click Add connector, and Mistral adds it to your account. Allow all of the displayed tools so you are not prompted for each one while you chat.
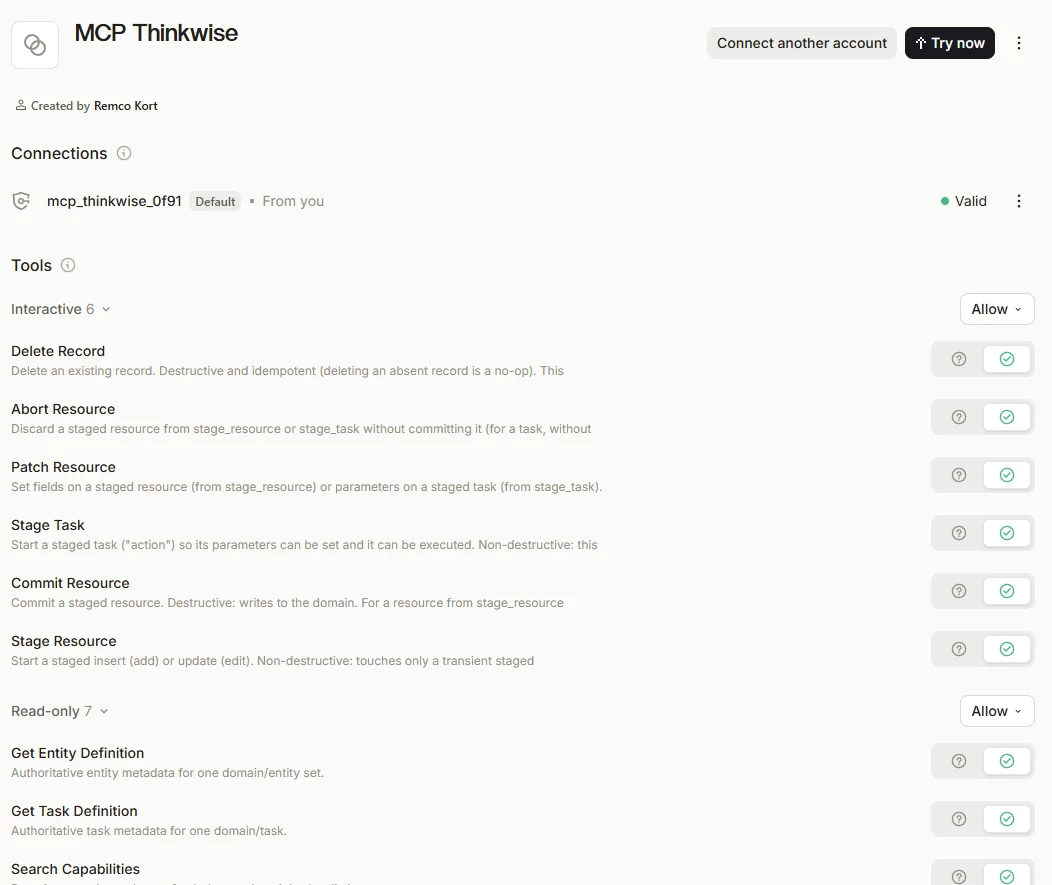
Scopes
What are scopes?
A scope is simply the set of access delegation roles your client application is allowed to use. When Claude first authorizes against your MCP connector, it requests exactly those scopes, no more and no less, and your user consents to them in the browser.
Scopes need a refresh any time you change the roles available to the client application. Add or remove a role in IAM, and the MCP connector keeps using the old scope list until you tell it to fetch the new one.
How do you refresh them?
You have three ways to refresh scopes after changing a client application's roles:
- Chat: ask Claude directly. Tell it to retrieve the scopes from the MCP server and update the local scopes, then reauthorize when it prompts you.
- Skill: use the attached skill, included with this post, so you never have to remember the exact phrasing.
- MCP manager: click the refresh scopes button.
Whichever route you take, the browser flow that opens requests scopes fresh from IAM's current configuration. If consent is enabled on the client application, the updated scope list appears right there on the consent screen, your confirmation that the new scopes made it through.
The road ahead
This beta is the starting point, not the finish line. MCP becomes an officially supported feature in the 2026.3 release, and that release also opens the Software Factory itself up to MCP, so your development environment gets the same AI-native access your application data has today. Every release after that keeps making the implementation faster and lighter on your infrastructure.
Now it is your turn. Install a connector, point Claude at your application, and see what it finds. We would love to hear about it: which use case pulled you in, and where MCP started saving you real time.
This post will keep growing, too. I am adding step-by-step guides for more platforms and AI tools over the coming weeks, and I will drop a comment below whenever a new one goes live. Please tell us in the comments which platform you would want to see next.
Using MCP Server in a Production environment will require an amended license agreement with Thinkwise, as Agentic AI via MCP typically automates and replaces human user interaction. MCP Server will be freely available in Develop and Test environments to empower you to experiment with MCP for end users and speed up development in the Software Factory.