

Creating Custom Components in Universal: A Step-by-Step Guide
The Universal GUI in the Thinkwise Platform offers a versatile environment for developing custom components to enhance your application’s functionality. Our platform delivers a lot of standard ‘LEGO’ components, but sometimes you just need a block that is unique to your organisation. This guide will walk you through configuring the Software Factory (SF), setting up the Internet Information Services (IIS) directory, and configuring a custom component, along with event message settings.
Universal has a dark and a light theme setting. This blog will show you how to follow that theme in a custom component.
Let's get started!
Custom components run with the same authentication session as Universal, so calls to Indicium inherit the user's credentials automatically.
When calling external services or endpoints, treat all outgoing data with care: apply modern security standards, send only what is strictly necessary, and never transmit sensitive business data to untrusted third parties.
Configure Software Factory (SF)
Set Component Location
Go to User Interface > Subjects > Settings > Components Tab.
Under Custom Component, set the location as either:
- A relative path from the Universal root (recommended), or
- A full URL (must be a subdomain of Universal’s domain to receive messages).
Example
If Universal runs at https://app.ourcompany.nl/universal, valid component URLs include:
https://app.ourcompany.nl/universal/componentshttps://app.ourcompany.nl/componentshttps://components.ourcompany.nl
Invalid: https://othercompany.nl/component
The recommended way is to do a variant of https://app.ourcompany.nl/universal/components/my_component under IIS, and set the relative path ‘components/my_component’ in the SF.
Create a Screen Type
- Go to Screen Types in SF
- Create a new screen type and drag in your custom component
- Link it to your subject
Set Up IIS
Choose one of two setups:
A. Virtual Directory (Simple)
- Create a virtual directory under the Universal IIS site
- Point it to your component folder
- Use the same application pool as Universal
B. Subdomain (Advanced)
- Create a new IIS site with a subdomain (e.g.,
component.yourdomain.com) - Point it to your component folder
- Use a separate application pool
- Ensure network access to the subdomain
This obviously only applies to on-premises IIS installs. For other environments like Azure, we refer to the documentation of that environment's official supplier.
How to Set Up Your Custom Component
While this guide uses vanilla HTML5 and JavaScript for simplicity, it's recommended to use a modern framework like React (Universal's native choice), Vue, or Angular for anything interactive or complex. For TypeScript-based setups, consider lightweight build tools like Vite, Remix, or Astro.
But for now, we will set up a plain HTML file, with a plain JavaScript file behind it.
<!DOCTYPE html>
<html lang="en">
<head>
    <meta charset="UTF-8">
    <meta name="viewport" content="width=device-width, initial-scale=1.0">
    <title>my-cust-component</title>
    <link rel="stylesheet" href="./css/base.css">
</head>
<body>

  <h1>My Custom Component</h1>

  <script src="./js/base.js"></script>
</body>
</html>
Theme-Aware Styling (base.css)
body {
  margin: 20px;
  font-family: Arial, sans-serif;
  background-color: #fff;
  color: #333;
}
body.dark {
  background-color: #1e1e1e;
  color: #ccc;
}
Universal Messaging Setup (base.js)
//We want to setup our window to listen to messages from Universal
window.addEventListener("message", function(event) {
  console.log("Message received: ", event.data);
});

//We need to wait for the load event before we can post a message to Universal
window.addEventListener("load", (event) => {
  //We trigger the initComponent event so that we will get the initContext event.
  window.parent?.postMessage({
    type: 'initComponent'
  }, '*');
});
Event Messages in Universal Custom Components
Event messages are crucial for enabling interaction between the Thinkwise Platform and your custom component. Follow these steps to set them up:
As you can see in the example JavaScript, Universal will communicate with your component through the postMessage system. This message system is considered a safe way to communicate with 3party components.
Universal uses the browser's postMessage API to safely communicate with custom components. This allows your component to:
- Initialize itself
- Receive context and data
- React to changes in Universal
Basic setup recap
window.addEventListener("message", function(event) {
  const context = event.data;
  console.log("Event received:", context);

  switch (context.EventType) {
    case 'initContext':
      // Initialize your component with context
      break;
    case 'updateDataSet':
      // Refresh dataset view
      break;
    case 'updateDataRow':
      // Highlight or update active row
      break;
    case 'updateState':
      // Enable/disable UI based on state
      break;
    case 'updateTheme':
      // Apply theme changes
      document.body.className = context.Theme === 'dark' ? 'dark' : '';
      break;
  }
});

window.addEventListener("load", () => {
  window.parent?.postMessage({ type: 'initComponent' }, '*');
});
Event Context Object
Here’s what Universal sends with each event:
{
  "InitializationInfo": {
    "Application": 1,
    "ApplicationAlias": "my_app",
    "ApplicationUrl": "https://ourcompany.app/indicium/iam/my_app",
    "MetaURL": "https://ourcompany.app/indicium/iam/iam",
    "Entity": "project"
  },
  "State": "regular",
  "Theme": "light",
  "EntityQueryPath": "https://..../project",
  "DataSetLocation": "https://..../project?$skip=0&$top=100",
  "DataRowLocation": "https://..../project(project_id=1)",
  "DataRow": {
    "project_id": 1,
    "project_name": "PR1"
  },
  "DataSet": [
    {
      "project_id": 1,
      "project_name": "PR1"
    },
    {
      "project_id": 2,
      "project_name": "PR2"
    }
  ],
  "EventType": "initContext"
}
What You Can Do With This Context
- Directly visualise data: DataRow and DataSet contain the data as DataSetLocation and DataRowLocation would return it.
- Fetch and manipulate data: Use
DataSetLocationfor GET,EntityQueryPathfor POST,DataRowLocationfor PUT. - Control UI: Use
Stateto enable/disable inputs (regular,editing,locked). - Adapt to theme: Use
Themeto toggle between light/dark. - React to events: Use
EventTypeto determine what triggered the message.
Pro Tip
If you're building with React or another framework, consider wrapping this logic in a custom hook or context provider to keep your component clean and reactive.
Setting the theme
As the simplest example we can give, we will implement following the current theme of Universal. This will show us the 2 main concepts;
- How to initialize your component with information from Universal.
- How to react to an event in Universal.
These two concepts are basically the same. In how they are set up. We will enhance our previous code by creating a function that sets the theme. And we will add 2 distinct places to set the theme.
//This function will set the theme of the component based on the theme passed in
//In the base.css file we have defined styles for the dark theme
const setTheme = (theme) => {
  if (theme === "dark") {
    window.document.getElementsByTagName("body")[0].classList.add("dark");
  } else {
    window.document.getElementsByTagName("body")[0].classList.remove("dark");
  }
};

//We want to setup our window to listen to messages from Universal
window.addEventListener("message", function(event) {

  if(event.data.EventType === "initContext") {
    setTheme(event.data.Theme);
    //This would be a good place to initialize your component
  }
  if(event.data.EventType === "updateTheme") {
    setTheme(event.data.Theme);
  }
});

//We need to wait for the load event before we can post a message to Universal
window.addEventListener("load", (event) => {
  //We trigger the initComponent event so that we will get the initContext event.
  window.parent.postMessage({
    type: 'initComponent'
  }, '*');
});
If you wanted to, you could leave the whole switch in the message event listener out of it and directly do a setTheme like this;
window.addEventListener("message", function(event) {
   setTheme(event.data.Theme);
});
This will work, but it will also call this code every time a message comes in. So when the Universal record would change, the theme would be set. For this code, that would be fine, but if you were to do this for more substantial code, that could hurt you. We added the EventType property to prevent you from always having to restart your whole code.
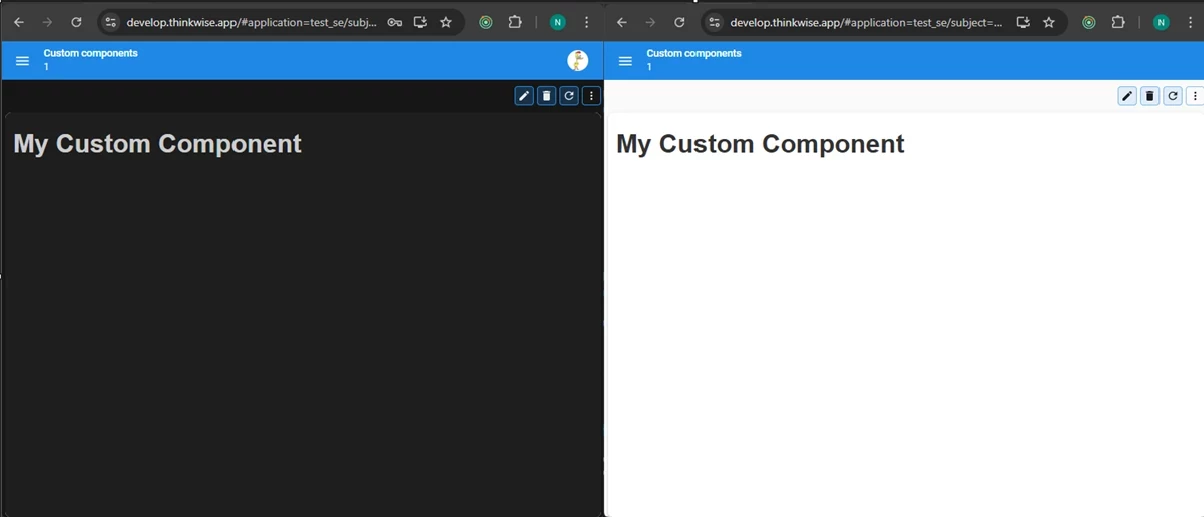
And here we would have the end result. A custom component that follows the Universal theme:
Conclusion
In this article, we’ve only scratched the surface of what’s possible with custom components in the Thinkwise Universal GUI. The flexibility of Universal—combined with the power of modern web technologies—opens the door to endless possibilities.
Whether you're building a simple visual enhancement or a fully interactive module, the tools are there. With a solid understanding of how Universal communicates via event messages, and how to structure your component for theme and state awareness, you're well-equipped to start building you can start building.
Ultimately, what you create depends on your needs and creativity. We hope this guide gives you the confidence and direction to begin crafting or adapting components that truly elevate your application.
Happy building!
