This is a follow-up to the Testwise introduction blog, read that first for the necessary context:
Disclaimers:
While a Record & Playback approach is a great way to start from having no automated tests, it does have a couple of disadvantages, some of which can be mitigated by replacing recorded steps with Testwise-provided reusable logic and helpers.
Some of below steps are going to change when we automate steps that are currently being performed manually
Depending on the versions you install; steps might differ
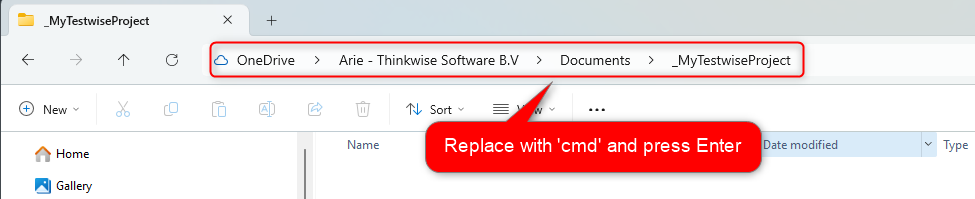
In your File explorer, create a folder on your local device → this will be your test project name
Go into the folder, select the navigation, replace with cmd and hit Enter
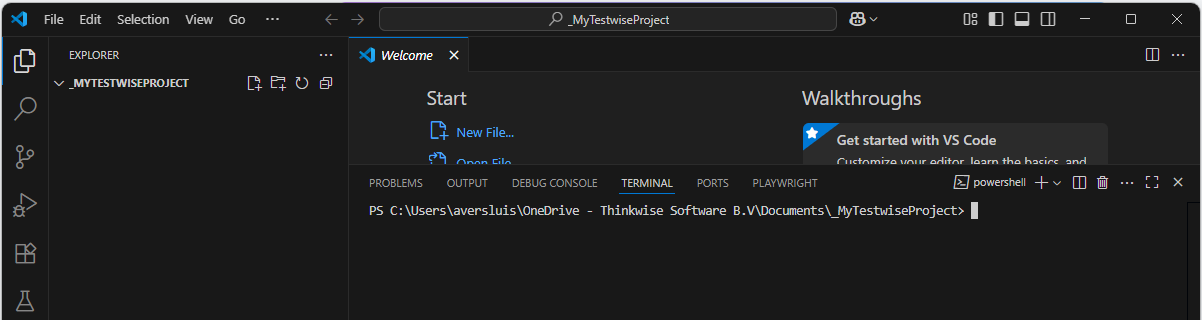
This will open up your terminal in the right folder. Type code . and hit Enter.
This will open up Visual Studio Code. In there press Ctrl + ~ which will open up the Terminal within Visual Studio Code, already pointing to your Test project folder:
Setup project dependencies:
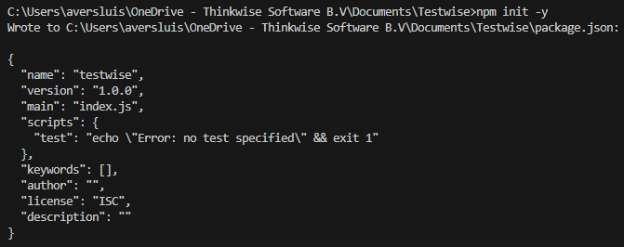
Run the following command to create a new NPM project: npm init -y
Expected result:
Run the following commands to set up all the dependencies:
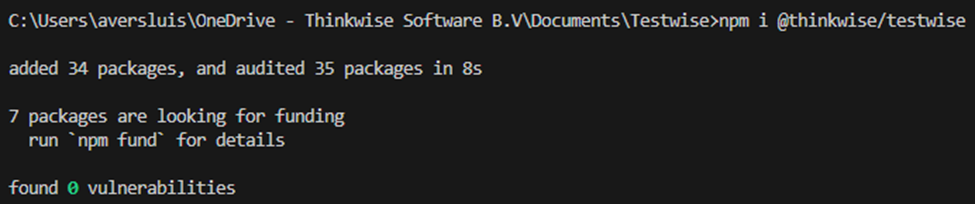
Install Testwise: npm i @thinkwise/testwise
Expected result:
Run the Testwise Install script to set up Testwise dependencies: npx testwise install
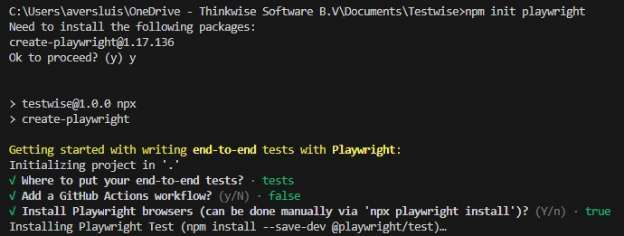
Initialize Playwright (choose all default options) npm init playwright
Confirm ‘y’
Press Enter on ‘Where to put your end-to-end tests?’ ‘tests’
Press Enter on ‘Add a GitHub Actions workflow?’ ‘false’
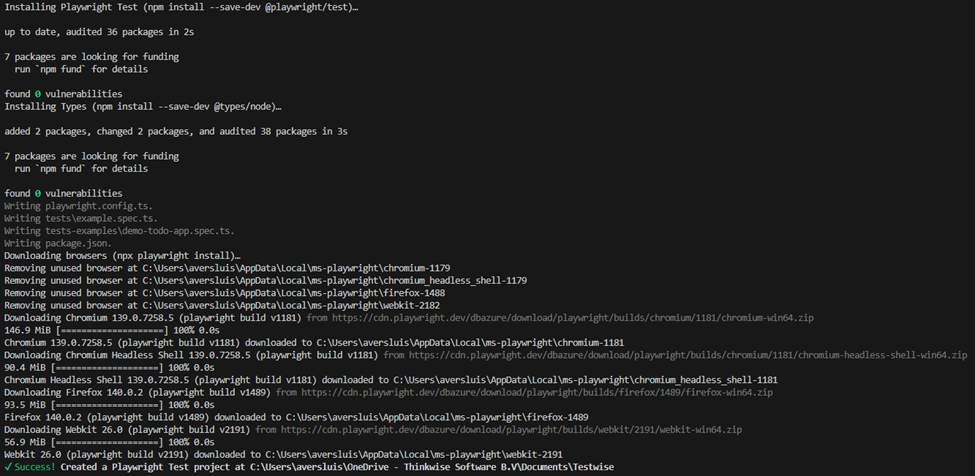
Press Enter on 'Install Playwright browsers?’ ’true’
Expected result:
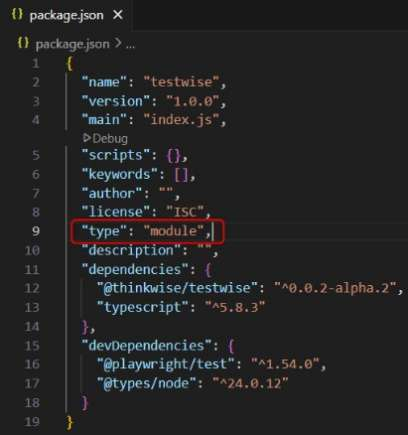
Go to package.json and add: “type”: “module”,
Then save your change
Note: if a “type” key already exists, make sure to update the key value to “module”
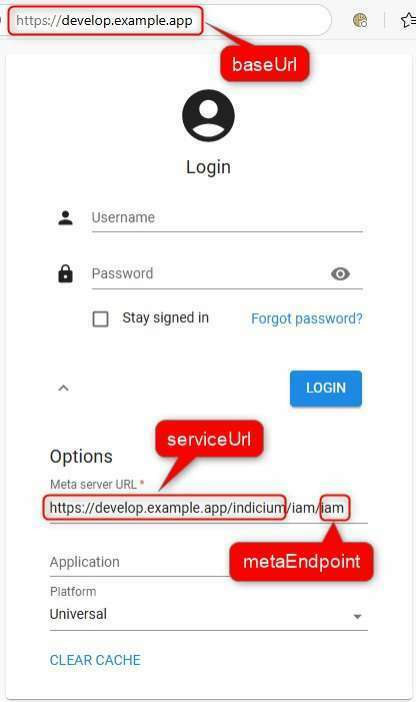
Go to Testwise.json and change the baseUrl and the serviceUrl to the ones applicable to your Thinkwise environment
baseUrl should match your Universal login page
serviceUrl should match the Meta server URL up until indicium
Go to playwright.config.ts and adjust the from: // baseURL: 'http://localhost:3000', to: baseURL: `${testwiseConfig().get<string>('environmentSettings.baseUrl')}`,
On testwiseConfig press ctrl + . and choose to add the import from @thinkwise/Testwise (save your changes)
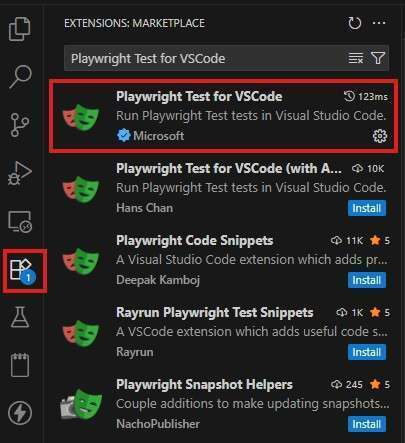
Search for Playwright Test for VSCode in extensions and install it
NOTE: you might have gotten the suggestion in VS Code to install this particular extension already. Pressing ‘Install’ there replaces step 7:
Now you’re all set, time to create your first test!
Create first test:
Navigate to the ‘Testing’ tab and select ‘Record new’ (this will open up a browser for you to start recording actions)
Navigate to your application, log in, and perform the actions for your test case (close the browser when you are done).
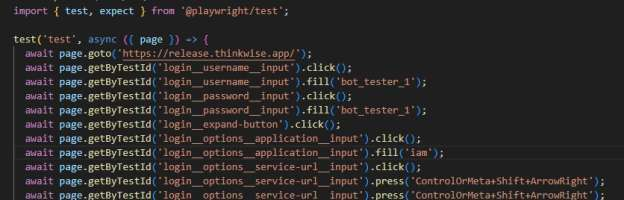
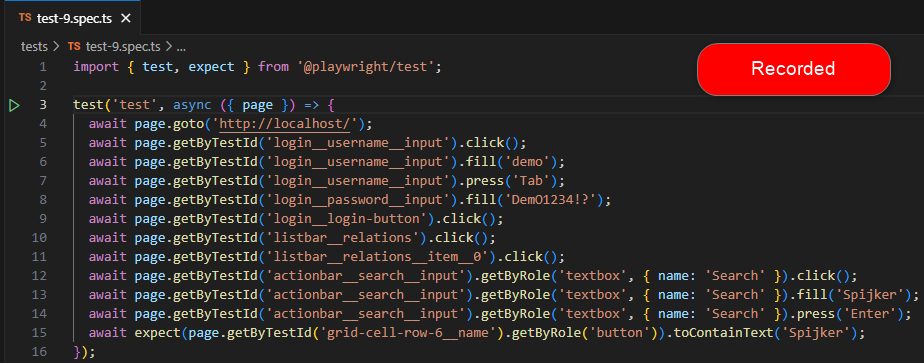
You will now have a very linear test script from the record and playback functionality in playwright. Changing this to a structured test script is out of scope for this introduction but we will clean the script up by using Testwise.
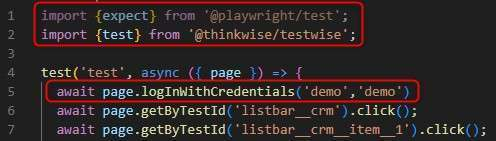
In the import on line 1, remove ‘test’ from the import, then add the following import: import { test } from '@thinkwise/testwise'
Then remove all steps that are part of the login process and replace it with: await page.logInWithCredentials('username', 'password');
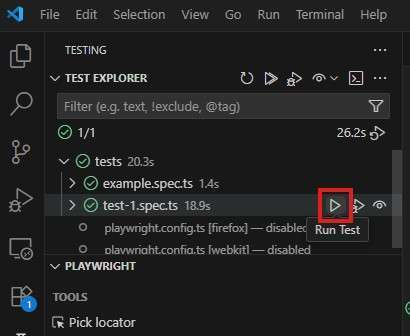
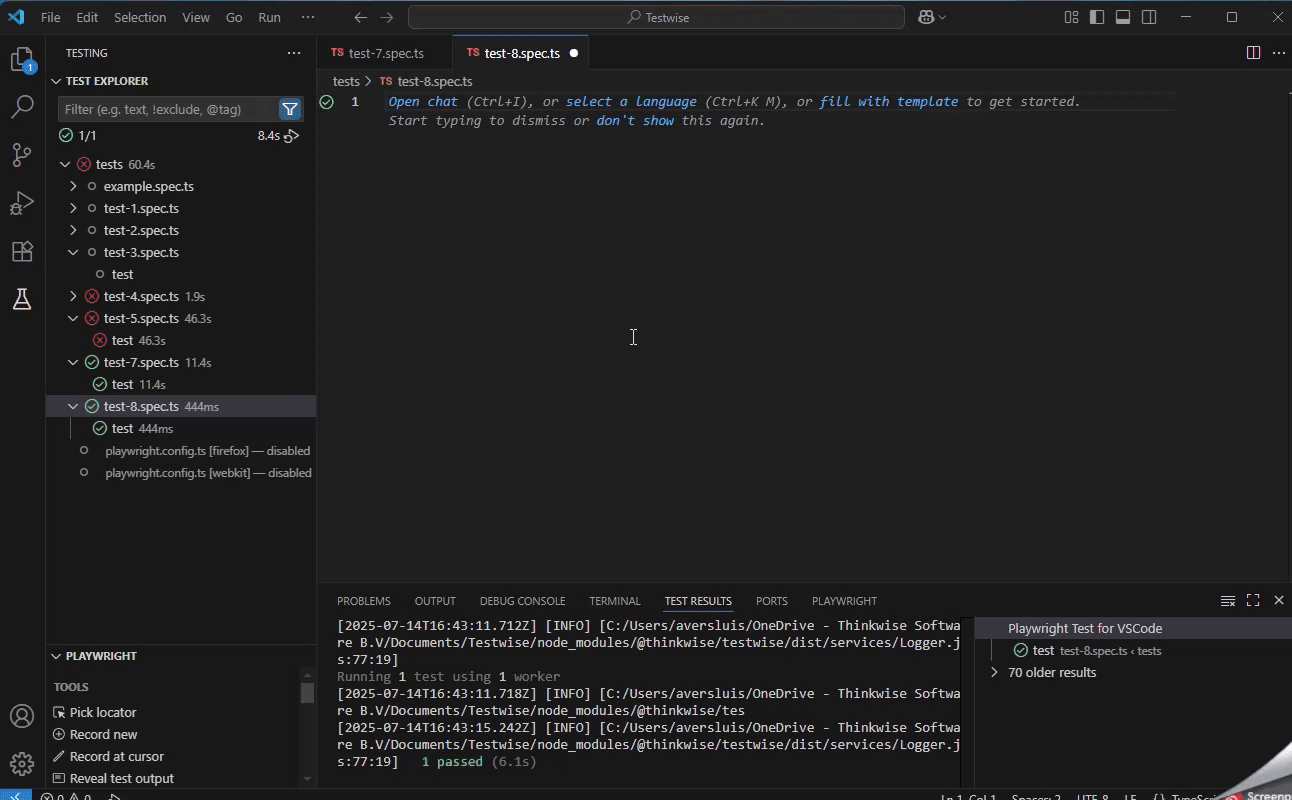
Run your test:
If your test is passing then you have successfully hooked up to the Testwise library. Congratulations!
So what is next?
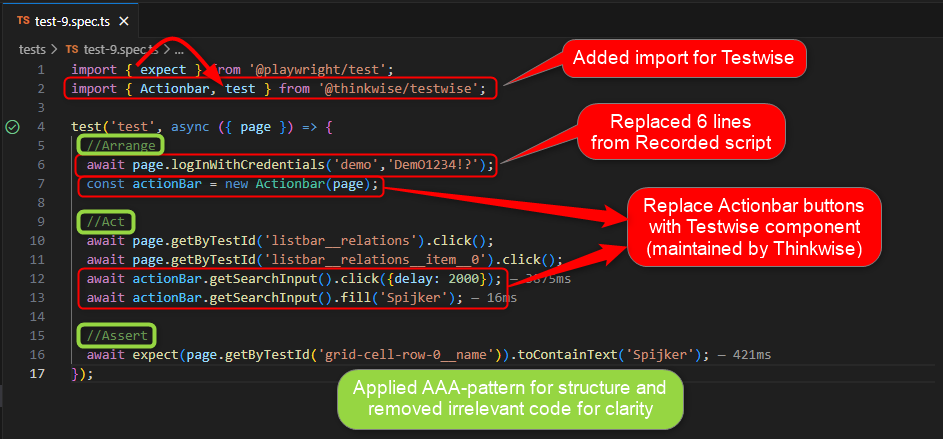
We will release detailed documentation on how to use the tool, but you could take things further by now replacing steps in your linear script with common components.
You would first initialize a component like this (a component can also have a set context, but we will not get into that here): const actionBar = new Actionbar(page);
Then we can replace steps such as this: await page.getByTestId('actionbar__add').click();
With component actions: await actionBar.getAddButton().click();
And end up with something like this:
test('Should not allow user to create duplicate tenants', async ({ page }) => {
await page.getByTestId('form-field__tenant-name__input').fill('This is a test');
await actionBar.getSaveButton().click();
// Assert
await expect(page.getByTestId('popup__tsfmessage__content__title')).toContainText('Cannot insert or update the row because a row with the same values already exists in \'Tenant\'. Please adjust the values to be unique and try again.');
});
We are not quite ready to commit this script to our codebase. As you can see we are using the AAA pattern, but we need to take this one step further, and apply the POM pattern, to promote reusability and maintainability of our tests and test artifacts. We will however cover these topics in future posts as well as covering many other useful topics.
Not sure about other readers, but as a not-so-technical person the above number of steps and lines of code makes me hesitant to even give it a try. However, I did ask @Nathan to dumb it down sufficiently for me as a QA newbie to grasp it. This is supposed to work for me, so I gave it try and after some trial-and-error it proved surprisingly easy to get it working!
I first setup all Prerequisites and Project dependencies:
On step 4 I had to double-check my serviceUrl a few times as it should not include the /iam/iam part
On step 7 got the recommendation by VS Code at the bottom right to install the Playwright Test for VSCode extension, so didn’t go to the Marketplace.
Then started Recording:
The recording resulted in below script (deleted 2 lines for clarity due to a wrong Ctrl+V):
Then cleaned up the script according to the Tutorial 101 recommendations:
Had to add a delay in line 12, else running the test failed. Note that we aim to fix this on the Universal GUI side in the near future.
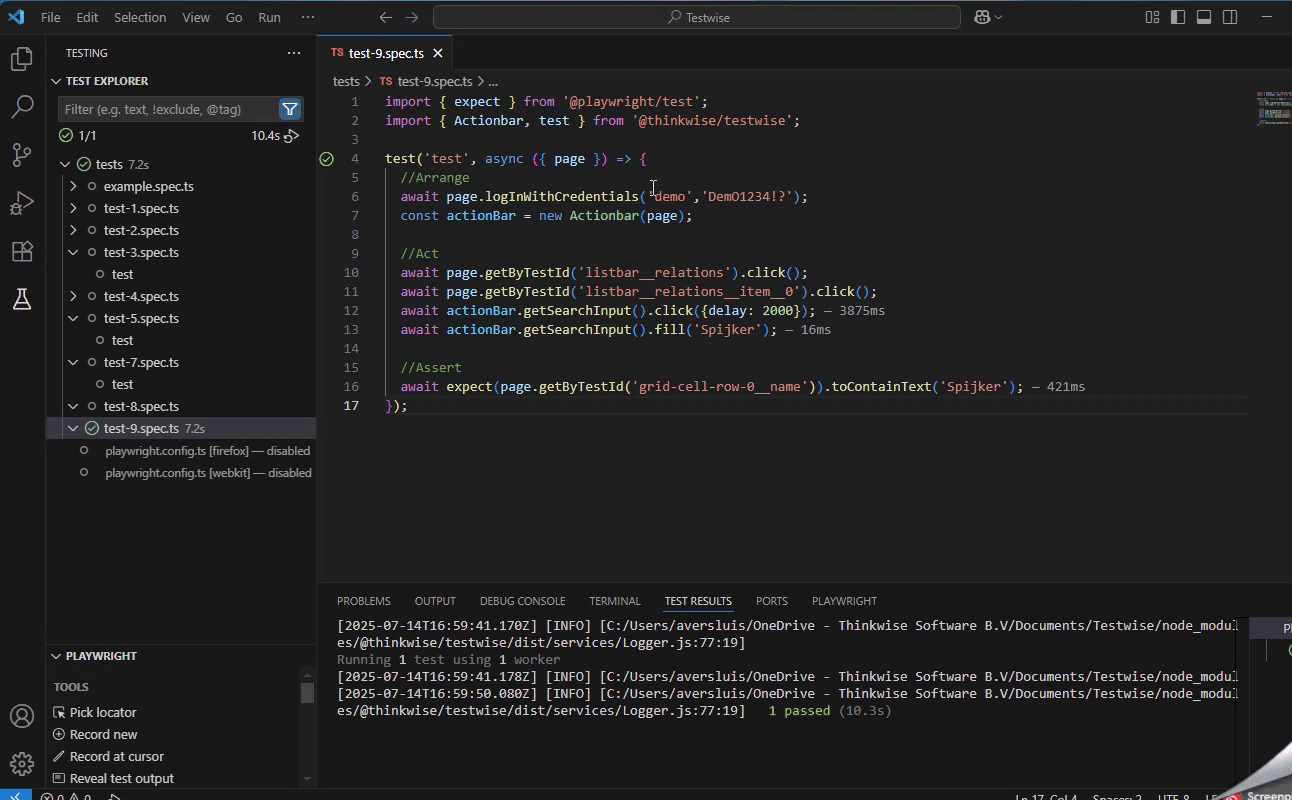
Then ran the test using the Debug Test button and it worked!
✅ I scored a green checkbox!
And if I can do it, I’m certain most of our Community can pick this up just as easily! 💪
I would like to inform you of the latest release that went out last week for Testwise.
Testwise release notes 0.1.12
Changes:
Selector updates to align with changes in Universal
Login helper enhancements
Better error handling for failed login attempts along with more meaningful error messages
Configurable login timeouts to cater for longer than expected response times
Catering for scenarios where base URLs are configured with route patterns, such as having Universal in a subfolder e.g. tcp.thinkwise.app/universal, where playwright discards/ignores everything after the slash. This is now handled in a better way
Expanding of components
Popup component has added general elements
Actionbar component is overhauled and expanded
Additional general buttons added
Functionality added to enhance user experience when interacting with the overflow menu. Before the change you would need to manually open the overflow menu before being able to interact with overflow menu items, after the change the open overflow menu step is automatically done for you
Other changes that don't impact users, namely standardization of component patterns
How to update to the new version:
Run the following command in your terminal that is pointing to the root of your project directory;
npm i @thinkwise/testwise@latest
To verify the version of Testwise post installation, run the following command in your terminal:
npm list @thinkwise/Testwise
You should see the following version returned: @thinkwise/testwise@0.1.12
Actionbar changes:
Covering all the differences between the previous version and this one will not be feasible for a blog post, so instead I will cover how to use the new version of the Testwise Actionbar component.
You can initialize your Actionbar in one of 2 ways (with and without context): const actionbar = new Actionbar(page);
Or
const actionbar = new Actionbar(page, context);
Context is of type locator (Locators | Playwright), so it gives you a lot of ways to define the Actionbar context
When do you need to use context?
When you are interacting with the Actionbar while having multiple Actionbars on the screen. When there are multiple Actionbar components on your screen then Playwright does not know which one you want to interact with, so by defining the context you tell it which one you want.
What to set the context to?
You can set it to any container in the DOM that only contains one Actionbar as a child
Now you can use the Actionbar component:
await actionbar.getAddButton().click();
What about the overflow?
With the new update you can use the overflow in the following manner: await actionbar.overflowMenu.getExportButton().click();
One of the quality of life enhancements worth noting is that the overflow menu will automatically be opened for you when you invoke any of the overflow methods, so no need to add a step to open the overflow manually before interacting with the menu options
For you to visualize how this is better, here is a before and after example of interacting with the overflow
Filter, Quick filter, Clear filters, Sort, Restore sort, Import, Export, Export immediately, Mass update, UP screen type, UP details, UP prefilters, UP grid, Cube sort, Pivot settings, Chart settings, Save as cube view, Delete cube view, Collapse all, Expand all
Search, Add, Copy, Update, Delete, Save, Cancel, Refresh, Sort, Restore sort, UP screen type, UP details, UP prefilters, UP grid, Cube sort, Pivot settings, Chart settings, Save as cube view, Delete cube view, Collapse all, Expand all