

But when it comes to our software, this would happen very differently. I would select the Car keys record, put it in edit mode and change a field indicating the location from Counter to My pocket. I would then save the record and.. *Poof!* – The keys are now in my pocket.
Very unnatural if you ask me. Editing the car keys? I sound like a locksmith!
This new feature, however, will bring our applications one step closer to the real world: Drag-drop of records!
Model-driven drag-drop
As with every feature, the definition of drag-drop is a part of the model. To keep things as easy and accessible as possible, no new logic concepts were introduced. The existing concepts of tasks and corresponding context logic are used. Besides that, variants play a big role when it comes to drag-drop.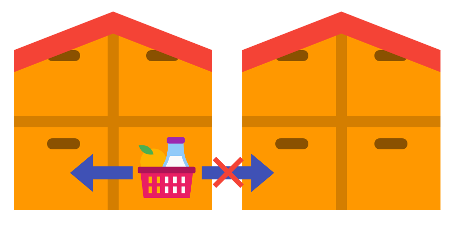
In this blog, we’ll use an example where we want to be able to drag-drop an article to a different location.
To make it more interesting, both locations must be part of same warehouse.
Creating a receiving task
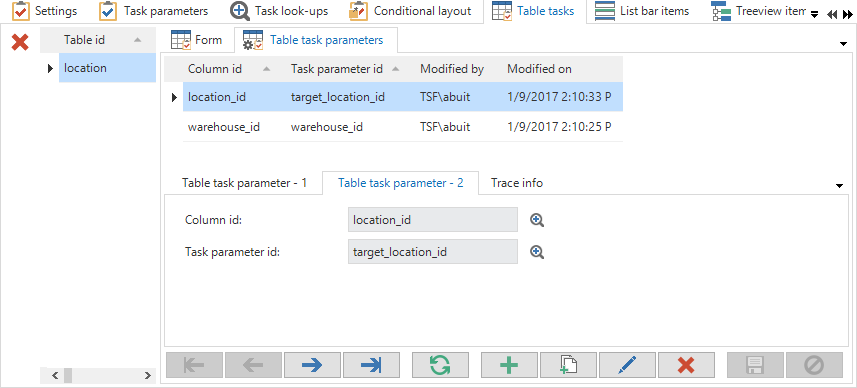
The first thing to do when setting up drag-drop is creating a task with enough parameters to receive information about two records, the dragged article and the location on which the drop-action will be done.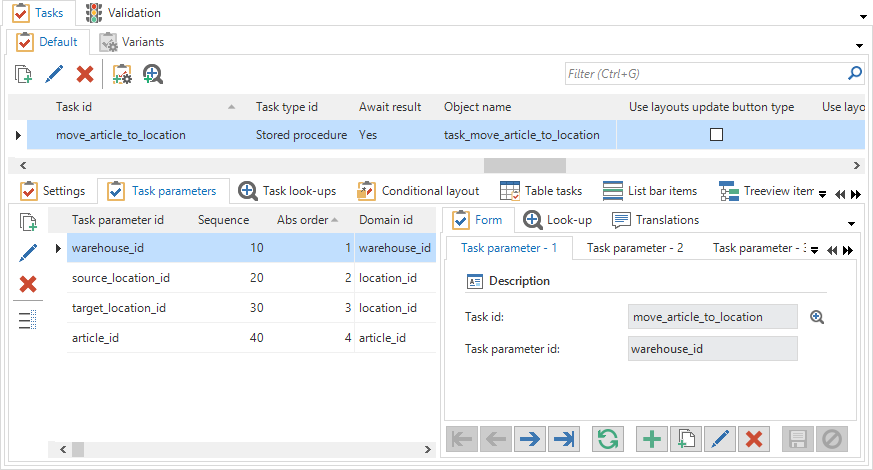
The receiving task should be bound on the table where the record will be dropped. Information about the record on which the drop-action is done can be used in the the task code by mapping columns to the task parameters.
We bind the task to the location table and set the following parameters at the task:
- warehouse_id
- target_location_id

The developer can choose to create a context procedure if needed, to disable dropping in certain situations. For instance, if one of the locations in our example is closed, we can use the context procedure to disable the receiving task. The task can also be hidden on variants where the dropping of rows should never be done. For instance, the overview of closed locations.
Last but not least, there should be code to execute the task. Nothing exciting so far, this might as well be a regular task that you can execute manually.
Adding the drag-drop link
The second part is modeled at the source table. This is the table where a record will be picked up, the articletable. We will create a drag-drop link on this table.The source table can be configured at Modeling – User interface – Subjects. Navigate to Links and go to Drag-drop. Here you can set up the drag-drop links. The drag-drop links determine where rows of this table can be dropped.
Add a row, choose the target table and select the table-bound task that should be fired for every dragged row. The effect will show on the mouse as an indicator of what will happen.

Specifying drag-drop link parameters
The values of the source table can be mapped to the task. If a task parameter is mapped by both a column from the source and a column from the target, the GUI will check whether or not the values are the same. If the values are not the same, the GUI will not allow the row to be dropped. This way, you can set up drag-drop to only allow things to happen within the same context.In our example, the drag-drop link maps the following task parameters at the article table:
- warehouse_id
- source_location_id
- article_id

Defining the drag-drop interactions
By default, your newly created drag-drop link is disabled. You will have to enable this for specific variants.The reason is simple. Imagine there are 5 variants of the source and 5 of the target, so there is already 36 possible situations where drag-drop can occur, if you count the base tables as well. And most of the time, you only want to enable the drag-drop in a very specific situation.
This Cartesian product of possible interactions is shown at Drag-drop interaction:

Here, you can choose where exactly the drag-drop link should be active. A disabled lock icon indicates that the drag-drop link is not enabled in this situation. Use the task to enable one or more selected situations. A green checkmark indicates the drag-drop link is active.
In our example, we configured drag-drop to be allowed between the base article table and the base location table and between the base article table and the the crossdock_location variant.
Advanced drag-drop interactions
It is possible that there are multiple drag-drop links configured between the same tables. This way you can have different tasks responsible for different source- & target variants.You can never have more than one tasks responsible for drag-drop on the same source- & target variant. When another drag-drop task is responsible for a source- & target variant, the disabled lock icon will be decorated with an info icon to indicate that enabling this drag-drop task would disable another drag-drop task.
The following screenshot shows an example of multiple drag-drop links with the same source- and target table. This example is configured so that drag-dropping to the same variant invokes the drag-drop task reorder_backlog_item. Drag-dropping to a different variant invokes the drag-drop task move_backlog_item.

When creating a new variant, no drag-drop interaction will be enabled by default on this new variant.
Drag-drop mode
If the main function of the table or variant is to act as a drag-drop source, you might want to check ‘Default drag-drop enabled’ at the subject by default or at a variant. This will put the grid and tree into drag-drop mode by default. We’ll get back to this a bit later.How does this work in the GUI?
We’ve always been proud of the fact that everything in the Windows and Web GUI can be done using the keyboard. Every action has a shortcut and the developer has the option to decorate tasks, reports, prefilters etc. with shortcuts.However, drag-drop will have virtually no keyboard interaction. You’ll need a mouse to perform drag-drop anyway, so we figured we’d save the shortcuts for something less mouse-oriented.
At this moment, drag-drop is only implemented for the Windows GUI. The Web GUI will be following shortly.
Drag-drop mode
When dragging with the mouse on a grid or a tree, multiple rows will be selected. This is the default behavior and it would be weird if the presence of a drag-drop link would change this behavior.
Because of this, drag-drop mode is introduced. You can find the option to enable the dragging of rows in the context menu. Dragging of rows is available only when there are drag-drop links with this table or variant as the source.
Enabling the dragging of rows will change the behavior from selection on dragging to actually dragging the rows for drag-drop. You can still select multiple rows using shift, ctrl and dragging on the row selector.
You can set a table or variant to be in drag-drop mode by default in the model as mentioned earlier.
Initiating drag-drop
When the dragging of rows is enabled, you can start drag-drop by dragging a row or a selection of rows from the grid or the tree.The user is allowed to drag a row from a grid that’s currently in edit mode. The grid will attempt to save the row before the drag-drop operation starts.
Pressing ESC will cancel the drag-drop operation. Well, there it is.. keyboard interaction!
Choosing a target
As long as you hold down that mouse, the drag-drop operation will be active. While hovering over documents, the mouse should indicate whether or not dropping is allowed. If a drag-drop link is set between the source and itself, you should be able to drop right away.The GUI will show a mouse cursor matching the drag-drop link that’s responsible if you were to release the mouse. At least one of the dragged rows must pass the equality test mentioned earlier. Besides that, the task must be enabled; if a context procedure has disabled the task you cannot drop the rows.
If the drag-drop task at the target table is mapped to columns with varying data, the GUI will navigate to the hovered row in the grid and tree. This will in turn also cause the context procedure to be re-evaluated. If the mapped columns are the same for all rows, the GUI will not navigate. After all, it wouldn’t matter on which row you would drop.
For instance, if the drop-target is the table sales_invoice_line and the bound task is mapped to the column sales_invoice_id, the GUI will not navigate while hovering over a sales invoice line when the sales invoice lines are is shown as a detail of sales_invoice. All the sales invoice lines will have the same value for sales_invoice_id anyway.
Drop it like it’s hot
When you release the mouse when hovering on a document that can receive the dragged rows, the task will be executed. The task will always be executed on the current row of the target document. Like mentioned, the context procedure can prevent this. Rows that do not pass the equality test will not cause the task to execute and if there are none, the task will not be executed either.If there are no rows present at the target document, the document might still set task parameters. Mapped task parameters will be set using the document’s filters when it’s a detail or zoomed document. This is default behavior and is no different from executing a task manually.
If there are visible task parameters, the task pop-up will be shown. This is again no different from executing a task manually. Depending on the model setting pop-up for every row you might get multiple pop-ups.
The source table will be refreshed if the task is executed for at least one dragged row. Refreshing of the target table depends on the settings of the task.
The GUI will attempt to navigate to the dropped row if the table is the same. This is common when re-positioning nodes in a list or a tree, but also when dragging between two variants of the same table to indicate a status change.
In our example, the final result would look something like this:

The location under renovation is blocked by the context procedure and dragging to the port warehouse is not allowed.
What about drag-drop before, after and between rows?
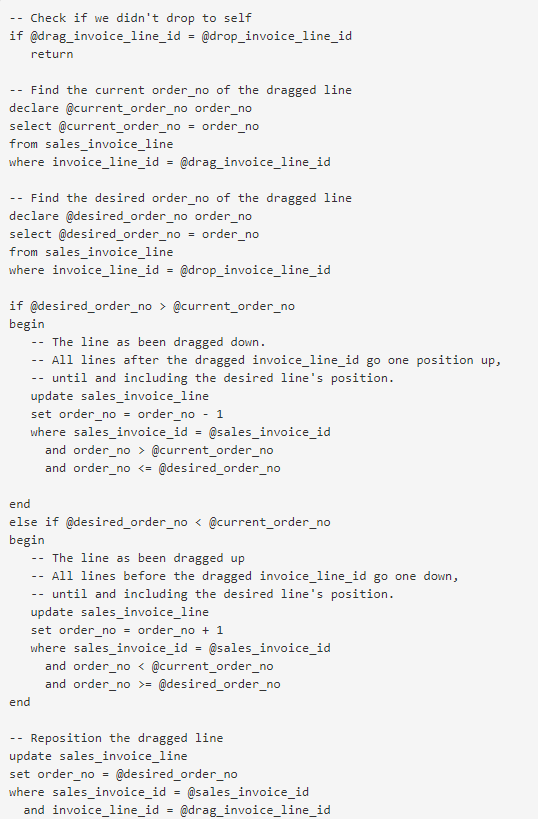
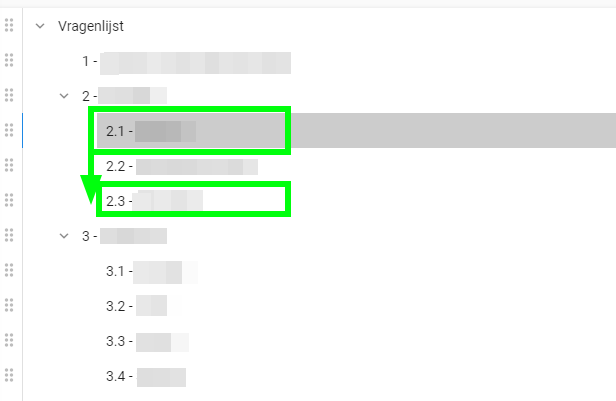
At first glance, it looks like this drag-drop is not suitable for re-positioning rows in a list. One would think this requires you to be able to drag-drop before, after and between rows.But this is not the case, depending on the source index and target index you can make a very fine guess of how the rows should be ordered after the drag-drop operation.
The following code example can be used in the drag-drop task when the source- and target variant are the same.
The parameters sent to the task are the following:
- sales_invoice_id – The sales invoice, mapped by the bound task and the drag drop link. Equality required!
- drag_invoice_line_id – The dragged line, mapped by the drag drop link.
- drop_invoice_line_id – The line on which the dragged line is dropped, mapped by the bound task.
What about drag-drop of nodes in a tree?
Similar code can be used when re-positioning nodes in a hierarchical tree. When the node is dropped on a node with a different parent, the user probably wants the dragged node to be positioned under the dropped node. When the node is dropped within the same parent, only re-positioning is required.If you want users to only re-position nodes within the same parent, you can map the parent_id at the task and the drag-drop link to make the GUI check for equality.
What about..?
- Navigating by hovering tab-pages or documents during hovering?
- Drag-drop to a cube cell?
- Drag-drop to a date in the scheduler?
- Drag-drop to a location in the maps component?
- Drag-drop to a specific column or cell in the grid?
- An explicit option to drag-drop before, after and between rows?
- A visual indication of possible drop-locations?
- Disabling drag-drop when there is no drop-locations are available?
- User preferences for drag-drop mode?
- Initiating a process flow after drag-drop?
- Using hotkeys such as Ctrl+X and Ctrl+V to perform drag-drop?
- Switching between drag-drop links during drag-drop by holding a key?
- Files drag-drop?